Set the Scale for Accurate Takeoffs
- Print
- DarkLight
- PDF
Set the Scale for Accurate Takeoffs
- Print
- DarkLight
- PDF
Article summary
Did you find this summary helpful?
Thank you for your feedback!
Key Information
Before you can measure or perform a takeoff in STACK | Takeoff & Estimate, you’ll need to set the scale of your plan. The scale tells STACK | Takeoff & Estimate how to translate the measurements on your digital drawing into real-world dimensions. By setting an accurate scale, you’ll ensure that your takeoffs and estimates are correct.
Scales can be detected automatically, selected manually, or calibrated with a known measurement. These are the options for setting the scale:
Use Automatic Scale Detection: If the plan sheet includes a scale, STACK | Takeoff & Estimate will detect and apply it automatically.
NOTE
This feature is only available for subscribed AI customers.
Applying a Standard Scale: Most plan sheets include a scale stamped by the architect. Use this option to select a matching scale from a list of common architectural and civil standards.
Calibrate the Scale from a Known Distance: If the sheet doesn’t list a scale, shows the wrong one, or has been resized, use this option instead. Draw along a known dimension on the plan, enter its real-world measurement, and STACK | Takeoff & Estimate will calculate an accurate scale.
Applying a Custom scale: If your project requires a scale that isn’t included in the standard list, you can define your own. Enter the custom ratio (for example, 1” = 7’) to create a scale that matches your unique plan requirements. This option ensures flexibility when working with non-standard or specialized drawings.
Once you’ve set a scale on one page, use this option to apply it to additional pages. This ensures consistency and saves time when working with multi-page plans.
TIP
For complex projects, you can apply multiple scales on the same sheet and update the scale of measurements you’ve already drawn whenever needed.
Applying a Standard Scale
Most plan sheets include a scale stamped by the architect. Use this option to select a matching scale from a list of common architectural and civil standards.

Open a plan sheet.
Locate the stamped scale.
Zoom in the better view the scale numbers.
Click +New Scale at the bottom right.
NOTE
If a scale has already been added to the plan sheet in STACK, it will be displayed next to the +Add Scale button. You can still add a scale but know there can be measurements with different scales on the sheet.
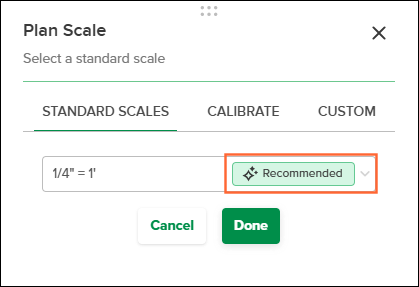
STANDARD SCALES is already selected by default.
Use our AI Recommended feature. When you upload plan sheets, the AI recommended scale feature analyzes the sheet and automatically preselects the most likely scale for you. This saves time and reduces the chance of choosing the wrong scale when it’s hard to locate, difficult to read, or shown in different places on different sheets. If multiple scales are detected, the dominant one is suggested; if none are found, no scale is selected. You’ll be notified when a scale is preselected and can verify, modify, or change it.
NOTE
This feature is only available to AI subscribed customers.
Alternatively, click the drop-down menu and locate the same scale as the one written on the plan sheet and select it.
The newly set scale will be displayed at the bottom right (in green) next to the +New Scale button.
In the PLANS & TAKEOFFS, Plans folder, the plan sheet scales will be displayed at the top right of the plan previews.TIP
Drawing a dimension line on a known distance allows verifying that the scale is correct.
Calibrating the Scale Based on a Known Distance
If the sheet doesn’t list a scale, shows the wrong one, or has been resized, use this option instead. Draw along a known dimension on the plan, enter its real-world measurement, and STACK | Takeoff & Estimate will calculate an accurate scale.

Open a plan sheet.
Locate a known dimension on the plan (for example, a wall or line with a measurement label).
Zoom in to better view the measurement numbers.
Click +New Scale at the bottom right.
NOTE
If a scale has already been added to the plan sheet in STACK, it will be displayed next to the +Add Scale button. You can still add a scale but know there can be measurements with different scales on the sheet.
In the Scale panel, select the CALIBRATE tab.
Enter the real-world length of that distance in feet (ft) and in inches (in) in the fields provided.
Click once to start the line at one end of the known dimension.
TIP
To draw a horizontal line at 0° or vertical line at 90°:
- MAC: Hold the Shift + Command keys.- PC: Hold the Shift key.
Click again to end the line at the other end of the dimension.
The calibrated scale will be displayed in green at the bottom right next to the +New Scale button.
In the PLANS & TAKEOFFS, Plans folder, the plan sheet scales will be displayed at the top right of the plan previews.TIP
You can confirm accuracy by drawing a dimension line on another know measurement.
Setting a Custom Scale
Adjust the scale in STACK | Takeoff & Estimate when the printed dimension on the plan sheet does not match the real measurement.
.gif)
Open the plan sheet.
Click +New Scale at the bottom right.
In the Scale panel, select CALIBRATE.
Enter the length adjustment from inch (in) to feet (ft).
Click Save.
The calibrated scale will be displayed in green at the bottom right next to the +New Scale button.
In the PLANS & TAKEOFFS, Plans folder, the plan sheet scales will be displayed at the top right of the plan previews.
Adding Multiple Scales to a Single Plan Sheet
Using multiple scales is especially useful when a plan sheet contains several drawings, each prepared at a different scale. This ensures that measurements are taken accurately for each drawing, using the correct scale. Applying the proper scale is essential, as it directly impacts the accuracy of measured quantities.

Open the plan sheet.
Locate one of the stamped scales.
Zoom in to better view the numbers.
Click +New Scale.
Select either STANDARD SCALE, CALIBRATE, or CUSTOM.
Set the new scale by following either the steps in Applying a Standard Scale, Calibrating the Scale Based on a Known Distance, or Setting a Custom Scale.
Click Annotations on the tool bar and select Dimension line.
NOTE
A newly added scale will only be saved after a dimension line has been drawn with that scale.
Click once to start the line at one end of the dimension.
Click again to end the line at the other end of the dimension.
Drag the measurement line at a further distance and double-click to place.
Repeat this process for all stamped scales within the plan sheet.
The calibrated new scales will be displayed at the bottom right next to the +New Scale button.
In the PLANS & TAKEOFFS, Plans folder, the plan sheet scales will be displayed at the top right of the plan previews.Each scale you add to a plan sheet appears as a button in the bottom-right corner, next to +New Scale. The active scale is highlighted in light green. This is the scale applied to any new measurement you draw.
To switch scales, simply click the button for the one you want before starting your next measurement.
TIP
Select any existing measurement on the sheet, and the scale used for that measurement will automatically activate.
Modifying the Scale
If you draw measurements on a plan sheet and later realize the scale is incorrect, there’s no need to delete your work. You can easily adjust the scale for a single measurement or multiple measurements at once.

Select the measurement(s) you want to update.
If the desired scale is already available on the plan sheet, click the correct scale button at the bottom.
If the scale isn’t listed, click +New Scale to create one.
See the instructions above for Applying a Standard Scale, Calibrating the Scale Based on a Known Distance, or Setting a Custom Scale.Click anywhere on the plan sheet to set it.
The modified scale will be displayed in green at the bottom right next to the +New Scale button.
All the measures made with this scale will be updated on the plan sheet.
Next Steps
Now that you’ve set your plan’s scale, you are ready to explore:
Related Articles
Creating and Editing Takeoffs
Manage Drawings and Project Documents
Was this article helpful?