Bulk Import Custom Items to STACK
- Print
- DarkLight
- PDF
Bulk Import Custom Items to STACK
- Print
- DarkLight
- PDF
Article summary
Did you find this summary helpful?
Thank you for your feedback!
It's easy to create and update individual items in STACK but if you have a large list of items, we can do a bulk import directly to a Custom Library in your account using our CSV Item Import Template. Find out how below.
NOTE: Items can only be imported to a Custom Library created in your account. They CANNOT be imported to STACK-provided item libraries (Quick Start, STACK, 1build, BNi, etc.).
Things to Do Before Import
Create any custom Cost Types that you want to use. (This is done in Account Settings/Company Settings.)
Determine the folder structure and naming convention you want to use in the item library.
If you are updating any items, download and/or Create Snapshot of existing reports, estimates, and estimate worksheets for projects that used those items, so you have a record of the original reports and estimates.
NOTE: The import will update any items that already exist in your specified Custom Library with the same item ID and folder structure as an item on your Item Import Template. Updated item information is applied to future AND existing projects. See Updating Items via Import section below for details.
Item Import Instructions
NOTE: If you want to import a mass update to the existing items within a Custom Library, you can export the item information from that Library in STACK instead of downloading and completing a blank Item Import Template.
Download the Item Import Template and save. (This is a CSV file.)*
.jpg)
Click Libraries on the main navigation toolbar.
Select a Custom Library from the Library dropdown.
Click the settings icon (gear) to the right of the Library dropdown.
Click the three dots to the far right of the library name.
Select Download Item Template. A CSV file named StackItemImportTemplate will be saved in the Downloads folder of your device.
NOTE: It's important to pay attention when you open and save the downloaded CSV file. It must be a CSV UTF-8 file to properly import back to STACK after you've made your updates. In most cases, if you open a CSV in Excel by simply double-clicking, it will not treat it as a UTF-8 file, and special characters like symbols, accents, and punctuation marks will be lost.
Open the template and input your item information. (Remember to open and save the file as a CSV UTF-8 file.)
The template has some instructions and examples of what information to enter in each column. Make sure to delete that information, except for the column titles in Row 1, keep the prepopulated info there.
Use the Item Import Template Guide below for reference and add an Accepted Value in the corresponding template columns.
Provide all Required information.
Do not skip rows.
Do not hide columns.
Refer to the Item Information and Folder Levels Visual References for additional info.
Email the populated template to your STACK Account Manager.
Your Account Manager will review the template and let you know if any formatting changes are needed.
Once the data is properly formatted, your Account Manager will add it to the import queue. Imports are usually completed in about three business days. You will be notified when your import is complete.
*If you do not have access to Excel, you can complete the template using Google Sheets - click here for instructions.
Item Import Template Guide
This provides a description of the information you should enter in each column of the Item Import Template along with an example. (See the bullet points below the table for more information about the Folder Level and Cost Type fields.)
NOTE: You cannot import information for the item Notes section.
Column - Field | Accepted Value | Example |
A - ItemName | Required, Text Name of item (usually material name). | Shingles (Metal) |
B - ItemDescription | Optional, Text Description of the item, how it functions, or any requirements or specifications. This info will only appear on item edit screens. | 24 Gauge Aluminum |
C - PurchaseUnit | Required, Text Unit of measure that will appear on reports. Usually how you purchase from your supplier (ex. bundle, gallon, roll, sheet, etc.) Can be same as Unit of Measure below. | Sq |
D - UnitofMeasure | Required, Must be a value listed below:
Unit of measure that will be used during takeoff. | sq ft |
E - CoverageRatePurchase | Required, Numeric Factor to convert from Unit of Measure (ex. Sq Ft) to Purchase Unit (ex. Gallons). | 1 (when 1 Squares = 100 sq ft) |
F - CoverageRateMeasured | Required, Numeric How many Units of Measure to equal the listed Purchase Unit. | 100 (when 1 Squares = 100 sq ft) |
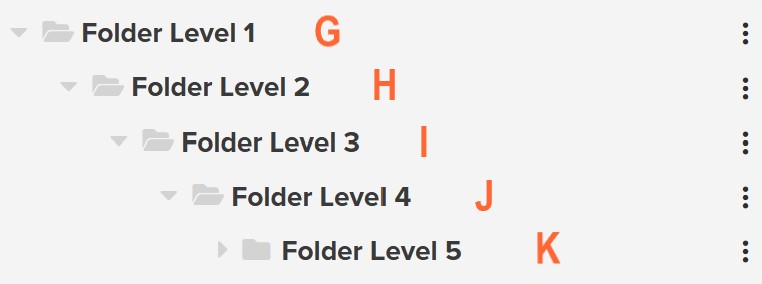
G - FolderLevel1 | Optional* (defaults to Items folder if not provided), Text This will be the root folder. Folders 1 - 5 are used to organize your items so you can easily find them. Folder information is not output in your estimates or reports. | Roofing |
H - FolderLevel2 | Optional*, Text Subfolder to 1 | Shingle |
I - FolderLevel3 | Optional*, Text Subfolder to 2 | Shingle (Metal) |
J - FolderLevel4 | Optional*, Text Subfolder to 3 | Shingle Metal (Aluminum) |
K - FolderLevel5 | Optional, Text Subfolder to 4 | |
L - CostType1 | Required, Text Equipment, Labor, Material, Subcontract or a custom cost type. (Setup any custom cost types prior to the import.) | Material |
M - UnitCost1 | Required, Numeric - can be 0 (zero). Example: 100.00 | 10 |
N - AccountingCode1 | Optional, Text Any accounting code, cost code, part #, SKU #, or info you want output to your reports or estimate. | 5409-07 |
O - CostType2 | Optional*, Text Equipment, Labor, Material, Subcontract or a custom cost type. (Setup any custom cost types prior to the import.) | Labor |
P - UnitCost2 | Required only if you enter a CostType2, Numeric - can be 0 (zero). Example: 100.00 | 25 |
Q - AccountingCode2 | Optional, Text Any accounting code, cost code, part #, SKU #, or info you want output to your reports or estimate. | 5409-08 |
R - CostType3 | Optional*, Text Equipment, Labor, Material, Subcontract or a custom cost type. (Setup any custom cost types prior to the import.) | |
S - UnitCost3 | Required only if you enter a CostType3, Numeric - can be 0 (zero). Example: 100.00 | |
T - AccountingCode3 | Optional, Text Any accounting code, cost code, part #, SKU #, or info you want output to your reports or estimate. | |
U - CostType4 | Optional*, Text Equipment, Labor, Material, Subcontract or a custom cost type. (Setup any custom cost types prior to the import.) | |
V - UnitCost4 | Required only if you enter a CostType4, Numeric - can be 0 (zero). Example: 100.00 | |
W - AccountingCode4 | Optional, Text Any accounting code, cost code, part #, SKU #, or info you want output to your reports or estimate. | |
X - CostType5 | Optional*, Text Equipment, Labor, Material, Subcontract or a custom cost type. (Setup any custom cost types prior to the import.) | |
Y - UnitCost5 | Required only if you enter a CostType5, Numeric - can be 0 (zero). Example: 100.00 | |
Z - AccountingCode5 | Optional, Text Any accounting code, cost code, part #, SKU #, or info you want output to your reports or estimate. | |
AA - ExternalId | Optional, Text An Item Number that can be used to quickly reference the item. | 10076 |
*Folder Levels: These fields are optional. However, if you do provide info for a folder level, you must also provide info for the preceding folder level(s). For example, if you provide information for FolderLevel4, you also need to provide information for FolderLevel3, FolderLevel2, and FolderLevel1. The item will be saved in the last folder level provided. In this example, the item would be saved in FolderLevel4.
*Cost Type: You are only required to have one cost type per item but can add up to five different cost types with associated unit costs and accounting codes per item via the Item Import Template.
Visual Reference - Item Details (Columns A-F and L-AA)
This shows how the item details you would enter when manually creating an item in STACK correlate to the information you need to enter in the Item Import Template columns.
.jpg)
.jpg)
Visual Refence - Folder Levels (Columns G-K)
This shows how your folder structure should be set up in STACK.
Updating Items via Import
To perform a mass update to the existing items in one of your Custom Libraries in STACK, you can download a blank Item Import Template and manually enter the item information or you can export the existing items from that Custom Library. Exporting the items will give you a prepopulated Item Import Template containing ALL of the current item information from the specified Custom Library which you can edit and import back to the Custom Library in STACK. (The export option is very useful if you need to do a mass update of your item prices.)
NOTE: If you export existing items, the prepopulated template you receive will show an “Export ID” column that is not shown on the blank Item Import Template. Do NOT edit the Export ID column. The info in that column must match what was exported or STACK will create a new item instead of updating the existing item information in the Custom Library.
Refer to Item Import Instructions and Item Import Template Guide above for instructions on how to fill out the template and import the information to STACK.
What Will Be Updated
Any items that already exist in the specified Custom Library with the same item name and folder structure as an item on your Item Import Template will be updated.
You can update these item information fields:
Item Name
Item Description
Measured Coverage (listed as "CoverageRateMeasured" and "Unit of Measure")
Purchase Coverage (listed as "CoverageRatePurchase" and "Purchase Unit")*
Cost Type
Unit Cost*
Accounting Code
Item Number (listed as "ExternalID")
*If the Purchase Unit you enter does not match an existing purchase unit in your account, a new purchase unit will be created in your account.
NOTE: Updated item information is applied to future AND existing projects.
This means existing reports and estimates you've already created for projects that use any items being updated will also be updated.* Before import, make sure to download and/or Create Snapshot of any existing reports, estimates, and estimate worksheets for current/past projects that will be impacted so you have a record of your original reports and estimates if needed.
*Unit Cost is an exception - it will NOT be updated on existing estimates.
It will be updated on existing reports and the updates will be applied to estimates and reports created after the import.
Update Limitations
You can only update items in the Custom Library you select. If the same item exits in other libraries, it will not be updated in those other libraries.
You cannot add, delete, or update item Notes via import, and you cannot add or remove an item from an assembly via import.
Since Folder Levels are used to match an import row with an existing item these fields cannot be changed via import.
The import will never delete items from your account. It also cannot move items from one folder to another. These operations must be performed in the STACK web application.
If you delete an item from a Custom Library in the STACK web application, it is disconnected from all existing takeoffs, assemblies, etc. You CANNOT undo the item deletion and disconnect by reimporting the deleted item Export ID and information; a new item will be created.
Using the Item Import Template with Google Sheets
If you do not have access to Excel, you can use Google Sheets to complete the Item Import Template.
Download the Item Import Template. (See Item Import Instructions, step 1 above.)
Log in to Google Drive at drive.google.com.
Select New, then choose File Upload.
Locate and select the Item Import Template file.
Choose Open to add the file to Google Drive.
Select the file in Google Drive to open it.
Choose Open with from the top of the screen, then Google Sheets.
Follow the directions above to fill in the Item Import Template.
Select the File option at the top of the screen.
Choose Download, then select Comma-separated values (.csv, current sheet).
Email the populated template to your STACK Account Manager.
Related Articles
What is an Item
Create, Edit, or Delete Custom Items
Export Your Custom Items from STACK
What is an Assembly
Create a Custom Assembly
Working with Item Formulas in Assemblies
Was this article helpful?