Account Settings
- Print
- DarkLight
- PDF
Account Settings
- Print
- DarkLight
- PDF
Article summary
Did you find this summary helpful?
Thank you for your feedback!
Account Settings Tabs Overview
Using the settings drop-down on the main navigation, you can navigate to account settings with options for Company Profile, Company Settings, Company Users, Billing Information, Subscription, Billing History, Catalogs, App Integrations, and Customer List.
Company Profile
Here you can update your company details, including:
Estimator type
Trade category
Trade specialties
Trade name
Company Profile
Your company profile helps us stay up-to-date with your estimator type, business category, and business specialties so that we can provide updates relevant to you and your team as needed on events and features. To edit this information, select the "Update Information" button under the Company Profile heading.
Tradename
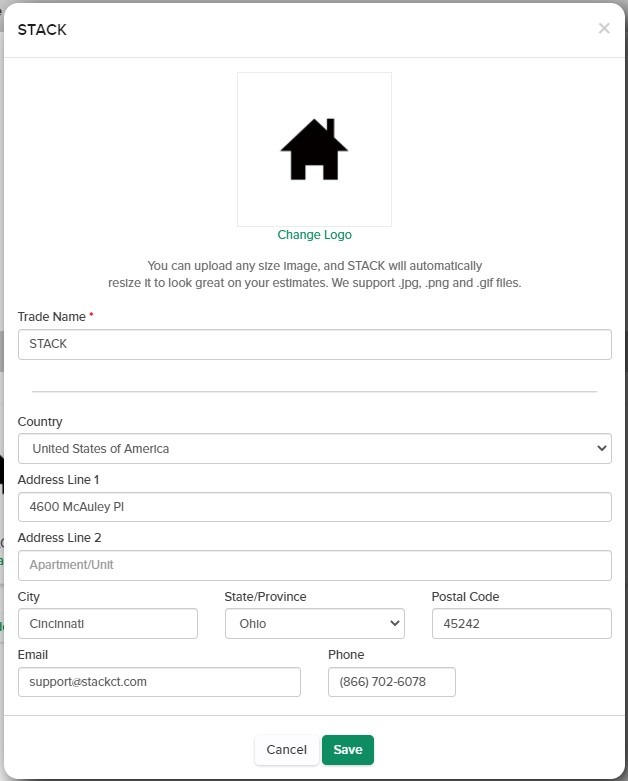
At STACK, trade names are used to add custom brands (such as logos) to your proposals. You can have multiple business names assigned to a company if required. To get started, select "New Trade Name" under Trade Names heading to open the Trade Name Editor window.
Use the "Trade Name" field to enter your business name and enter your address and contact information to include your business information in your proposal.
Select "Change Logo" to upload a logo. The preferred logo format is .PNG, but .JPG and .GIF files of any size can also be used. Once your image is uploaded, you can crop, rotate or enhance it with our editing tools before hitting "Done" to add the logo.
When you have updated all the desired fields, select "Save" at the bottom of the window to save your changes and return to the company profile page.
TIP: Fill in all address information at the business name level to avoid missing information or mistakes in your proposals.
Company Settings
Here you can change your company name and default settings
Set metric instead of imperial as the default for all projects
Create company level tag groups
Create default business cost types and profit margin percentages
Manage a variety of templates to quickly reuse on any budget or proposal:
Company Settings
You can set your company name by editing the "Company name" field. You can also change your project's default measurements from imperial to metric by selecting the box next to "Use metric measurements by default." Make sure to hit "Save" to save the changes made here.
Location Settings
Here you can set your default currency and measurement system.
Set default currency
To set your currency, simply select the desired currency from the drop-down menu. At this time, the currency settings currently affect only the proposals that you print from your estimates, but we are also working to include the settings directly in your estimates and reports.
Change the default measurement system
STACK uses the Imperial measurement system by default. If you prefer to use metric by default, check the Use metric measurements by default box.
Company Labels
Company tag groups allow you to use the same default groupings in each project in STACK without having to enter the information for each project.
Follow these instructions to get started:
Click the green + New Label button.
In the Label Name field, enter the name of your label group.
Click the green + Add button.
The label name you entered will appear in a drop-down menu at the top of the Company Labels section.Click the green +New Option button and a text box will appear on the right.
Write the options for your label as needed.
Press the Enter key or click + New option to submit the option
Your new tag will be automatically available in all projects you create. After creating your takeoff, click the Library tab in the Labels section and select the labels you want to include by clicking + Project
For more information on tag groups, visit the following article:
Using Label Groups
Types of Company Costs
Cost types are a field entered at the item level that allows you to filter and group reports, estimates, and proposals in STACK. The standard cost types are Material, Labor, Subcontract and None. Using company cost types, you can expand these options and set a default markup percentage per cost type to add an additional level of customization to your reports, estimates, and proposals.
Follow these instructions to get started:
Create Company Cost Types
Click the green + Add Cost Type button.
Enter the desired markup percentage in the Default Markup % box.
Click Save & Close.
Visit the "Items" tab to locate and assign your new cost type to the desired items using the "Cost Type" drop-down menu in the Cost Information section.
Select the green Save button to save your changes
Set Default Markup Percentage
Click the pencil icon to the right of the cost type that you want to add/change markup percentage.
Enter the desired markup percentage in the Default Markup % box.
Click Save & Close.
Non-Measured Item Sets
Non-Measured items allow you to add additional line items to your estimates that are not linked to your takeoff data. When creating non-measured item sets, you will have the option of quickly adding a selection of prepared line items to your estimates rather than manually adding each item. Follow these instructions to get started:
Create an Item Set
Enter the name of your item set and click the green + Add Item Set button.
Enter the name and unit of each line item at the bottom of the edit window
Select the plus sign to add an item
Select the X to the right of an existing item to remove it
Click Done to save the item set.
Edit or Delete a Set of Items
Select the name of the item set you want to modify
Follow the instructions above to add or remove an item or
Select "Delete it" at the bottom of the edit window to delete a set of items.
Scope of Work Templates
Here, you can enter text that can be applied to the Scope of Work section in any proposal. You can create multiple Scope of Work templates to apply to different types of projects. Follow these instructions to get started:
Create a Scope of Work Template
Enter a name for your template and click the green + Add Template button.
Enter scope of work text for the template. (This field has a limit of 9,000 characters.)
TIP: When pasting your Scope of Work, a plain text document works best. If you see unusual characters when pasting from a Word document, you will need to disable "Smart Quotes" in Word settings and use the "Paste as Plain Text" option.
Terms and Conditions Templates
Here, you can enter text to apply to the Terms and Conditions section on any proposal. You can create multiple Terms and Conditions templates to apply to different types of projects. Follow these instructions to get started:
Create a Terms and Conditions Template
Enter a name for your template and click the green + Add Template button.
Enter text for your Terms and Conditions. (This field has a limit of 9,000 characters.)
TIP: When pasting your Terms and Conditions, a plain text document works best. If you see unusual characters when pasting from a Word document, you will need to disable "Smart Quotes" in Word settings and use the "Paste as Plain Text" option.
Company Users
Here you can view and manage your account users. As a reminder, only account owners can manage / edit the list of active and inactive users. For more information on user roles and user mapping, see the article below:
Billing Information
Here you can update your billing contact information as well as your credit card and billing address on file.
Subscription
Here you can see your current subscription level and update your subscription term.
Billing History
Here you can view the history of credit card charges on the account.
Catalogs
Here you can see all the active catalogs assigned to the company.
App Integrations
Here you can see our integration options and manage your account connections. Our main integration partners include:
BidCentral
Customer List
Allows you to create and maintain a centralized list of customer contact information - company, contact name, address, email, and phone number - for use on estimates.
See Create a Customer List for more information and instructions.
Related Articles
Manage and Assign Users
Update Your Billing Information and Reactivate an On-Hold Account
Was this article helpful?