Upload Project Files
- Print
- DarkLight
- PDF
Upload Project Files
- Print
- DarkLight
- PDF
Article summary
Did you find this summary helpful?
Thank you for your feedback!
STACK gives you the option to upload files to a Project as Plans or Documents. Each option has different capabilities in STACK, so it’s important to choose the appropriate one for each file upload.
Plans
You’ll want to upload most files as Plans.
They’re the files you’ll use to create Takeoffs.
Multipage files will be split and saved as individual plan sheets.
Plans will appear on the Overview tab.
You can search, measure, print, and use the full capability of STACK with Plans.
Documents
These files should be considered reference materials.
They will be stored in STACK and available for download.
Multipage files will be saved as a single document; they will NOT be split into individual page files.
Documents will NOT appear on the Overview tab.
You will NOT be able to search, or measure and create takeoffs on these files.
TIP: Consider uploading large (1000+ page) spec documents as Documents so they don’t clutter up the Overview tab and make it hard to navigate the project. (The downside is that the spec document will not be searchable.)
If you want search capability on a large spec document, you can create a separate project just for those files and upload them as Plans. This will allow you to have the specs available and searchable in STACK while avoiding the hassle of sorting through so many pages on the Overview tab when trying to do your takeoffs.
See below for more info and instructions:
Supported File Types
File Size Guidelines
Upload Files to a Project
Project Size Guidelines
Supported File Types
STACK supports the upload of PDF, ZIP, PNG, JPG, or TIFF files.
If you're working with CAD or BIM files (e.g., DWF, DWG, DXF) you’ll need to convert them to one of the file types noted above before uploading.
File Size Guidelines
There is a 100-file maximum per upload. If you have more than 100 files to upload, you'll need to upload in batches.
The maximum size for each file is 2 GB. If the file is a multi-page or zip file that will be split into individual sheet files during the upload (Plans), the total combined size of the individual sheets cannot exceed 10 GB.
Upload Files to a Project
You can upload files to a project from the project Home screen or Plans screen.
From the HOME Screen
.gif)
Open the project from the Project List or click on the Home tab of the project.
Scroll to the Project Files section.
Choose Upload Plans or Upload Documents.
Select the icon for your desired upload method - local file (from your computer), web camera, the web, Dropbox, Google Drive, Box, or OneDrive - from the gray bar on the left of the upload area.
Select the file(s) you want to upload.
Wait for the green progress bar to complete and click Done.
It can take a few seconds to several minutes for the files to load depending on file size and your internet speed. The uploaded files will be available in the Plans and Documents section on the project Plans tab.
NOTE: If you try to upload a file that exceeds the maximum size (see File Size Guidelines above), you'll receive a message that the upload failed - Upload failed for [File Name]. File is too large. Please split the file into multiple files.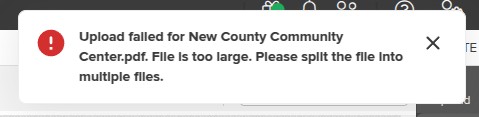
Split the file into smaller files and repeat the upload process.
You can repeat this process to upload additional files at any time.
From the Plans Screen
Uploading from the Plans screen allows you to upload files directly to any folders you’ve created.
Go to the PLANS & TAKEOFFS section of the project.
Click on the PLANS tab.*
On the left side of the screen, under Plans and Documents, click the three dots next to the name of the folder where you want the files uploaded.
TIP: You can create your own folders to organize project files.Choose Upload Plans or Upload Supporting Documents.
Select the icon for your desired upload method - local file (from your computer), web camera, the web, Dropbox, Google Drive, Box, or OneDrive - from the gray bar on the left of the upload area.
Select the file(s) you want to upload.
Wait for the green progress bar to complete and click Done.
It can take a few seconds to several minutes for the files to load depending on file size and your internet speed. The uploaded files will be available in the Plans and Documents section on the project Plans tab.
NOTE: If you try to upload a file that exceeds the maximum size (see File Size Guidelines above), you'll receive a message that the upload failed - Upload failed for [File Name]. File is too large. Please split the file into multiple files.Split the file into smaller files and repeat the upload process.
You can repeat this process to upload additional files at any time.
*You can also upload files from the Plans or Takeoffs tab by clicking Upload on the toolbar on the right of the Plans or Takeoffs tab and following steps 5-7 above. However, files uploaded in this way will automatically upload as Plans and you will have to manually move them into the folder of your choice.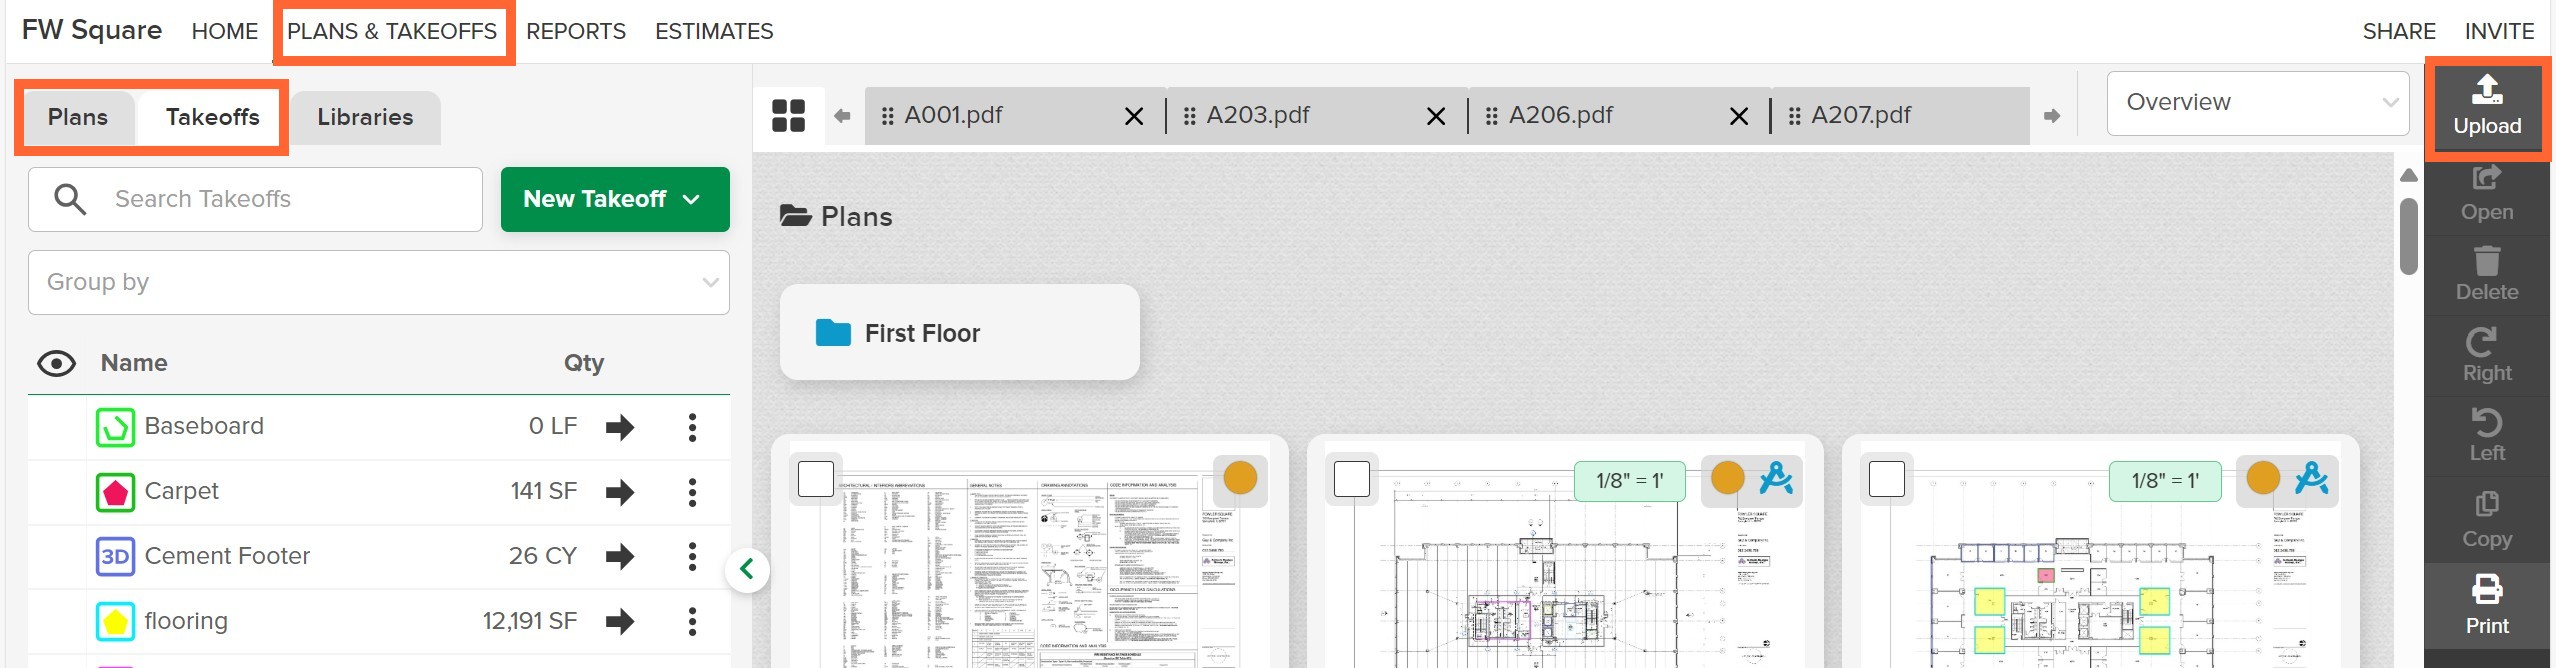
Project Size Guidelines
For optimal performance, keep the size of each project within these guidelines:
Plan sheets
Up to 500 per project is optimal; performance degrades at 5,000+Takeoff templates
Up to 100 per project is optimal; performance degrades at 300+Measurements
Up to 1,000 per project is optimal; performance degrades at 5,000+
Larger projects will run slower on the average device. We recommend splitting project documents into two separate projects if you reach the thresholds listed above.
Next Steps
We recommend taking the time to create folders and organize the plan sheets and supporting documents so you can quickly locate the files you need as you work.
Once you’ve uploaded (and organized) your project files, you’re ready to create a takeoff.
Related Articles
Create a Project and Add Project Information
Create Folders to Organize Your Plans
Manage Drawings and Other Project Documents
Text and Keyword Search Plans
Plan Overlay
Printing Plans and Documents
Was this article helpful?