Printing Plans and Documents
- Print
- DarkLight
- PDF
Printing Plans and Documents
- Print
- DarkLight
- PDF
Article summary
Did you find this summary helpful?
Thank you for your feedback!
When you print Plans and Supporting Documents in STACK, it is a print to PDF function, so we save the files as PDFs for you to download and print.
There are a few ways you can print your plans and documents:
You can quickly print individual plans sheets/documents or an entire folder of plan sheets/documents directly from the Plans and Documents list.
You can print an individual plan sheet/document, multiple plan sheets/documents of your choice, or all plan sheets/documents from the Plans or Takeoffs Overview. When printing "all," you have the option to only to print the plan sheets with takeoffs.
From an open plan sheet, you can print the entire plan sheet (Full Sheet) or zoom in to print a specific portion of the sheet (Current View).
By default, the plan sheets you print will include any takeoffs, measurements, and annotations (including plan legends) that have been added. However, you do have the ability to exclude measurements and/or annotations for all print options except the Print Current View option.
Print from the Plans and Documents List
You can print a single plan sheet or document directly from the Plans and Documents list or print all plans/documents within a folder from the list.
NOTE: By default, the sheets you print will include any takeoffs, measurements, and annotations (including plan legends) that have been added. However, you do have the ability to exclude measurements and/or annotations.
NOTE: The maximum number of sheets you can print/download at one time is 500. Your request will fail and you'll receive an error message if you attempt to print/download more than 500 sheet at a time.
.gif)
Go to the PLANS & TAKEOFFS section of your project.
Click the Plans tab.
Locate the individual plan sheet/document or folder of sheets/documents you want to print under Plans and Documents.
Click the three dots to the right of the sheet/document or folder.
Select Print (for individual sheets/documents) or Print All Sheets (for folders).
By default, Measurements and Annotations are checked to be included on the printed page(s).
If you do not want to include them, uncheck the box next to Measurements and/or Annotations.
NOTE: If you are printing all sheets in a folder, you'll also have the option to print All Sheets or Only Sheets with Takeoffs. Click the button next to the option you want..jpg)
Click the Open Print Preview button.
When the files are ready for download, the preview screen will open. You will also receive a Print download message under My Notifications (the bell icon on the top toolbar)..jpg)
Click the Download icon at the right of the toolbar on the preview screen.
.jpg)
The page(s) will be downloaded and saved to your device's Downloads folder. You can open and print from there.*
*You may need to adjust your Printer Settings to accommodate paper size, quality, and scale. Settings are specific to your device and printer.
Print from Plans or Takeoffs Overview (thumbnail view)
You can print a single plan sheet/document, multiple plan sheets/documents, or all sheets at once from the Plans or Takeoffs Overview.
NOTE: By default, the sheets you print will include any takeoffs, measurements, and annotations (including plan legends) that have been added. However, you do have the ability to exclude measurements and/or annotations.
NOTE: The maximum number of sheets you can print/download at one time is 500. Your request will fail and you'll receive an error message if you attempt to print/download more than 500 sheet at a time.
.gif)
Go to the Plans or Takeoffs tab of your project.
To choose specific sheets/documents to print, click the checkbox in the upper left of the thumbnail on the Overview tab for each page you want to print.
TIP: If you select one thumbnail, hold the shift key and select another thumbnail, all thumbnails between them will also be selected.
Hotkey CTRL + A (or Command A on a Mac) will select all of the thumbnails and ESC will de-select all selected thumbnail images.
OR
To print all sheets, go to step 3.Click Print on the toolbar at the right.
By default, Measurements and Annotations are checked to be included on the printed page(s).
If you do not want to include them, uncheck the box next to Measurements and/or Annotations. (This will apply to all pages being printed at the time.)
If you are printing all sheets, you will also have the option to print All Sheets or Only Sheets with Takeoffs. Check the box next to the option you want.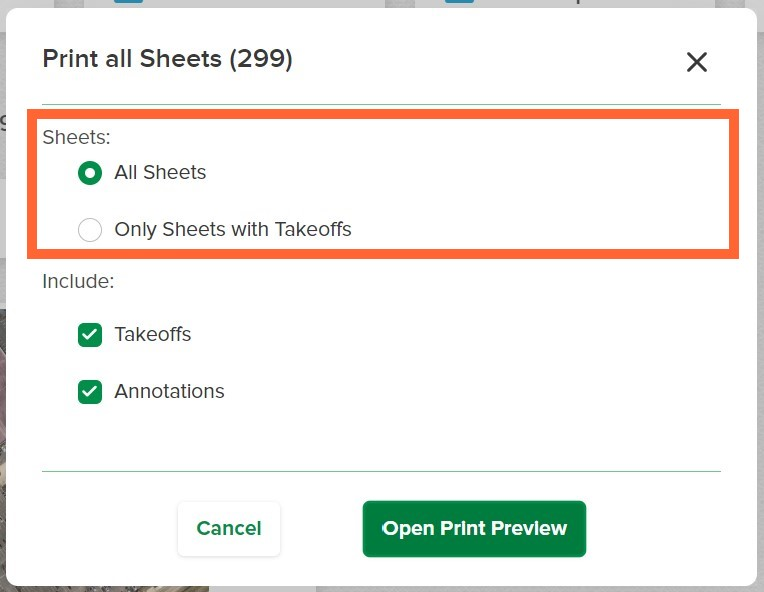
Click the Open Print Preview button.
When the files are ready for download, the preview screen will open. You will also receive a Print download message under My Notifications (the bell icon on the top toolbar).Click the Download icon at the right of the toolbar on the preview screen.
The page(s) will be downloaded and saved to your device's Downloads folder. You can open and print from there.*
*You may need to adjust your Printer Settings to accommodate paper size, quality, and scale. Settings are specific to your device and printer.
Print from an Open Plan Sheet
You have two options when printing from an open plan sheet:
Full Sheet - This option will print the entire sheet.
Current View - This option allows you to zoom in and print a specific portion of the sheet.
Print the Full Sheet
NOTE: By default, the sheets you print will include any takeoffs, measurements, and annotations (including plan legends) that have been added. However, you do have the ability to exclude measurements and/or annotations.
.gif)
Open the plan sheet you want to print.
Click Print on the toolbar at the right.
Make sure Full Sheet is marked as the Print Layout. (This is the default selection.)
By default, Measurements and Annotations are checked to be included on the printed page(s).
If you do not want to include them, uncheck the box next to Measurements and/or Annotations. (This will apply to all pages being printed at the time.)Click the Open Print Preview button.
When the files are ready for download, the preview screen will open. You will also receive a Print download message under My Notifications (the bell icon on the top toolbar).Click the Download icon at the right of the toolbar on the preview screen.
The page(s) will be downloaded and saved to your device's Downloads folder. You can open and print from there.*
*You may need to adjust your Printer Settings to accommodate paper size, quality, and scale. Settings are specific to your device and printer.
Print Current View
NOTE: By default, sheets you print from Current View will contain any takeoffs, measurements, and annotations (including plan legends) that have been added. This is the only print option that will also include overlay. You do not have the option to include/exclude measurements and annotations when using this print option.
TIP: You can Hide Annotations if you don't want them to be visible when you Print Current View.
.gif)
Open the plan sheet you want to print and scroll/zoom in to the view of the sheet you want to print.
Click Print on the toolbar at the right.
Select Current View for the Print Layout.
This will only print the portion of the plan that is visible on your screen.Click the Download PDF button.
The page will be downloaded and saved to your device's Downloads folder. You can open and print from there.*
*You may need to adjust your Printer Settings to accommodate paper size, quality, and scale. Settings are specific to your device and printer.
Print Plan Sheets to Scale (on a large format printer or plotter)
Follow instructions above to download a PDF of the plans you want to print.
Open the PDF in Acrobat Reader.
Select Properties from the File menu.
On the Properties page, find the physical dimensions of the PDF. (They will usually be in inches, e.g., 24in x 36in.)Close the Properties window.
Select Print from the File menu in Adobe Acrobat.
In the Print window, select a page size that is at least as large as the PDF.
This will ensure that the paper size is large enough to print the plan to scale.Adjust your Printer Settings* to accommodate paper size, quality, and scale as needed.
*Settings are specific to your device and printer.
Related Articles
Annotation Tools
STACK Reports Overview
Managing Drawings and Other Project Documents
Rotate Plans
Was this article helpful?