Navigating STACK
- Print
- DarkLight
- PDF
Navigating STACK
- Print
- DarkLight
- PDF
Article summary
Did you find this summary helpful?
Thank you for your feedback!
The navigation and sub-navigation toolbars at the top of your screen is where you will find your general account and project specific options.
The measuring toolbar in the Takeoffs section is where you will find the tools you need to measure and annotate your plan sheets.
Main Navigation Overview
The black bar at the top of the screen is the Main Navigation Toolbar. This is where you will access general account options.

Full-screen Icon (four corners) - Expands your current browser window to full screen.
New Tab Icon (box w/arrow) - Opens your current browser view in a new tab.
TIP: You can use more than one monitor while working in STACK - just click the New Tab Icon, then use your mouse to click and drag the new tab that opens over to your second monitor. You can repeat the process for additional monitors.PROJECTS (aka your Project List)- Where you will create new projects and find existing projects.
CALENDAR - Provides a calendar view of your projects.
LIBRARIES - Where you will find pre-built item and assembly libraries and create your own Custom Libraries, items, and assemblies.
NOTE: You will not see Libraries on the Main Navigation Toolbar if you do not have any Libraries or do not have a role/permissions to create or delete Libraries.What’s New Icon (gift) - Information about new and updated features.
My Notifications Icon (bell) - Shows in-app notifications like when a proposal download is complete.
My Team Icon (two-people) - Lets you see what members are on your team and what they're working on.
Help Icon (?) - Quick access to resources including our online Help Center for instructions and training videos, and a list of keyboard shortcuts.
Settings Icon (person w/gear) - Where you can update Preferences and Company Settings, request new features, access Excel tools, or log out of STACK.
NOTE: Some items under Settings are only available/visible to Account Owners and users assigned specific roles/permissions.
TIP: Clicking the STACK icon at the left side of the main navigation will take you to your project list, same as PROJECTS.
Sub-Navigation Overview
When you open a project, the Sub-navigation Toolbar will appear under the main navigation at the top of the screen. This is where you will access project-specific options.

HOME - Where you can view and edit project details like project name, status, bid date, assigned to, location, and notes, as well as upload project plans and documents.
PLANS & TAKEOFFS - Where you can view, search, and organize project plans and documents; create and edit takeoffs on your plan sheets; and find the Takeoff Library to access pre-built takeoffs.
REPORTS - Offers several pre-built reports that you can customize for your needs.
ESTIMATES - Where you will create estimates to calculate the total project cost, find/edit estimates you've already created, and export/download your estimate data.
SHARE - Allows you to share view-only access to your project documents, takeoffs, and reports.
INVITE - Allows you to invite other users to perform takeoffs on a blank set of plans.
Measuring Toolbar Overview
The Measuring Toolbar automatically appears on the right side of the screen in the Takeoffs section when you have a plan sheet open in the canvas view.
NOTE: The options available on the toolbar change depending on the measurement type of the takeoff you have selected.
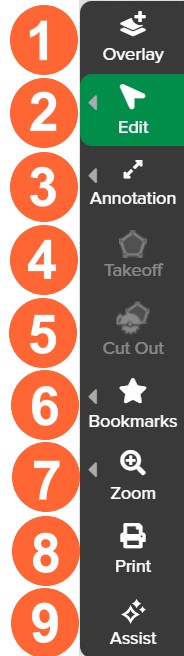
- Overlay - Overlay and compare multiple plan sheets in the same view.
- Edit - Select measurements and markups, cut, copy, paste, merge, change takeoff, explode area, rotate, flip, cut line, or delete. You can also undo these actions (except change takeoff, which must be done manually).
NOTE: You can undo up to 50 actions on a page. However, if you navigate to another page or tab, you cannot come back and undo something you did before changing pages. Also, when using zoom and undo, if you don't see the action undo, it might be because it is outside your zoomed-in field of view. - Annotation - Add a highlight, cloud, call out, dimension line, text box, or legend to any plan sheet.
- Takeoff - Options to create measurements and counts.
- CutOut - Cut out/remove an area from an existing measurement.
- Bookmarks - Save and link specific sheet views to reference later.
- Zoom - Zoom in or out on a plan sheet.
- Print - Export or print the desired project docs or sheet views.
- Assist - Access STACKS's AI based tools like Floor Plan AI.
TIP: You can use keyboard shortcuts for many edit tools. You can also use the mouse wheel or trackpad to zoom in and out.
Related Articles
STACK Training #1: Mastering the Basics
STACK Keyboard Shortcuts
Was this article helpful?