Manually Enter Estimate Worksheet Data
- Impression
- SombreLumière
- PDF
Manually Enter Estimate Worksheet Data
- Impression
- SombreLumière
- PDF
The content is currently unavailable in French. You are viewing the default English version.
Résumé de l’article
Avez-vous trouvé ce résumé utile ?
Merci pour vos commentaires
Certain data can be entered or modified directly within the Estimate Worksheet, allowing you to manage costs, quantities, and markups without relying solely on takeoff data.
You can:
Manually add new line items and enter unit costs or quantities.
Override existing quantities or unit costs imported from takeoffs or libraries.
Add items even when quantities or measurements are not yet available.
Enter unit costs and line-item markups or override defaults from STACK Items or Company Cost Types.
Enter measurement quantities directly without performing a takeoff.
Add or remove Items and Assemblies and edit Assembly Inputs directly from the worksheet. (See Add or Remove Items and Assemblies in the Estimate Worksheet for details.)
TIP
To include project-level expenses such as overhead, sales tax, or other costs that are not tied to specific takeoffs or times, manually add them in the Other Costs section. See Add or Delete Additional Costs from an Estimate Worksheet for instructions.
Key Information
Editable cells have a white background; non-editable cells appear grey.
Manually entered or overridden data is shown in bold to indicate a change from the system default.
Manual entries persist even when takeoffs or library data are updated. To revert to defaults, reset the affected cell.
Data changes update all related calculations immediately, including Base Costs, Subtotals, and Estimate Totals.
Edits made in the Estimate Worksheet do not modify underlying takeoffs or library items.
NOTE
For larger or more complex projects that include distributed costs from the Other Costs section, temporarily deferring calculation can improve performance responsiveness. When differing is enabled, totals are recalculated only after all edits are complete, rather than after each change.
To enable or disable deferred calculation, select click the three dot menu on the top right and select Preferences. In the Estimate Preferences window, check Defer calculation of distributions from Other Costs.
Add a Row / Line Item
You can add line-item rows directly on the estimate, then manually enter an item name and other data like unit cost and adjusted quantity. This gives you the ability to add things to the estimate without creating a takeoff.
Right click within the estimate worksheet.
Click Add row.
A new row will appear at the bottom of the worksheet or Group.Enter data in the Item, Unit Cost, Adjusted Quantity and any other appropriate cells.
NOTE
If you add a row when data is grouped, the item will appear in that Group and will always be associated with that Group. This means if you later ungroup, and make the Group column visible (e.g., Label), the new line item will have the appropriate value for that column, and if you later regroup, the line item will still appear in that Group.
Delete an Added Row
Only rows you have manually added to the estimate can be deleted.
NOTE
Deleting a row is permanent and cannot be undone.
Right click on the row you want to delete.
Click Delete row.
Manually Enter Data
Editable fields are displayed with a white background. Click in a white cell to enter or modify data. Fields with a light grey background cannot be edited.
When a value is manually entered or overridden — such as Unit Cost, Account Code, Rate, Purchase Quantity, Cost Modifier %, or Profit Markup % — the cell content appears in bold to indicate that it differs from the system default. Returning the value to its default removes the bold formatting.
When a value is manually entered or overridden for Unit Cost, Account Code, Rate - the cell content appears in bold to indicate that it differs from the system default. Returning the value to its default removes the bold formatting.
The Cost Modifier % and Profit Markup % columns allow you to apply markups at the line-item level, per cost type, for greater control over pricing and profitability.
Cost Modifier % represents the percentage of the Extended Cost added as a Cost Modifier. It only applies to extended cost while excluding Distributed Cost. This amount contributes to the total Base Costs.
Profit Markup % represents the percentage applied to the Extended Cost + Cost Modifier + Distributed Cost (For that cost type) to define the desired profit margin. It is included in line item subtotals and contributes to overall profit and margin calculations in estimate totals and dashboard metrics.
Manually entered data remains fixed even when changes occur to takeoffs or library values. To update these fields, enter a new value or reset the cell to its default.
Linked Cells
Link Cells by Items helps you keep your estimate clean and consistent. When you change a cost value for an Item—such as its Unit Cost—STACK automatically updates that same value everywhere else that Item appears in the estimate. Cells are linked within a Cost Type, so if you unlink an Item, it is unlinked for all columns in that cost type—but not in other cost types. Linking only applies to cost-related cells in the cost types; Rate, Waste %, and Purchase Quantity columns are never linked. Takeoffs without Items are always unlinked. This saves time, prevents mistakes, and ensures your Item costs stay in sync, no matter how your estimate is organized.

In the Estimate worksheet, edit the Unit Cost for an Item.
All associated linked cells, meaning all unit cost for the same item (e.g. caulk), will update automatically.
If you do not want an item’s cost to update with the others, right click on the cost cell and select Unlink this Item from Cost Type Material.
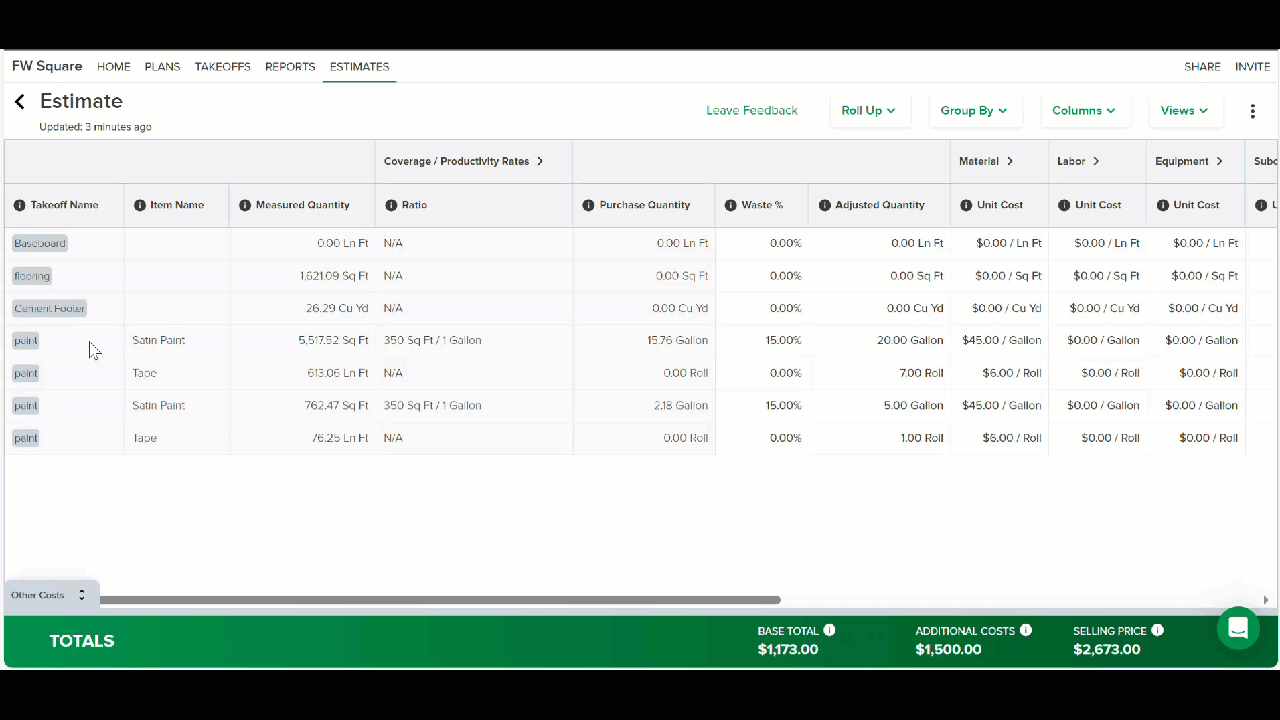
Worksheet Column Descriptions
The Estimate Worksheet contains a series of columns that display item details, measurements, cost data, and markup values. Available columns may vary depending on your project setup, measurement type, and selected cost types.
Column Category | Column Name | Description |
|---|---|---|
Group | Categorizes the line item according to its assigned cost group (e.g., Material, Labor, Equipment, Subcontract). Groups are used to organize data, summarize totals, and control how costs roll up in the estimate. | |
Item Name | Displays the item or assembly name as defined in your library or entered manually. | |
Measurements | Measured Quantity | The total measurement value pulled from the takeoff associated with the item. |
Sq Ft | The total square footage measured for the takeoff. Applies to area-based measurements. | |
Ln Ft | The total linear footage measured for the takeoff. Applies to length-based measurements. | |
Cu Yd | The total cubic yard quantity measured for the takeoff. Applies to volume-based measurements. | |
EA | The total number of each (individual) items counted in the takeoff. | |
Drop Count | The total number of drops recorded in the takeoff. Used when drop-based measurement applies. | |
Scale | Shows the scale used for the plan sheet measurement. This is read-only and reflects the takeoff setup. | |
Rate | The factor used to calculate the purchase quantity from the measured quantity. This value can be manually adjusted. | |
Purchase Quantity | The total quantity required for purchasing or production, calculated as Measured Quantity × Rate. | |
Material | Unit Cost | The cost per unit for material. Pulled from the library or entered manually. |
Accounting Code | The accounting or cost code associated with the material. Used for reporting and integrations. | |
Extended Cost | The total material cost before markups. Calculated as Unit Cost × Purchase Quantity. | |
Cost Modifier % | The percentage of the material Extended Cost added as a Cost Modifier. This amount contributes to the total Base Costs. (This replaces the legacy Cost Markup % field.) | |
Profit Markup % | The percentage applied to the Extended Cost + Cost Modifier to calculate profit for material. | |
Labor | Unit Cost | The cost per labor unit, such as per hour or per quantity. Sourced from the library or entered manually. |
Accounting Code | The accounting or cost code associated with labor. Used for job costing and export. | |
Extended Cost | The total labor cost before markups. Calculated as Unit Cost × Purchase Quantity. | |
Cost Modifier % | The percentage of the labor Extended Cost added as a Cost Modifier. This amount contributes to the total Base Costs. | |
Profit Markup % | The percentage applied to the Extended Cost + Cost Modifier to calculate profit for labor. | |
Equipment | Unit Cost | The cost per unit of equipment used on the project. May represent hourly, daily, or usage-based rates. Pulled from the library or entered manually. |
Extended Cost | The total equipment cost before markups. Calculated as Unit Cost × Purchase Quantity. | |
Cost Modifier % | The percentage of the equipment Extended Cost added as a Cost Modifier. This amount contributes to the total Base Costs. | |
Subcontractor | Unit Cost | The cost per unit for subcontracted work or services. Typically represents the subcontractor’s quoted rate per quantity or unit of measure. |
Extended Cost | The total subcontractor cost before markups. Calculated as Unit Cost × Purchase Quantity. | |
Cost Modifier % | The percentage of the subcontractor Extended Cost added as a Cost Modifier. This amount contributes to the total Base Costs. | |
Total | Extended Costs | The combined total of all extended costs across cost types for the line item. |
Cost Modifier | The total dollar value derived from all cost modifier percentages across material and labor. | |
Distributed Costs | Represents indirect or shared costs allocated across multiple items. Excluded from markup calculations. | |
Base Costs | The sum of Extended Costs, Cost Modifiers, and Distributed Costs. | |
Profit Markup | The total profit amount calculated from the Profit Markup % applied across cost types. | |
Distributed Margin | Represents profit or margin distributed across items based on configured settings. | |
Subtotal | The total value for the line item, including all costs, modifiers, and profit markups. Used in estimate and dashboard profit calculations. |
Other Costs
The Other Costs section allows you to include additional project expenses that are not directly tied to material or labor items. These costs can represent items such as taxes, permits, equipment rentals, insurance, or any other indirect or project-level costs.
Each entry in the Other Costs table can be configured to calculate automatically or entered manually, depending on the selected calculation type.
Column | Description |
|---|---|
Group | Organizes related cost entries under a shared category (e.g., Overhead, Tax, Fees). Groups can be expanded or collapsed for easier navigation. |
Type | Defines the cost classification, such as Tax, Permit, Equipment, or Custom. Determines how the cost interacts with estimate totals. |
Accounting Code | The accounting or cost code associated with the cost entry. Used for reporting, job costing, and exporting data to accounting systems. |
Name | The name or description of the cost (e.g., “Sales Tax,” “Permit Fee,” “General Liability Insurance”). |
Calculation Type | Determines how the cost is calculated. Options include Percentage, Fixed Amount, or Manual Entry. |
Percentage Value | The numeric percentage applied when the Calculation Type is set to Percentage. |
Percentage Of | Specifies the portion of the estimate that the percentage applies to (e.g., Estimate Subtotal, Material Costs, Labor Costs). |
Options | Provides additional settings for how the cost behaves in the estimate, such as whether it should be included in profit or margin calculations. |
Basis Amount | Displays the monetary value used as the calculation base for percentage-based costs. For example, if the percentage applies to the Estimate Subtotal, this field shows that subtotal amount. |
Distribute | Indicates whether the cost is distributed across all line items in the estimate. Distributed costs are allocated proportionally based on each line item’s value. |
Distributed Costs | Displays the total dollar amount of costs distributed across all items when Distribute is enabled. This value is excluded from markup calculations. |
Additional Costs | Allows you to add new cost entries or modify existing ones within the Other Costs table. |
Note | Provides space for optional comments or details related to the cost entry. Notes are informational only and do not affect calculations. |
NOTE
Other Costs are included in the project total and reflected in the Estimate Summary and Dashboard calculations when applicable.
Setting a Cost Modifier %
There are two ways to set a Cost Modifier % in the Estimate Worksheet.
You can apply it directly to individual line items, or define it as an Other Cost that automatically applies to the estimate as a whole. Both methods adjust costs to account for overhead, waste, or indirect expenses and are reflected in line item and total calculations.
There are two ways to set a Cost Modifier % in the Estimate Worksheet — either directly on individual line items or by applying the same percentage to multiple rows at once.
Both methods adjust the item’s Extended Cost to account for additional expenses such as overhead, waste, or indirect costs.
.gif)
Set per Line Item
Use this method to adjust costs for a specific material or labor line.
Open the estimate and go to the Estimate Worksheet.
Locate the line item where you want to apply the modifier.
In the Material – Cost Modifier % or Labor – Cost Modifier % column, right click the white (editable) cell.
Select Apply to Column.
The cell value appears in bold to indicate a manual override.
The Total – Cost Modifier, Base Costs, and Subtotal automatically recalculate for that line.
Apply as Other Cost
Use this method when you want the same Cost Modifier applied to the entire estimate rather than individual line items.
In the Estimate Worksheet, scroll to the Other Costs section below the line items.
Click the Equal icon (=) to extend.
Right click on a white cell and select Add a New Cost.
Select the Type of Other Cost:
Direct Cost
Indirect Cost
Contingency
Overhead
Profit
Tax
Enter the desired Percentage Value (for example,
10).In Percentage Of, select Estimate Subtotal to apply the modifier to the total project value.
Confirm the Basis Amount reflects the correct subtotal value.
(Optional) Enable Distribute if you want the modifier distributed proportionally across all line items.
The applied modifier is displayed in the Distributed Costs and Base Costs totals and is included in the overall project Subtotal.
Manually Enter Measured Quantities
You can enter Measured Quantities directly in your Estimate Worksheet without using the takeoff tools to actually measure anything in STACK.
Just add/create takeoffs in the project, then manually enter the Measured Quantity (Primary measurement) as well as any Secondary measurements* for the takeoffs in the estimate.
The values you enter will be used as the inputs to any item coverage/productivity rates and item formulas in assemblies, so you can continue to use your existing items and assemblies (which use those formulas to convert the Measured Quantities into Purchase Quantities).
* When you draw a measurement in STACK, both a Primary measurement (the Measured Quantity) and a Secondary measurement(s) is output. (The output units of measure depend on the Takeoff Measurement Type.)
For example: The Area Takeoff Measurement Type outputs the Sq Ft (Primary measurement) and the Ln Ft of the perimeter (Secondary measurement).
All Takeoff Measurement Types also provide an EA measurement output which is the number of measurements/counts times any multipliers that are applied to the takeoff.
STACK inputs those measurements in item coverage/productivity rate formulas and item formulas in assemblies to calculate purchase quantities and costs in the estimate.
See Takeoff Measurement Types for more info on the Primary and Secondary outputs for each takeoff type and formulas in which they are used.
Key Information:
You can only manually enter a Measured Quantity if there is no quantity from an actual measurement. (The Measured Quantity cell will be zero (0).)
You can only enter measured quantities for a Takeoff, not for individual items or assemblies attached to the takeoff.
(This allows you to use the same Takeoffs/Assemblies/Items whether you're going to draw measurements, or manually enter measured quantities; which means you can start with manually entered values then go measure later.)The value(s) you enter will be used for all Estimate Worksheets in the project.
The measured quantity entered on the estimate will not be listed on the Takeoff List in the PLANS & TAKEOFFS section of the project. The Takeoff List measurement will be zero (0) because nothing has actually been measured on the Takeoff.
If you manually enter a Measured Quantity on the estimate and then actually draw measurements for the Takeoff in the PLANS & TAKEOFFS section of the project, the quantity from the drawn measurement(s) will permanently replace the manually entered Measured Quantity for all Estimate Worksheets in the project.
If you start to draw measurements for the Takeoff, you'll receive a warning message to remind you that quantities have been manually entered and will be permanently discarded if you proceed to actually measure.
To Manually Enter Measured Quantities:.gif)
TIP
Click the Measurements header to view/edit data in the primary and secondary measurement columns (Sq Ft, Ln Ft, Cu Yd, or EA).
Click in the Measured Quantity cell for the takeoff and type in the Primary measurement amount.
The Measurements cell (Sq Ft, Ln Ft, Cu Yd, or EA) representing the Primary measurement will auto populate with the same amount.
NOTE: If the unit of measure is EA, you can only enter a whole number.(Optional) Click in any Measurements cell(s) for the takeoff (Sq Ft, Ln Ft, Cu Yd, EA)with a white background and type in the Secondary measurement amount(s).
The cells available to edit depend on the Takeoff Measurement Type.
Shortcuts to Enter and Reset Data
.gif)
You can copy and paste data within the editable cells on the estimate.
You can also copy and paste data from editable cells back and forth from your estimate and Excel.
You can drag and fill to enter the same data in consecutive cells within a column - enter the data in one cell, then click the green square in the bottom right of the cell and drag up or down to fill the other cells with the same data.
.jpg)
When you right click on cells in some columns (Cost Type Unit Cost, Cost Type Markup %, and Waste %), you can choose to apply the value of that cell to other line items with the same purchase unit in the entire column or grouping (if you are using Group By on the estimate).
If you have manually entered data in the cells of some columns (Rate, Cost Type Unit Cost, Cost Type Accounting Code), you can right click on the cell and choose to Reset the value of that cell or click on the menu in the column header to Reset values for the entire column and the cell(s) will be reset to their default or calculated value. (For Rate, the value will be rest to the actual measured quantity from the Takeoff.)
Defer Calculation of Distributions from Other Costs
Every time you manually edit a data point in the main estimate grid - like changing Purchase Quantity, Rate, Waste, Unit Cost, Markup, etc. - any distributed costs from the Other Costs section of the estimate are automatically recalculated by default. On larger, complex projects, this can take a few seconds (depending on your device) for each edit you make.
Setting your estimate Preferences to Defer calculation of distributions from Other Costs lets you defer all those recalculations until you finish editing. This makes your line-item edits immediate, which may improve your estimate performance and save time while editing those larger/complex estimates.
It is important to note that while you're making edits with this preference enabled, some numbers in the Totals section of the main grid will be out of sync until you choose to recalculate. However, the totals on the green bar at the bottom of the estimate worksheet will always be accurate, regardless of preference setting or recalculation status.
To set the preference:

Click the three dots on the right side of the estimate toolbar at the top of the worksheet.
Click Preferences.
Check the Defer calculation of distributions from Other Costs box.
Click Save.
If you decide you no longer want this Preference enabled, follow the same instructions and uncheck the box in step 3.
Once this preference is enabled, you will need to force the recalculation process when you finish making edits. This can be done by clicking the refresh icon on the Totals header on the estimate.
Recalculation will also happen if you refresh your browser, close and reopen/load the estimate, or Export the estimate (to CSV, XLS, or Proposal).
When the recalculations are complete, the icon on the Totals header will change to indicate all numbers are up to date.

Related Articles
Estimate Worksheet Overview
Add or Delete Additional Costs from an Estimate Worksheet
Add or Remove Items and Assemblies in the Estimate Worksheet
Cet article vous a-t-il été utile ?