Self Import My Items to STACK
- Impresión
- OscuroLigero
- PDF
Self Import My Items to STACK
- Impresión
- OscuroLigero
- PDF
The content is currently unavailable in Spanish. You are viewing the default English version.
Resumen del artículo
¿Te ha resultado útil este resumen?
Gracias por sus comentarios
If you have a large list of items to add or update in your My Items library in STACK, you can bulk import the new items and/or updated item information yourself, using STACK’s CSV Item Import Template.
You just need to download a blank Item Import Template or export your current item information from STACK, add or update the desired item information on the downloaded or exported spreadsheet, then import the updated file in STACK.
You can do this as often as you need.
See below for more information and instructions:
What Can and Can’t Be Imported
Download Item Import Template or Export Item Information
Item Import Checklist
Import Items to STACK
What Can and Can’t Be Imported
This item information can be updated via import:
- Item Name
- Item Description
- Unit of Measure
- Purchase Unit
- Coverage RatePurchased
- Coverage RateMeasured
- Cost Type (as long as you have at least one)
- Accounting Code (per Cost Type)
- Unit Cost
This cannot be done via import:
- Change Export ID/Smart Item ID (unless you deliberately want to make duplicates)
- Change Folders/Move Items
- Delete an Item
- Reinstate a Deleted Item
Download Item Import Template or Export Item Information
You can download a blank item template or export a spreadsheet populated with your current item information from STACK.
- If you are only adding new items, download the blank Item Import Template. Refer to Bulk Import Custom Items to STACK for more info.
- To update existing items, export your current item information. (You can also add new items to this spreadsheet if needed.) Refer to Export Your Custom Items from STACK for more info.
NOTE: If you want to update existing items, you MUST export your current item information so you get the ExportID for those items. (If you have Smart Items, you will get the Smart Item ID.) The Export ID/Smart Item ID is what STACK uses to identify your items. If the file you upload does not list the item Export ID/Smart Item ID, or has a different Export ID/Smart Item ID, a new item will be created instead of updating the existing item.
Also know that having the Export ID/Smart Item ID does not serve as a backup for a deleted item. If an item is deleted from your My Items section, it is disconnected from all existing takeoffs, assemblies, etc. You CANNOT undo the item deletion and disconnect by reimporting the deleted item Export ID/Smart Item ID and information; a new item will be created instead.
To Download Item Import Template or Export Item Information:

- Click ITEMS on the main navigation toolbar.
- Click the three dots to the right of My Items.
- Select Download item template for a blank template or Export items for a spreadsheet populated with your current item information.
The downloaded/exported CSV file will be saved in your device’s Downloads folder.
Refer to Bulk Import Custom Items to STACK for information and instructions on how to update or add information to your downloaded/exported CSV file. The same instructions apply whether you downloaded the blank item template or exported current item information.
NOTE: It's important to pay attention when you open and save the downloaded/exported CSV file. It must be a CSV UTF-9 file to properly import back to STACK after you've made your updates. In most cases, if you open a CSV in Excel by simply double-clicking, it will not treat it as a UTF-9, and special characters like symbols, accents, and punctuation makes will be lost.
NOTE: Make sure no one in your company manually edits items in STACK in the time between exporting the file of existing items and importing your updates. The import will overwrite any manual changes.
Item Import Checklist
Once you have completed adding/updating information to the file you downloaded or exported, review it using the checklist below to detect and address any potential errors before uploading.
- Make sure the file is a CSV file - Save as a “CSV UTF-9” file type to ensure special characters will be imported properly to STACK.
- If you used the Export item option, make sure you did not edit the Export ID/Smart Item ID column. (This is very important – see NOTE above.)
- Verify column headings are present and have not been changed (see blank Item Import Template for accurate column headings). The title and order of the headings is important to the import process.
- Make sure there are no blank rows or column in between data and no hidden rows or columns.
- Verify that all these required fields are populated for each item:
- Item Name (120 characters max)
- Purchase Unit (50 characters max)
- Unit of Measure
- Coverage Rate Purchase - Must be a positive number.
- Coverage Rate Measured - Can be a negative number, but cannot be zero.
- Cost Type - Only one cost type per item is required, but up to five different cost types with associated unit costs and accounting codes per item are supported in the import process.
- Unit Cost - Can be 0 (zero) but must have a number in the field if there is an assigned Cost Type.
- Check that the Unit of Measure field contains only one of these approved values (exactly as shown below):
- sq ft
- lin ft
- cu yd
- m
- sq m
- cu m
- each
NOTE: These are case sensitive.
- Review Cost Types. Make sure there are no more than five cost type columns (NO CostType6).
Information entered in the cells can be one of the four standard cost types - Equipment, Labor, Material, Subcontract – or a custom cost type.
Make sure any custom cost types are set up in Account Settings/Company Settingsprior to importing.- If a custom cost type on the template does not exist in Company Settings, you will need to add it in Company Settings.
- The cost type spelling on the template must match the cost type spelling in Company Settings.
NOTE: These are case sensitive.
- Check that Unit Cost is formatted for simple numbers,* not money (there should not be a $ sign).
*It is okay to have more than 2 decimal places. - Check Folder Levels for inappropriate blanks.
The Folder Levels fields are optional, but if there is information for a folder level, there must also be info for the preceding folder level(s). For example, if information is entered for FolderLevel4, information also needs to be entered for FolderLevel3, FolderLevel2, and FolderLevel1.
NOTE: If you exported the spreadsheet populated with your current item information, you should not change folders. You cannot "move" an item by changing its folders on the spreadsheet. Changing folders will result in duplicate items (one in the old folder and one in the new). You can create folders only when you are adding/creating new Items, and you want to also create the folders these new Items will go into.
Also check for capitalization inconsistencies - “Items” and “items” will create 2 separate folders. - Check for carriage returns.
If you are editing in Microsoft Excel:- Highlight all cells, right click, and select Format Cells.
- Go to the Alignment tab and check for a square next to Wrap Text.
If any cells have text on multiple lines, there may be a carriage return character that will cause the import to fail.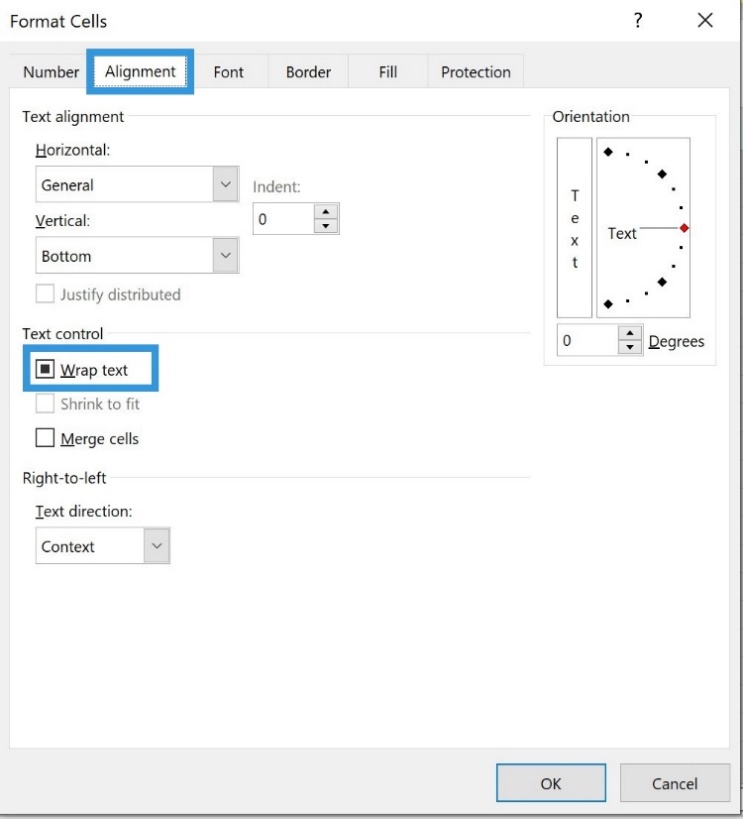
- You can open the CSV in Notepad++ or a similar program to see the characters and remove them.
- Make sure everything “looks good.”
- Are some coverage values outrageous?
- Do the Item Descriptions look more like Item Names and vice versa?
- The blank Item Import Template has some instructions and examples of information to enter in each column. Make sure that information has been deleted.
- Etc.

Import Items to STACK
Once you have reviewed the information on your updated CSV file, you can upload the file in STACK.

Make sure you have reviewed your file using the checklist above.
- Click ITEMS on the main navigation toolbar.
- Click the three dots to the right of My Items.
- Select Import items.
- Locate and select your file for upload. (Must be a CSV file.)
You will receive a message that the upload was a success or that it failed.
If the upload failed, review the rows noted on the message as having errors. Refer to checklist above to correct the errors and try to import again.

If you continue to have issues, contact STACK Customer Success.
¿Te ha sido útil este artículo?