Project List
- Print
- DarkLight
- PDF
Project List
- Print
- DarkLight
- PDF
Article summary
Did you find this summary helpful?
Thank you for your feedback!
Project List is the list of all your projects and is where you’ll find and open the project you want to work on. Your Project List is the first thing you see once you log in and can also be found by clicking the PROJECTS tab on the top navigation toolbar.
We know your Project List can get very long, so you have the ability to filter, sort, and search the list. This allows you to quickly locate a specific project and can help you manage your projects by filtering the list to only show projects with a certain status or projects assigned to you.
Searches, sorts, and filters you apply are stored in session. This eliminates the hassle of having to reapply them every time you access the page, but you can easily change them or reset to the default view at any time.
NOTE: Only projects are shown on the Project List. If you want to see Events you’ve created, or see your projects in a calendar view, go to the CALENDAR tab on the top navigation toolbar.
Default Project List View
By default, projects are listed from most recent bid date to oldest (top to bottom).
.jpg)
The Project List displays the following project details:
PROJECT NAME
An icon will be displayed next to the Project Name of projects to which you have been invited to bid, that you've shared or have been shared with you, or that have been made Private.

STATUS*
BID DATE
LOCATION
City, State/Province (Canada) only.ASSIGNED TO*
If there are more than five assigned users, you will see five icons and +# of additional assignees. Icon colors are auto assigned by STACK based on the first letter of the user’s email.NOTES
*You can change the project STATUS and who the project is ASSIGNED TO directly from the Project List. Just click on the specific project STATUS or ASSIGNED TO detail you want to update, then select the correct information from the menu that opens. If you are changing the ASSIGNED TO data, click the Confirm button to save your selection.
.gif)
The three dots at the far right of each project give you the option to open the project in a new browser tab. Depending on your role and permissions, you may also have access to edit the project details listed above, copy/delete the project, or make the project private/public.
.jpg)
NOTE: The number of columns visible on your Project List depends on your screen size. Columns are removed from view (right to left) as screen size is reduced. The Project Name column and three dots will always be visible so you can open the project and access the edit details menu regardless of screen size. Viewing in landscape mode will allow you to view the most information.
Search
You can search the Project Name, Location, and Notes sections of the Project List for text or numeric matches.
Search results will be displayed until you clear the current search or reset the view.
To Search
.gif)
Click in the Search bar at the top left of the Project List.
Type in the text you want to search for.
Click the green Search box.
If no results are found, you will receive this message -

Clicking Reset to all Projects will clear the search, as well as all filters you have applied.
To just clear the current search but keep your applied filters, click the X inside the search bar.
Sort
You can sort your project list by the data in the Project Name, Status, Bid Date, or Location column.
The sorts you apply are remembered in session (even if you close the browser and come back later) until you change them.
If a column is sorted, an arrow will be displayed next to the column name.
.jpg)
To Sort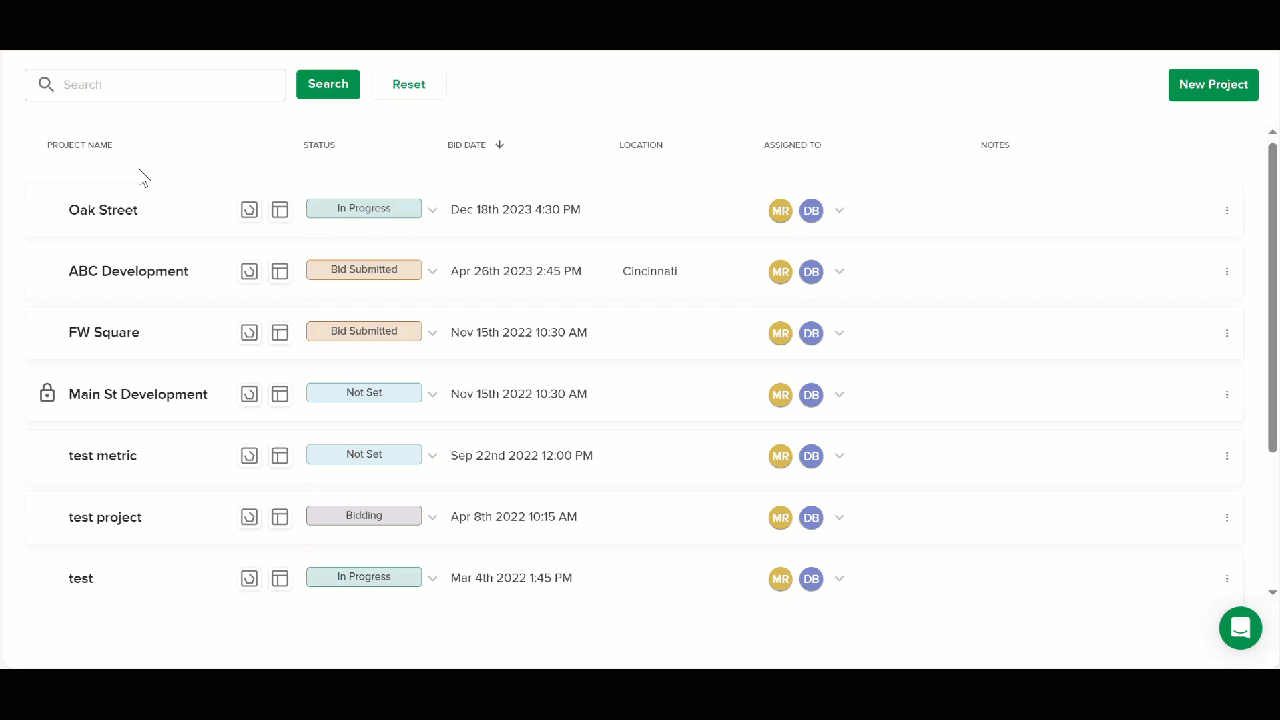
Click the column name you want to sort by once to sort the data in ascending order (A-Z).
An arrow pointing up will appear next to the column name.Click the column name again to sort in descending order (Z-A).
An arrow pointing down will appear next to the column name.
Filter
You can filter your project list by Status and/or Assigned to.
The filters you apply are remembered in session (even if you close the browser and come back later) until you remove them or reset the view.
When filters are applied, the filter icon (shown below) will be visible to the right of the column name at the top of the list, so you know the list is currently being filtered by that information.
.jpg)
To Apply Filters
.gif)
Click on the Filter icon to the right of the column name you want to filter.
(You can only filter the Status and/or Assigned to columns. If filters are not currently applied to the column, you will need to hover your mouse over the column name for the icon to appear.)Click to check the box next to each filter you want to apply.
Clicking the Select All box will apply all filters.Click outside of the filter menu to apply the filter(s).
To remove a filter, uncheck the box next to that filter.
NOTE: If you use Search while filters are applied, it will only return results from the filtered list.
Reset Project List View
Resetting you view will clear any active search AND remove all applied filters, going back to the default project list view.
To reset your view, click the Reset button at the top left of the Project List.

Open a Project
.jpg)
Find the project you want to open on the Project List (PROJECTS tab).
Click on the Project Name.
OR
Click on the three dots to the far right of the project row and select Open in New Tab.
Either of the above options will take you to the project HOME screen.
TIP: The icons* to the right of the Project Name are shortcuts. Clicking will take you directly to the project's TAKEOFF tab (left icon) or ESTIMATE tab (right icon).
*The takeoff icon will be green if a takeoff exists in the project. The estimate icon will be green if an estimate has been created in the project.
.jpg)
Export Project List
The Export Project List option enables you to download a complete list of all projects in your account as a CSV file. This is helpful for tracking project details, reporting, or sharing project data outside of STACK. The exported file includes important information such as project name, status, bid and creation dates, location, and more.
The exported CSV includes the following details (when available):
CompanyId
ProjectId
TakeoffId
CreatedBy
UserId
ProjectName
Status
DateCreated
BidDate
AddressLine1
AddressLine2
City
State
PostalCode
Country
UseMetric
IsPrivate
Notes

Go to the Projects page.
Click the New Project drop-down menu at the top right.
Select Export Project List to CSV.
When the confirmation dialog appears, choose Export to continue.
A message confirms that your project list is being generated.
The CSV file will automatically download to your browser’s default Downloads folder.
Open the file in Excel or another spreadsheet program to view your exported project data.
NOTE
The Export Project List is only available to Account Owners.
Was this article helpful?