Creating and Editing Takeoffs
- Print
- DarkLight
- PDF
Creating and Editing Takeoffs
- Print
- DarkLight
- PDF
Article summary
Did you find this summary helpful?
Thank you for your feedback!
Create a Takeoff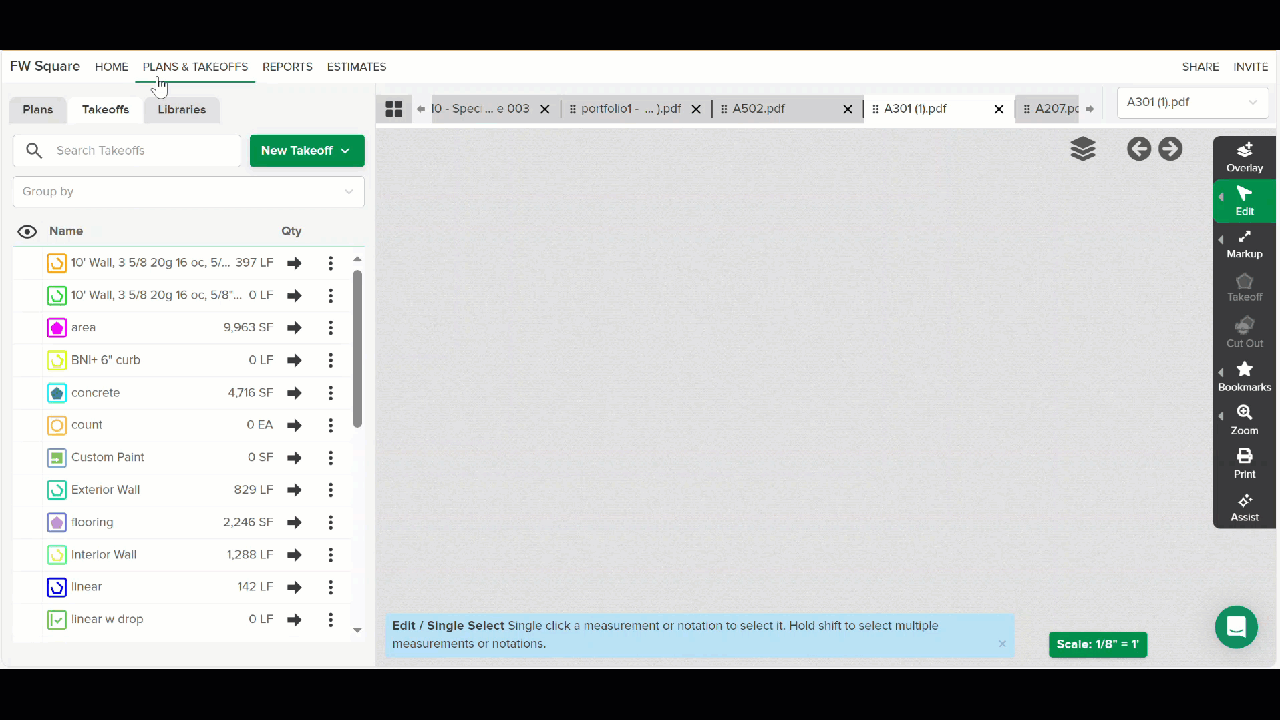
Go to the PLANS & TAKEOFFS section of your project.
Click on the Takeoff tab.
Click New Takeoff.
Select the desired Takeoff Measurement Type from the dropdown.
Enter a Takeoff Name.
(Optional) Enter a Description of the takeoff.
Review the text in the yellow box to ensure you've selected the correct measurement type.
Click the Create Takeoff button to save the takeoff OR click the <- Takeoffs button to discard and start over.
Once you click Create Takeoff, the Takeoff Settings panel will appear where you can change the Appearance; add Tags, Items and Assemblies, or just Start Measuring.
TIP: You can click the Copy or Copy and Modify* button at the bottom of the Takeoff Settings panel to create a copy of the current takeoff. You can change the takeoff name, description, and assembly options as needed.
*The button will say Copy if the takeoff has no assembly or Copy and Modify if an assembly has been added.
Repeat the steps above to create additional takeoffs.
When you create a takeoff, it is added to the Takeoff List. That is where you will be able to open, add measurements/counts, edit, or delete the takeoff if needed.
Add Measurements or Counts
NOTE: The default measurements system in STACK is imperial but you can Change Measurements to Metric if needed.
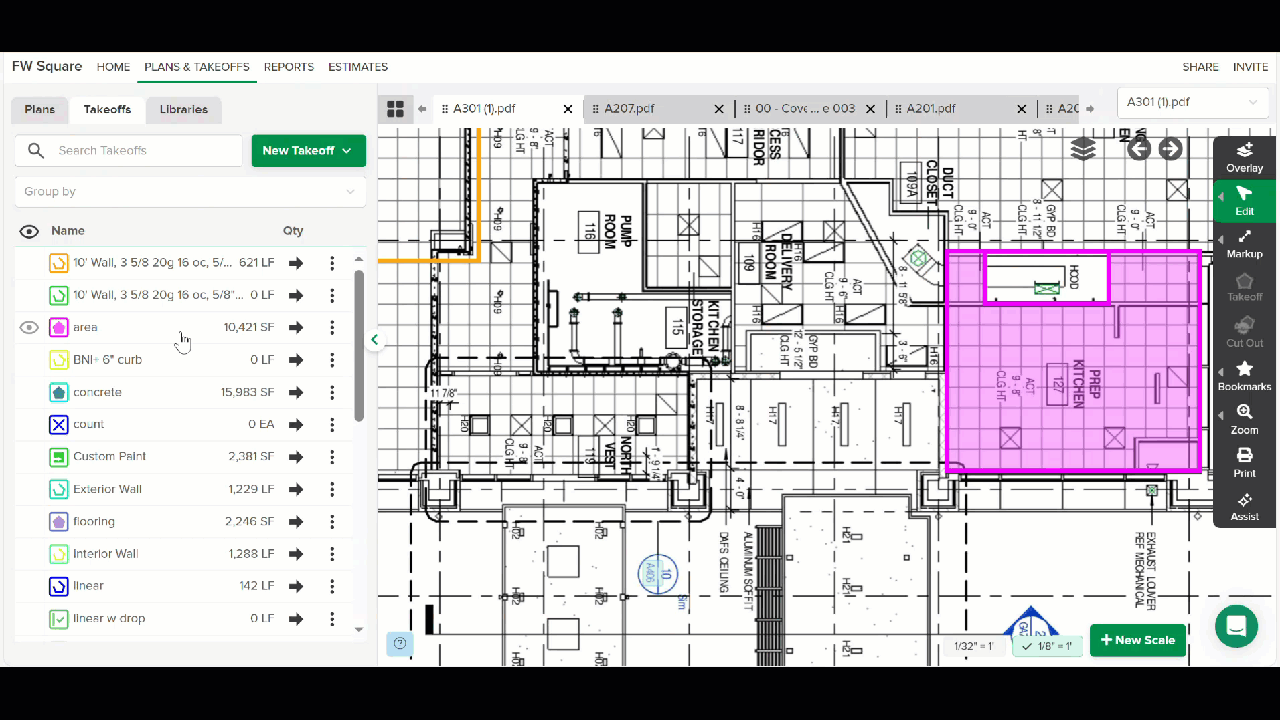
Open the plan sheet you want measure.
Click the takeoff that you want measurements/counts applied to on the Takeoff List OR Create a Takeoff.
Click Start Measuring. (You will be prompted to set the scale if you haven't already.)
(Optional) On the left side panel, you can add a Multiplier or Label if needed.
TIP: Labels allow you to group and organize your takeoff data.Go to Takeoff on the right toolbar and click tool you want to use to draw your measurement/count.
NOTE: The options available on the toolbar (Autocount, cutout, rectangle, and shape tools, etc.) vary based on the Takeoff Measurement Type.Click once on the plan where you want to begin measuring. (For counts, just click where you want to place the count on the plan.)
If using the polygon tool, click again when you want to change direction, then double click or press enter to complete a measurement. (See section below if you need to measure an arc.)
If using the rectangle tool, drag your mouse to expand the rectangle to cover the area you're measuring, then double click or press enter to complete a measurement.
TIP: When drawing a measurement, it will automatically snap to the nearest intersecting lines (like the corner) of an existing measurement as you draw closer to the existing measurement. This can make drawing measurements faster and more accurate, but you can press S on your keyboard to turn the snap function off if you want. Just press S again to turn it back on.
Repeat step 5 for everything you want to measure/count for this takeoff.
TIP: You can click on the tab of any open plan sheet along the top of the takeoff canvas and continue drawing measurements/counts on those sheets for the selected takeoff.Once you’re done measuring for the selected takeoff, click Finish Measuring on the left side panel.
The total measured quantity will be displayed next to the takeoff name on the Takeoff List.
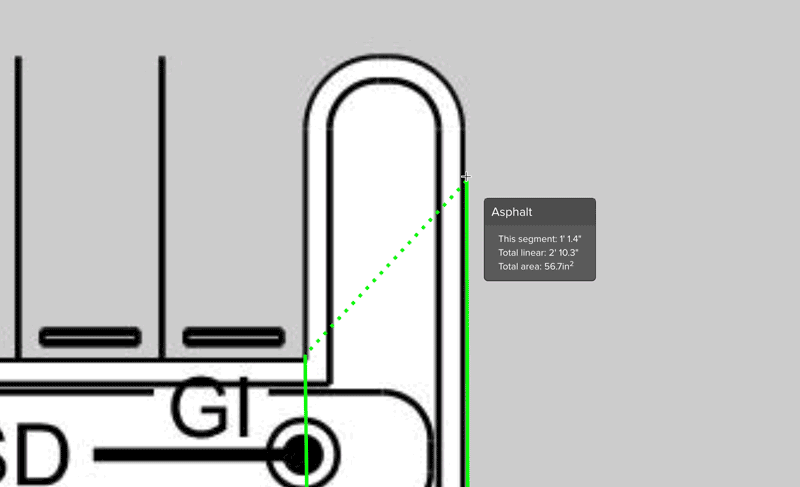
Measure an Arc
STACK offers the ability to easily measure arcs while using the Line or Shape Takeoff tools.
An arc can be created at any time while measuring by pressing the “A” key and can be used multiple times during a measurement. An arc can also be a starting point by pressing the "A" key prior to starting a measurement.
Here are the steps to create an arc:
Press A on your keyboard to create an arc segment (you can also click on the arc icon in the upper right).
The line color will turn blue indicating you are ready to create an arc.Click midway along the curve of the arc.
Click on the last point of the arc, and continue with your straight line measuring.
It's also possible to cut out an area of a shape that contains an arc.
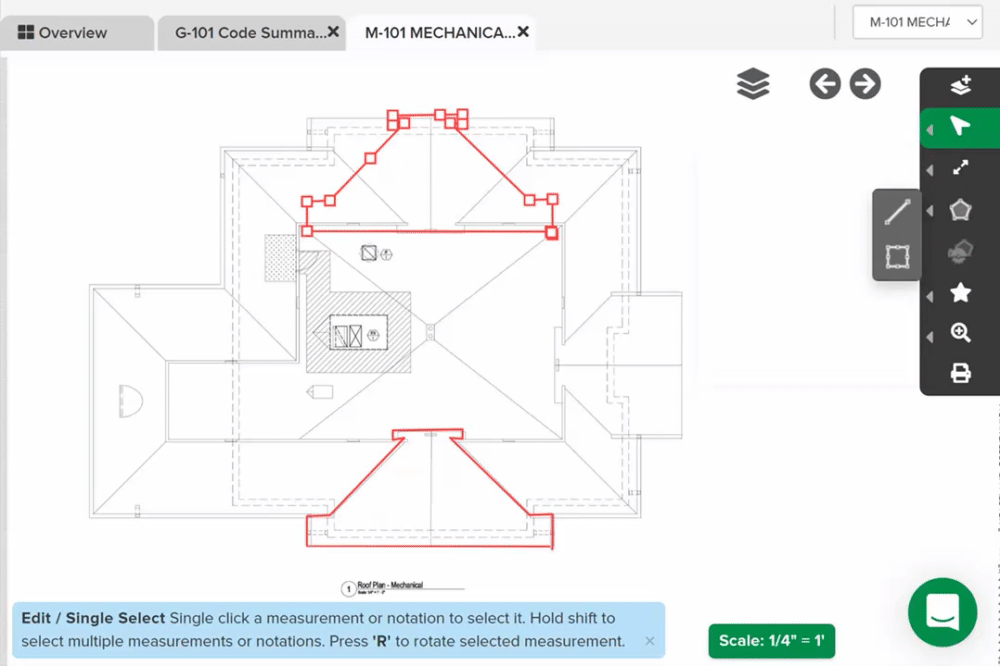
Select Measurements and Annotations
You can select individual measurements/annotations, multiple measurements/annotations, or all measurements and annotations on a plan sheet to edit or delete at one time.
Select Individual Measurement or Annotation
Go to Edit on the right toolbar and click Single Select.
Click on the measurement or annotation you want to select.
TIP: You can select additional measurements/>annotations by pressing the shift key while clicking on the measurements/annotations.
Select Multiple Measurements/Markups
Go to Edit on the right toolbar and click Multiselect.
Click and draw a box around the area that includes the measurements/markups you want to select.
(All measurements/markups within the area of the box you draw will be selected.)
TIP: You can select additional measurements/markups by pressing the shift key while clicking on the measurements/markups.
Select All Measurements and Markups
Go to Edit on the right toolbar and click Select All.
(All measurements and markups on the plan sheet will be selected.)
TIP: You can also use hot keys CTRL + A or COMMAND + A to select all.
Copy and Paste Measurements
From the toolbar on the right side, select edit and choose “Select Single” to select one measurement, “Multiselect” to select multiple measurements , or "Select All" to select all measurements on the page.
Hover over the desired measurement(s). Click once for single select or draw a box around the desired area if using multiselect.
Once selected, you can use the appropriate hotkeys ('ctrl' 'c' for windows computers, 'command' 'c' for Mac), or navigate back to the edit option in the right toolbar and select the 'copy' function to duplicate the measurement details (including attached items and assemblies)
To paste, move your mouse to the area you would like to paste the takeoffs and use the appropriate hotkeys to paste them in that spot ('ctrl' 'v' for windows computers, 'command' 'v' for Mac) or navigate back to the edit option in the right toolbar and select the 'paste' function for the measurements to appear in the top left of the page.
Rotate Measurements
Helpful when used with copy/paste for multiple like measurements with different orientations.
Select the measurement(s) you want to rotate.
Go to Edit on the right toolbar and select Rotate to enable 360º rotation of the selected measurement(s).
TIP: You can also use keyboard shortcut R to enable Rotate.Click and hold the rotate handle and move your mouse to rotate the selected measurement(s).
Change Takeoff
The Change Takeoff tool allows you to move measurements from one takeoff to another existing takeoff or a new takeoff.
The Takeoff Measurement Type of the current takeoff and the takeoff to which you want to move measurements must be compatible. For example, Linear, Pitched Linear, Surface Area, and Volume 3D are compatible Takeoff Measurement Types since they represent lines and Area, Pitched Area, and Volume 2D are compatible since they represent areas. All the measurements you are moving must also be compatible with the measurement type.
See Takeoff Measurement Types for more information.
.gif)
Go to the Takeoffs tab and open the plan sheet containing the measurement(s) you want to assign to a different takeoff.
Select the desired measurement(s).
Click/hover on Edit on the right toolbar.
Select Change Takeoff from the menu. (A new dialog box will open.)
Click in the To field.
Choose an existing takeoff or create a new takeoff where you want to move the measurement(s).
To select an existing takeoff, Search or scroll through the dropdown list to locate the takeoff you want and click the takeoff name.
NOTE: Only takeoffs with compatible Takeoff Measurement Types will be available in the dropdown.
ORTo create a new takeoff, click + New Takeoff at the top of the dropdown list.
Click in the Takeoff Name field and type a name for the new takeoff.
Click in the Takeoff Type field and select the desired Takeoff Measurement Type from the dropdown list.
There may be additional fields to complete depending on the measurement type - enter additional info as required.
If you are moving multiple measurements with different inputs, you will have the option to keep the original measurement inputs or change them all to a single input.
To keep the original inputs, check the Keep measurement inputs as is box.
ORTo assign all the measurements the same input, enter the new input.
Click the green Change button.
TIP: If you selected multiple measurements and are unable to use this tool, you may have selected incompatible measurements.
Use a Multiplier
If you have a multi-floor project with a repeating floor plan or a large project that uses the same size windows throughout, using the Multiplier on your measurements can save you a lot of time. The Multiplier allows you to measure/count once and multiply that data by a number of your choice to get the total measurements/counts you need.
If you have an item or assembly attached to the takeoff, material quantities will also be multiplied.
A Multiplier can be applied when you create a takeoff or to existing measurements/counts.
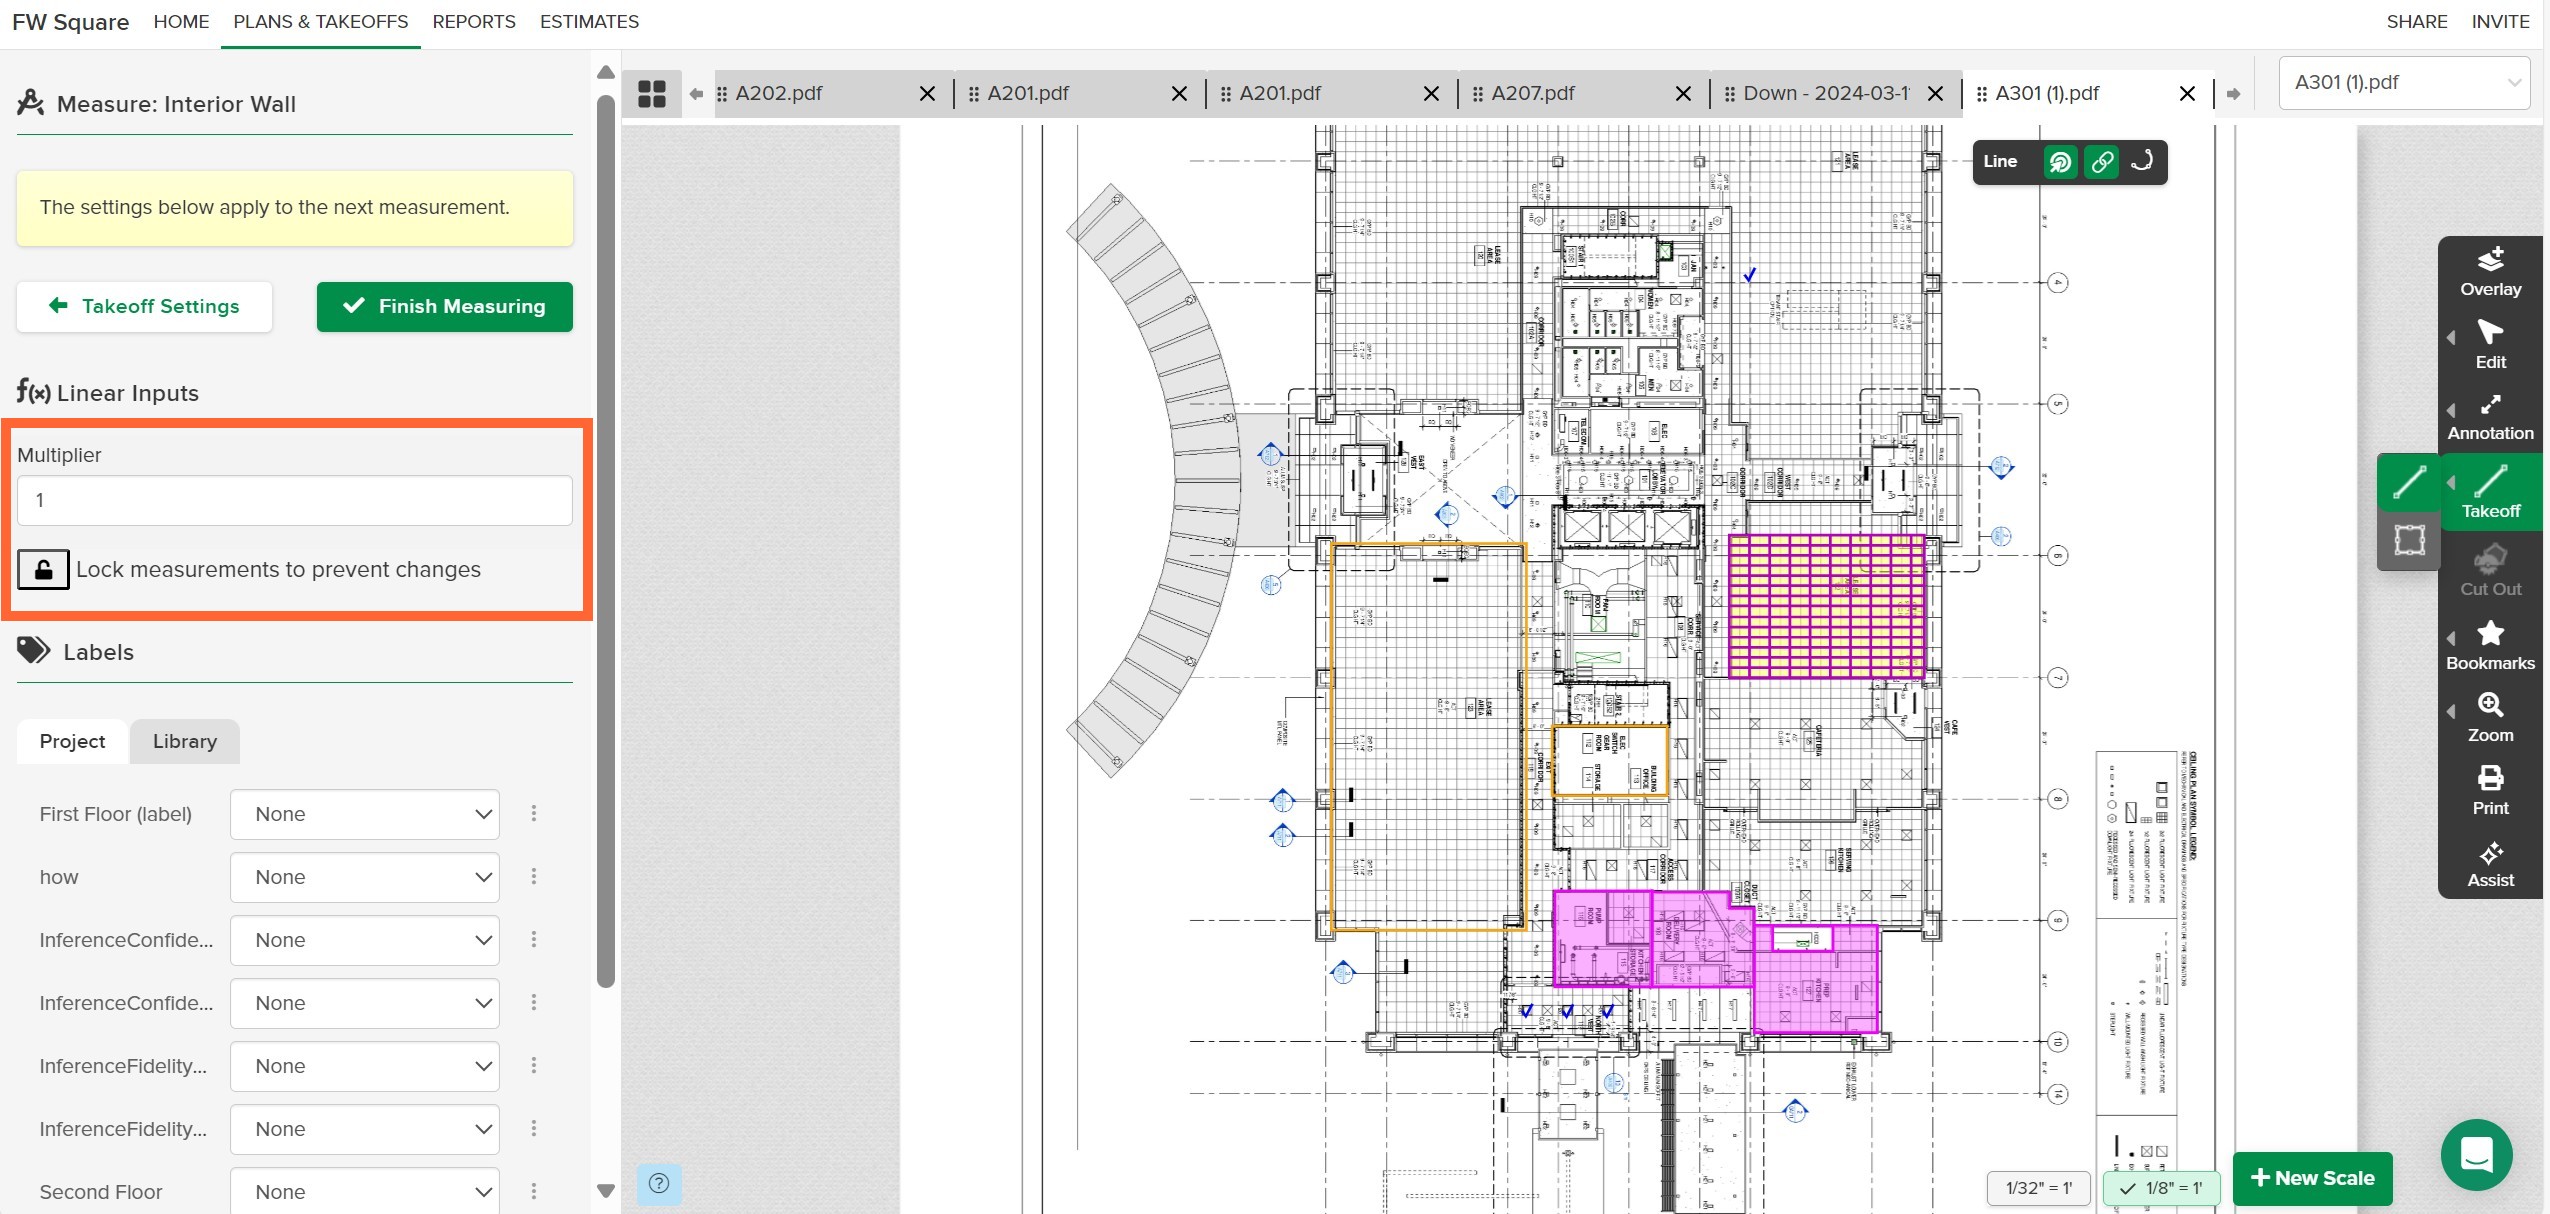
Apply a Multiplier When Creating a Takeoff:
After you enter the takeoff details and click Start Measuring, you’ll see the Multiplier box under the ‘Measurement Type’ Inputs.
Click in the box and enter the number you want to multiply by.
Click the Save button.
Draw the measurement(s)/count(s) needed for the takeoff.
Once you click Finish Measuring, all the measurements/counts that you added will be multiplied by the Multiplier number you entered.
Apply a Multiplier to Existing Measurements/Counts:
Open the plan sheet containing the measurement(s)/count(s) that you want to multiply.
Select the measurement(s)/count(s) to which you want to apply a Multiplier.
TIP: You can apply the Multiplier to several takeoffs of different types at once. However, takeoffs that have different values assigned to the same variable inputs (height, rise, run, width, drop length and/or depth) can't be updated simultaneously.Click in the Multiplier box on the left panel and enter the number you want to multiply by.
Click the Save button.
The measurement(s)/count(s) that you selected will be multiplied by the Multiplier number you entered.
TIP: Clicking the Lock icon below the Multiplier box will lock your multiplier number (and any other inputs) and apply it to any existing measurements/counts on the takeoff as well as any new measurements/counts added to the takeoff. You will not be able to select and change the multiplier for individual measurements on the takeoff unless you click the Lock icon again to unlock it.
Related Articles
Autocount
Set the Scale
Using Label Groups
Annotation Tools
Plan Overlay
STACK Reports Overview
Was this article helpful?