Create, Edit, or Delete Custom Assemblies
- Print
- DarkLight
- PDF
Create, Edit, or Delete Custom Assemblies
- Print
- DarkLight
- PDF
Article summary
Did you find this summary helpful?
Thank you for your feedback!
Why Create a Custom Assembly
STACK provides a number of pre-built assemblies that will easily work for most projects, but in certain cases you may want to expand them to include additional items for your trade or build a brand new assembly to represent a unique building condition or material system to fit your exact needs. Creating a custom assembly allows you to incorporate items specific to your work.
Once you've created an assembly, it's available for you to re-use project after project, and you can edit or delete it at any time if needed.
Best Practices
Custom assemblies are created and saved within Custom Libraries under Libraries. We strongly recommend that you create a folder structure there to help organize your custom assemblies and that you give your assemblies detailed names so you can easily find what you need as your library of custom assemblies grows.
TIP: You can click and drag assemblies to easily move them from one folder to another within a Custom Library.
Ways to Create a Custom Assembly
Create an assembly from scratch.
Copy a pre-built assembly and customize it to suit your needs.
This can be an assembly you've previously created in one of your Custom Libraries, or an assembly from the STACK, Quick Start, 1build, BNi, or other assembly library.
Copy and Customize a Pre-built Assembly
You cannot change a pre-built assembly in a STACK or other vendor supplied library like BNi or 1build. However, you can copy these pre-built assemblies (or an assembly you've previously created) to one of your Custom Libraries and customize from there. The copied assembly will have the same items, same structure, and same formulas as the original.
TIP: We recommend this method if you only need to add a few more items to the assembly.
NOTE: Only Account Owners and users assigned the necessary permission can copy/edit an assembly. See Custom Libraries for more info.
.gif)
Click Libraries on the main navigation toolbar.
Click the Assemblies tab.
Select the library containing the assembly you want to copy from the Library dropdown.
Locate the assembly you want to copy.
If it is in a STACK supplied or other third party library, click on the assembly name.
If it is in one of your Custom Libraries, click the three dots to the right of the assembly name.
Click Save As.
If the assembly is in a STACK supplied or other third party library, Save As will be a button at the bottom of the Assembly Information screen that opens when you click on the assembly name in step 4.
If the assembly is in one of your Custom Libraries, Save As will be an option on the menu that appears when you click the three dots in step 4.
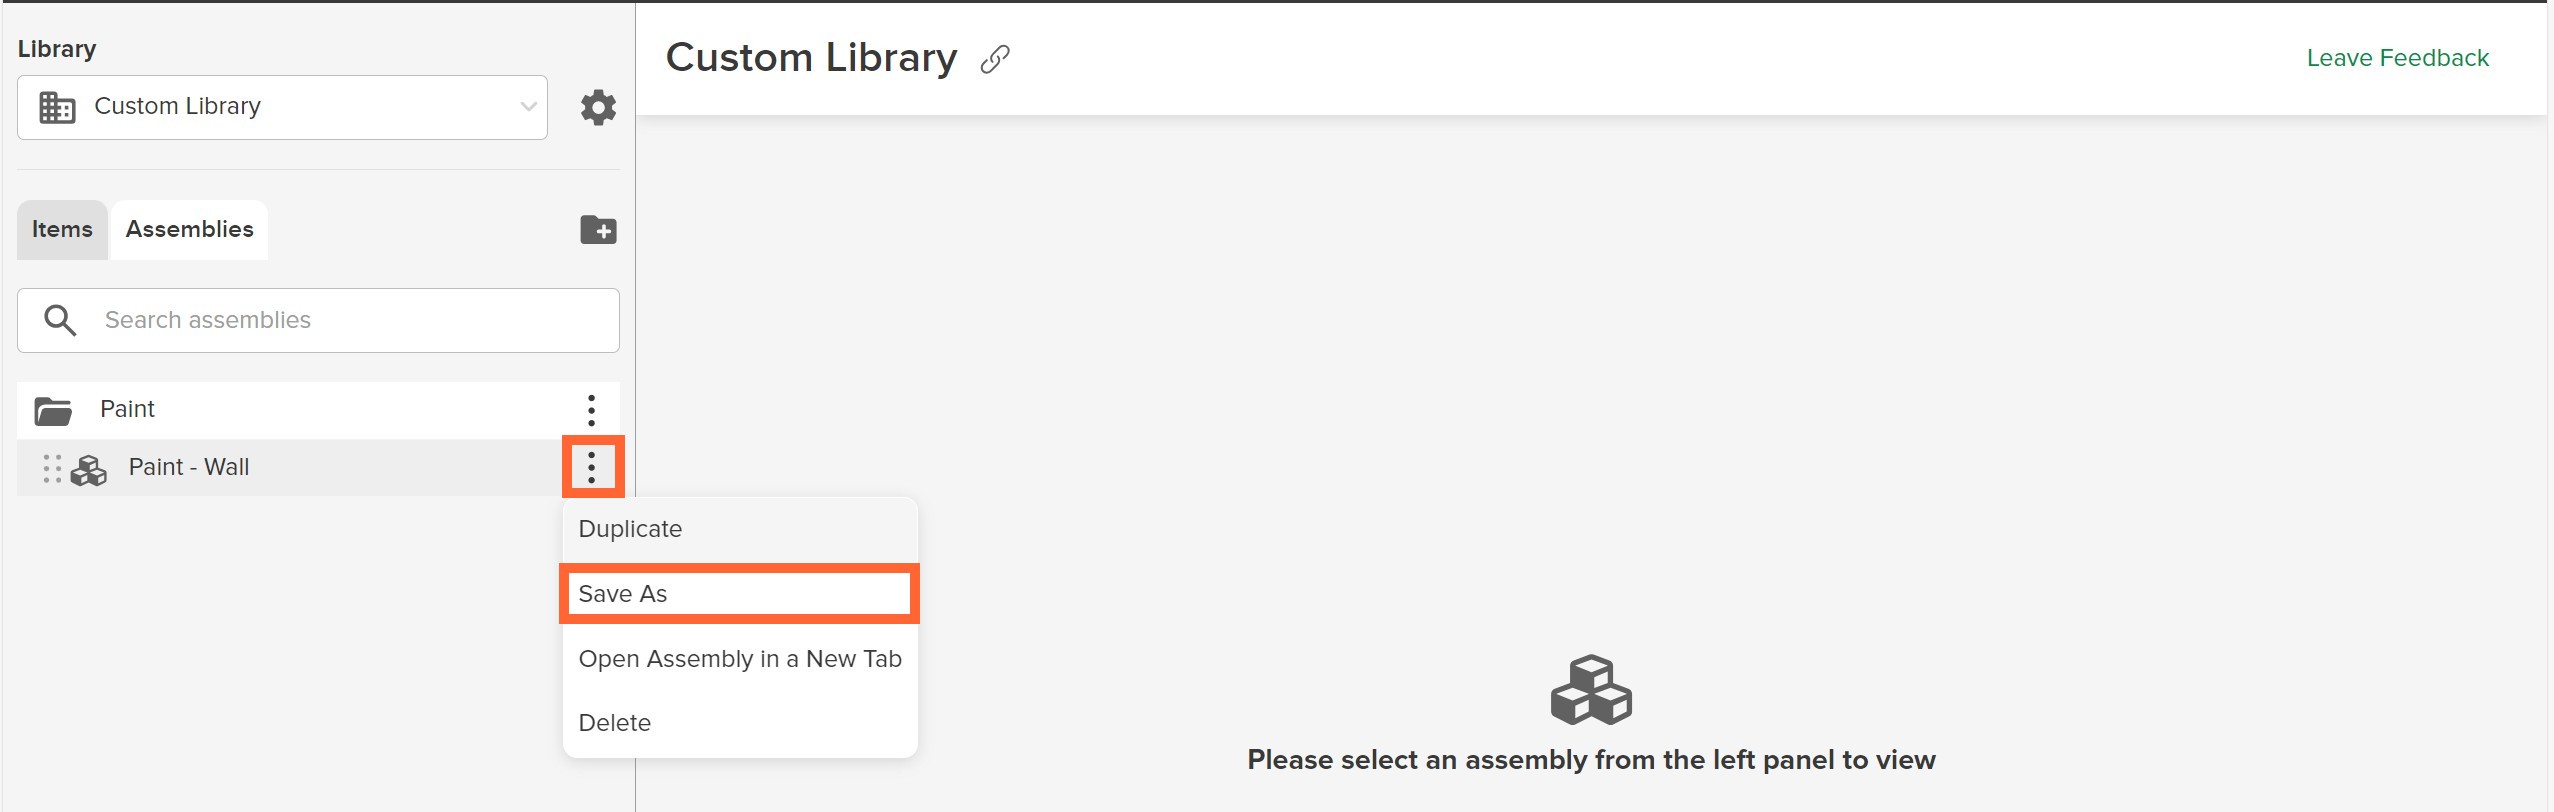
TIP: If the assembly is in one of your Custom Libraries and you select Duplicate instead, it will create a copy of the assembly in the same Custom Library and folder as the original assembly.
Type in a new Assembly Name. (We recommend changing the name to avoid confusing the copied assembly with the original assembly.)
Click in the Library dropdown and select the custom library where you want to save the copied assembly.
Search Library or click on the displayed folders for an expanded list view to locate the folder where you want to save the copied assembly and click on that folder.
NOTE: If no folders are showing, you have probably not yet created any folders in the custom library you selected. You will need to create a folder in that library before you can proceed with the copy assembly process.Click Save. The assembly will now be available in your selected library.
Make any desired changes to the new assembly.
NOTE: For data to compute properly on your estimates, the items added to an assembly must have a unit of measurement that matches/is compatible with the assembly unit of measurement. See Unit of Measurement Mismatches for more info.
Create a Custom Assembly
Creating your own custom assembly gives you complete control over the structure, which items are included, and the formulas of each item.
NOTE: Only Account Owners and users assigned the necessary permission can create an assembly. See Custom Libraries for more info.
.jpg)
Click Libraries on the main navigation toolbar.
.gif)
Click the Assemblies tab.
Click in the Library dropdown and select the Custom Library where you want to create the assembly.
Locate the folder where you want to save the assembly. (Create a new folder if needed.)
Click the green + that appears when you hover over the folder.
OR
Click the three dots next to the folder and select Add New Assembly.Type in a name for the assembly where is says New Assembly (highlighted in blue).
TIP: If you need to create multiple assemblies to measure the same building condition in different ways, if can be helpful to include the assembly measurement type at the end of the name so you can quickly identify which assembly you need. Example: Steel Beam - Linear and Steel Beam - CountEnter the assembly information.
Assembly Number (Optional)
You can enter number of your choosing to reference the assembly. The Assembly Number can be used in the Search Items bar to locate the assembly in the Library.Unit of Measure (Required)
Choose one of the listed values from the dropdown. This determines the Takeoff Measurement Type that can be used with this assembly. NOTE: This field is locked as soon as you save the assembly and cannot be changed.
TIP: If you're unsure which takeoff measurement type you may use, you can select Each so you can add the assembly to any takeoff and then use different takeoff variables in the formula of each item to get the data you need.Assembly Description (Optional)
You can enter a description of the assembly - how it functions or any requirements/specifications. This description will only appear on the Assembly Information screen.
Click Save.
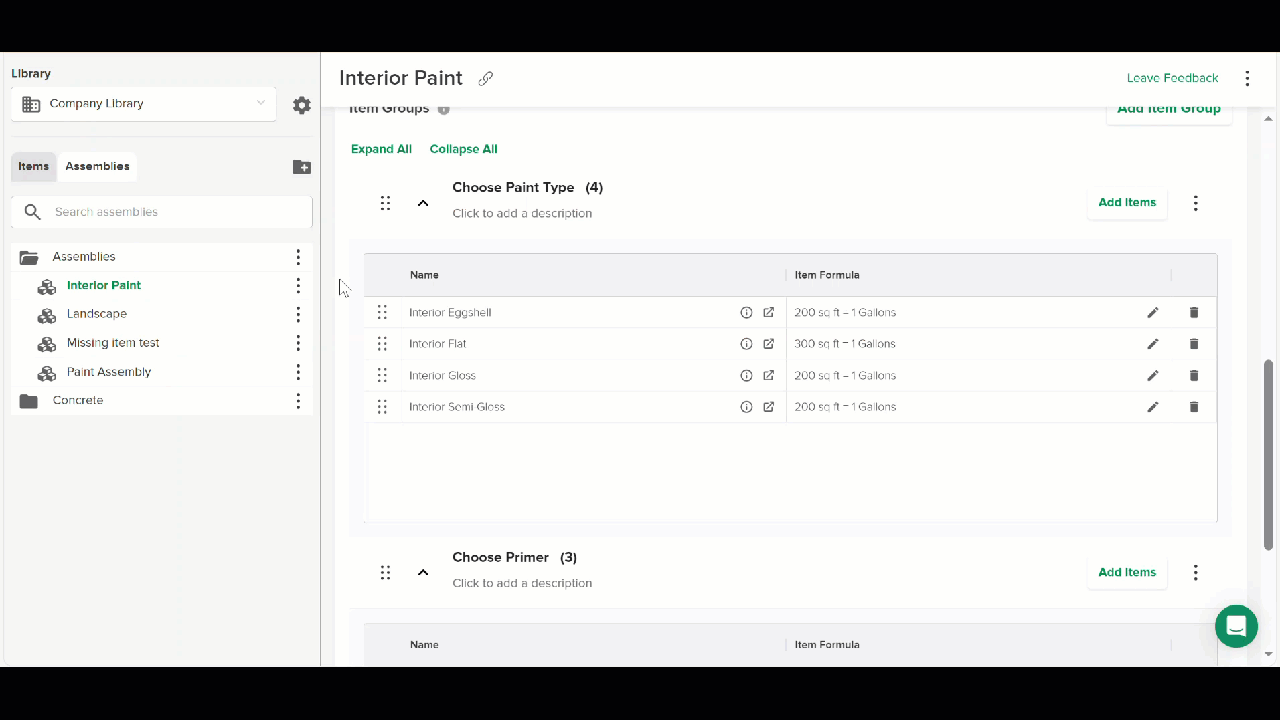
Now you can add Required Items and/or Item Groups to the assembly.
Add Required Items
Required Items are a great way to save time and eliminate potential errors in item selections since these items will automatically appear on the Item Reports and Estimates every time you use the assembly. You can add items from any available item library to Required Items.
Using BNi or ibuild items will allow you to apply national or regional cost data to Material and Labor Estimates.
NOTE: For data to compute properly on your estimates, the items added to an assembly must have a unit of measurement that matches/is compatible with the assembly unit of measurement. See Unit of Measurement Mismatches for more info.
.gif)
Go to the Required Items section and click Add Item.
Click the Library dropdown and select the library that contains the item(s) you want to add.
Search Library or click on the displayed folders for an expanded list view to locate the item(s) you want to add.
Click the green + next to each item you want to add to the assembly.
Repeat steps 2-4 to add items from other libraries.
Click the Add button.
TIP: You can click the dots to the left of each item and drag to reorder the Required Items list.You can now create/add Items Groups (instructions below) if needed.
TIP: Hovering over the info icon next to each Required Item will show the item's coverage rate and clicking the arrow icon will take you to the item's information screen.
Click the edit (pencil) icon to access the Formula Editor and change the Item Formula or click the trash icon to remove a Required Item from the assembly.
.jpg)
NOTE: Required Items can have custom formulas. Custom variables for required items will be listed along with other custom variables for items in Item groups, you just won't see the required item on the Edit Assembly screen.
Create Item Groups
Item Groups let you add optional items to your assembly or select an item that's conditional upon selecting an item from another group.
You can create multiple Item Groups, add items from any available item library to any Item Group, and you can add the same items to multiple Item Groups in the same assembly.
TIP: Since you can only choose one option from each item group, we recommend creating additional Item Groups with the same item list if you need to choose additional items from the same group. Example: If you need to choose drywall for both sides of a wall, but are installing different types on each side, create two item groups - one named Side 1 and the other named Side 2 - with the same items to represent each side of the wall.
.gif)
Go to the Item Groups section and click Add Item Group.
Type in a name for the item group where is says New Item Group (highlighted in blue).
TIP: Consider starting the name of item groups that require a selection with "Choose" and groups that are optional with "Add" Example: Choose Stud Height, Add Headers(Optional) Click where it says Click to add a description below the name and type in a description of the Item Group.
Click Add Items to the right of the Item Group name.
Click the Library dropdown and select the library that contains the item(s) you want to add.
Search Library or click on the displayed folders for an expanded list view to locate the item(s) you want to add.
Click the green + next to each item you want to add.
NOTE: For data to compute properly on your estimates, the items added to an assembly must have a unit of measurement that matches/is compatible with the assembly unit of measurement. See Unit of Measurement Mismatches for more info.Repeat steps 5-7 to add additional items from other libraries.
Click the Add button.
Repeat the entire process to create as many additional Item Groups as needed for the assembly.
TIP: The order you select items will be the order they appear in the Item Group, but you can click the dots to the left of each item and drag to reorder the list.
Likewise, if you create multiple Item Groups, they will be listed in the order in which they are created. However, you can click the dots to the left of each Item Group and drag to reorder the list.
TIP: Hovering over the info icon next to each item in an Item Group will show the item's coverage rate and clicking the arrow icon will take you to the item's information screen.
Click the edit (pencil) icon to access the Formula Editor and change the Item Formula or click the trash icon to remove an item from the Item Group.

To delete an entire Item Group from the assembly, click the three dots to the right of the Item Group name, select Delete Group, and click the red Delete button to confirm.

Unit of Measurement Mismatches
For data to compute properly on your estimates, the items added to an assembly must have a unit of measurement that matches/is compatible with the assembly unit of measurement.
For example, adding an item with a sq ft unit of measurement to an assembly with a lin ft unit of measurement would cause an error on your estimates because the assembly would be missing the second dimension needed to compute square feet.
There are some cases where item and assembly units of measurement don't match but still compute properly. For example, if the item unit of measurement is linear feet and the assembly unit of measurement is square feet, STACK can calculate the linear feet of the item by taking the perimeter of the polygon used to measure the assembly.
The table below shows item and assembly unit of measurement matches and acceptable “mismatches.”
In cases where the item and assembly units of measurement don't match and aren't an acceptable "mismatch," you can create a custom formula to provide the additional data needed to avoid errors on your estimates.
Acceptable Mismatches - Assembly / Item Units of Measurement
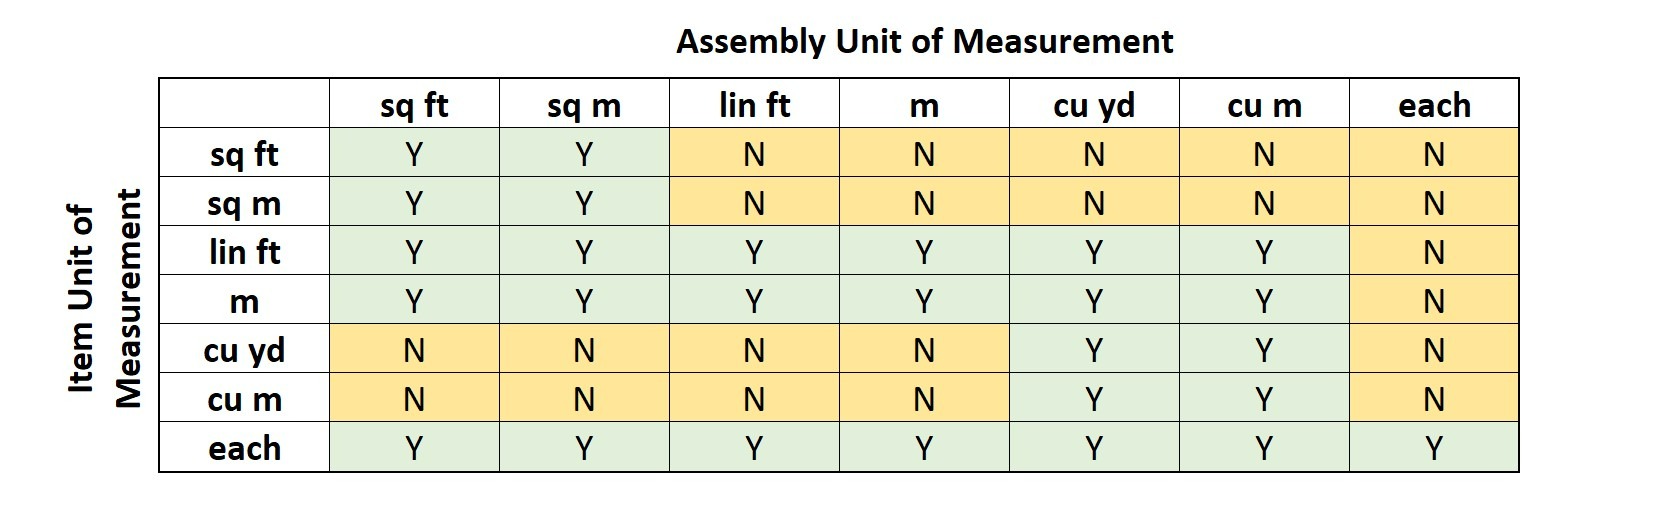
The Y cells in the table show the item and assembly unit of measurement combinations that work together without the need for custom formulas.
The N cells indicate unit of measurement combinations that will prompt error warnings (example below) on the assembly information screen and produce a ZERO Qty on your estimates unless you create a custom formula.
.jpg)
Edit or Delete a Custom Assembly
You can only edit or delete assemblies in your Custom Libraries; NOT assemblies in the STACK, QuickStart, 1build, BNi, or other assembly libraries.
NOTE: Editing or deleting an assembly will affect ALL projects that contain that assembly.
We recommend that you download and/or Create Snapshot of existing reports, estimates, and estimate worksheets for projects that use the assembly you want to edit or delete, prior to making the changes, so you have a record of the original reports and estimates.
NOTE: Only Account Owners and users assigned the necessary permission can delete an assembly. See Custom Libraries for more info.
Edit an Assembly
Click Libraries on the main navigation toolbar.
.gif)
Click the Assemblies tab.
Select the Custom Library that contains the assembly you want to edit from the Library dropdown.
Locate the assembly you want to edit and click on the assembly name to open it.
Make your desired edits.
You can edit the Assembly Name, Assembly Number, Assembly Details, or Item Group Name - just click in the desired field and type in the new info.
You can add or remove Required Items, Item Groups, or items within an Item Group.
(Refer to Add Required Items and Create Item Groups above for detailed instructions if needed.)
Delete an Assembly
Click Libraries on the main navigation toolbar.
Click the Assemblies tab.
Select the Custom Library that contains the assembly you want to delete from the Library dropdown.
Locate the assembly you want to delete and click the three dots to the right of the assembly name.
Click Delete.
Click the red Delete button to confirm.
Related Articles
What is an Item
Bulk Import Custom Items to STACK
What is an Assembly
Working with Item Formulas in Assemblies
Mastering Custom Formulas
Excel Functions in Formulas
Was this article helpful?