- Print
- DarkLight
- PDF
Custom Libraries
- Print
- DarkLight
- PDF
If your team works on different types of projects or in different locations, it may be helpful to organize your custom items/assemblies and saved takeoffs based on project type or location. Custom Libraries give you the ability to do that.
You can create as many Custom Libraries in your STACK account* as you'd like to group your custom items/assemblies and saved takeoffs in any manner that suits your workflow. You have the ability to restrict which members of your team have access to the libraries - you can assign different permission levels to individual users or offices for each library and assign libraries to specific projects. You can also customize the list of purchase units available within each library.
Custom Libraries allow you to make sure your team only has access to information that is relevant to the specific projects they're working on, which can help them work more efficiently and accurately.
*You cannot create Custom Libraries if your account has Published Catalogs.
Custom Library Permissions
There are a number of different permission levels related to Custom Libraries that determine which libraries are visible to a user in different areas of STACK and what actions the user can perform. The permissions you assign determine if a user can create or delete libraries, edit the data within a library, or only view the library. Some permissions are assigned at the account level in Account Settings, some are assigned within each Custom Library, and some are determined at the project level. This gives you a lot of flexibility and control over what access each user has to each library.
NOTE: Users assigned the Account Owner role have ALL permissions and can create/delete/edit/view everything. You cannot limit Account Owner permissions.
Account Level Permissions
To be able to create a Custom Library in the account, a user must be assigned the Can create libraries permissions in Account Settings.
To be able to delete a Custom Library in the account, a user must also be assigned the Can delete libraries permissions in Account Settings.
(See Assign and Manage Account Users for instructions on assigning these permissions.)
Library Level Permissions
Within each Custom Library you create, you have the ability to assign View, Create, and/or Delete permissions to Offices and/or individual Users within your account.
View - Allows the user to view items, assemblies, and takeoffs within the Library and assign the Library to projects.
Create - Allows the user to create and edit folders, items, assemblies, and takeoffs within the Library; and move items and assemblies to different folders within the Library.
Delete Permission - Allows the user to delete an item, assembly, or takeoff within the Library.
(See Create a Custom Library section below for instructions to assign Office and User Permissions.)
If you assign permissions to an Office in a library, any individual user you add to that library will automatically be assigned the same permissions as the Office to which they are assigned. You can add additional library permissions to the user, but you cannot remove any permissions from the individual user that are assigned to their Office.
NOTE: The user that created the library will be assigned all User Permissions within that library (View, Create, and Delete). You cannot remove any permissions from this user in the library. This ensures at least one user always has all permissions within the library.
It is also important to note that the User Permissions and Office Permissions that are assigned within a Custom Library only apply to that specific Library.
NOTE: Users with Viewer Roles assigned in Account Settings (Viewer, Project Creator, IT Admin) are not able to view Libraries regardless of Library level permissions assigned.
Project Level Permissions
You can assign Custom Libraries to individual projects from the project HOME screen under Project Settings/Project Libraries. (See Create a Project and Add Project Information for instructions on how to do this.)
When libraries are assigned to the project, only the assigned libraries will be visible in the project Library menu/Libraries tab and available to users when adding Items and Assemblies to a takeoff in the project.
Create a Custom Library
NOTE: Only users assigned Can create libraries permissions in Account Settings can create a library.
You cannot create a Custom Library if your account has Published Catalogs.
.jpg)
Click Libraries on the main navigation toolbar.
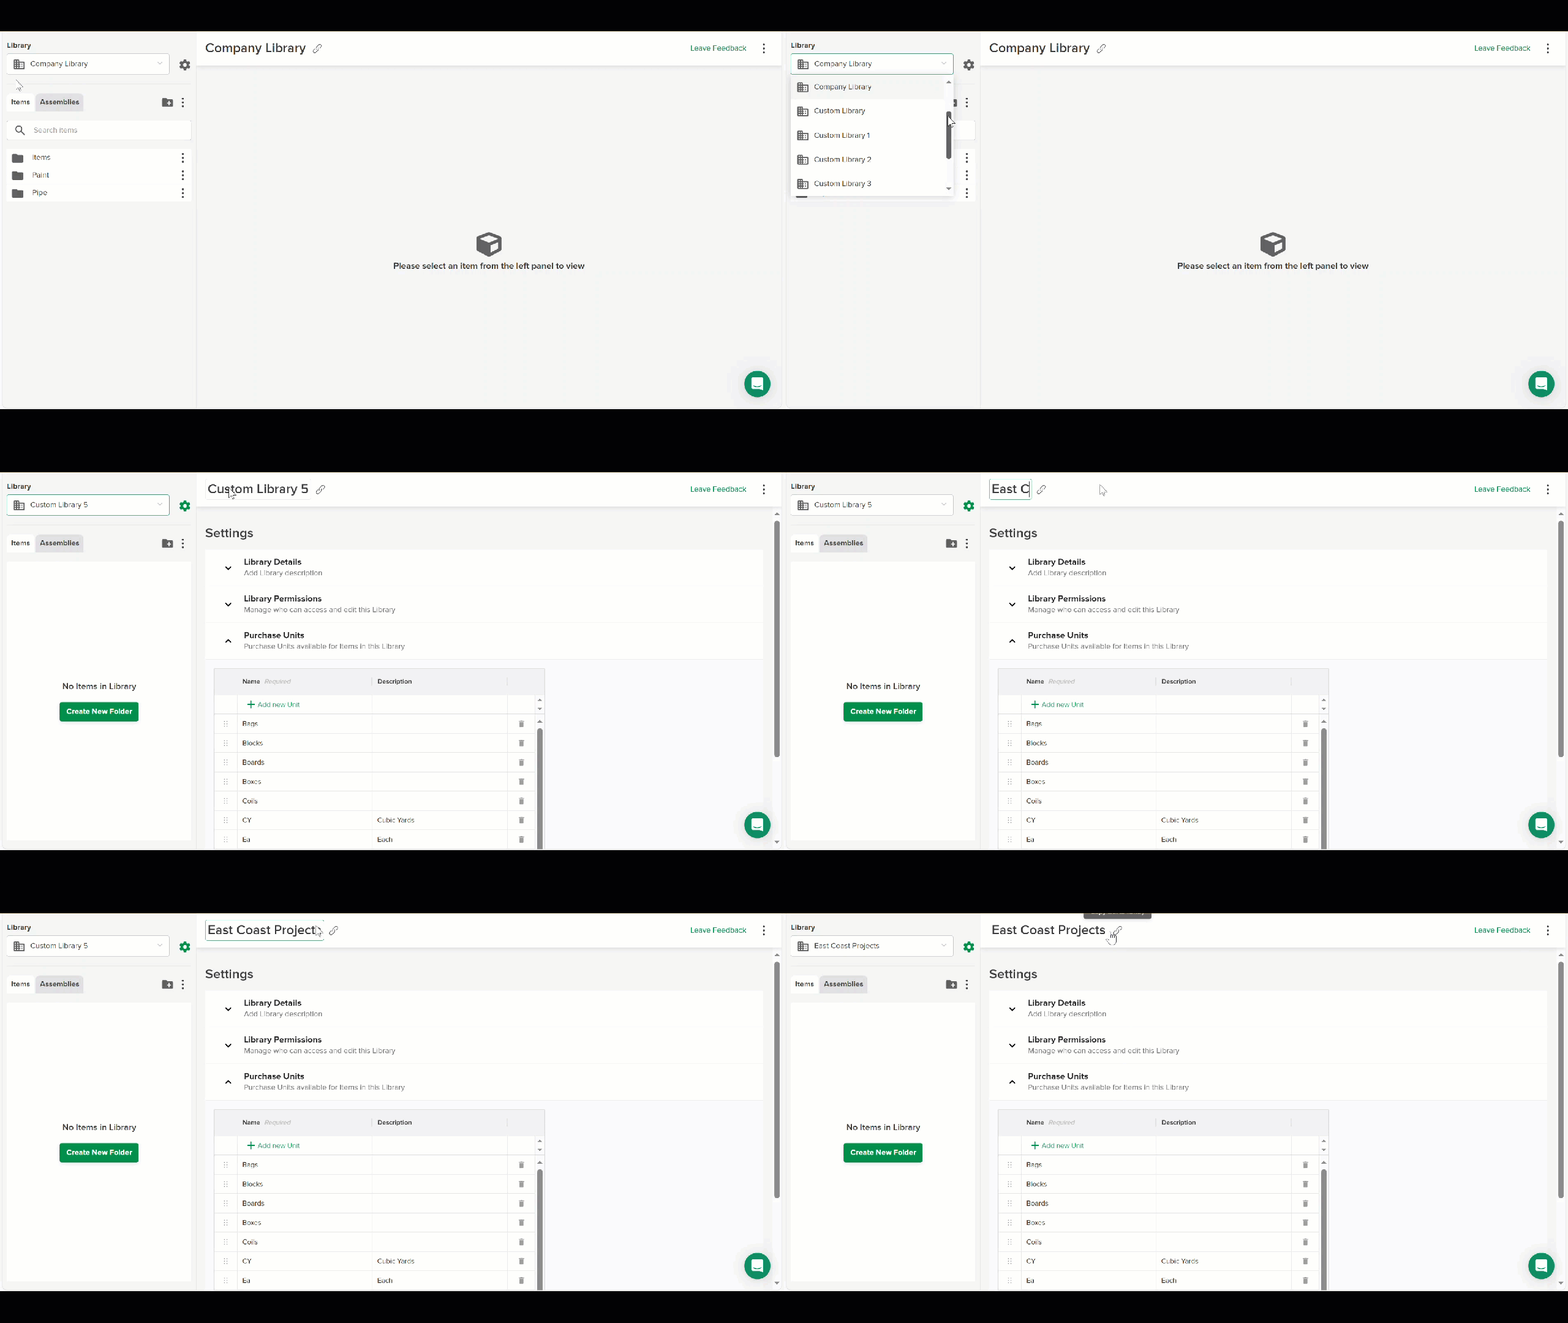
Click in the Library dropdown and select +New Library. (It is at the top of the dropdown list.)
NOTE: If you do not see + New Library in the dropdown, you do not have permissions to create a library.Name the library - click on the default library name (Custom Library) at the top left of the screen and type in the name you want.
TIP: The link icon next to the Library name provides a direct link to the library. You can share the link with other users who have permission to access the library..gif)
Click on Library Details.
(Optional) Type in a description of the library in the Library Description field.
TIP: The description will appear below the library name in the Library dropdown. We recommend entering a description that will help users know what data the library contains.Make sure the Evaluate formulas that use the Each unit of measure using field is displaying the correct measurement system. Imperial is the default but you can click in the field and select Metric if needed.
NOTE: It is important that you have the appropriate measurement system selected for your work so assembly formula data related to Items with the "Each" unit of measure calculates properly in STACK. More info.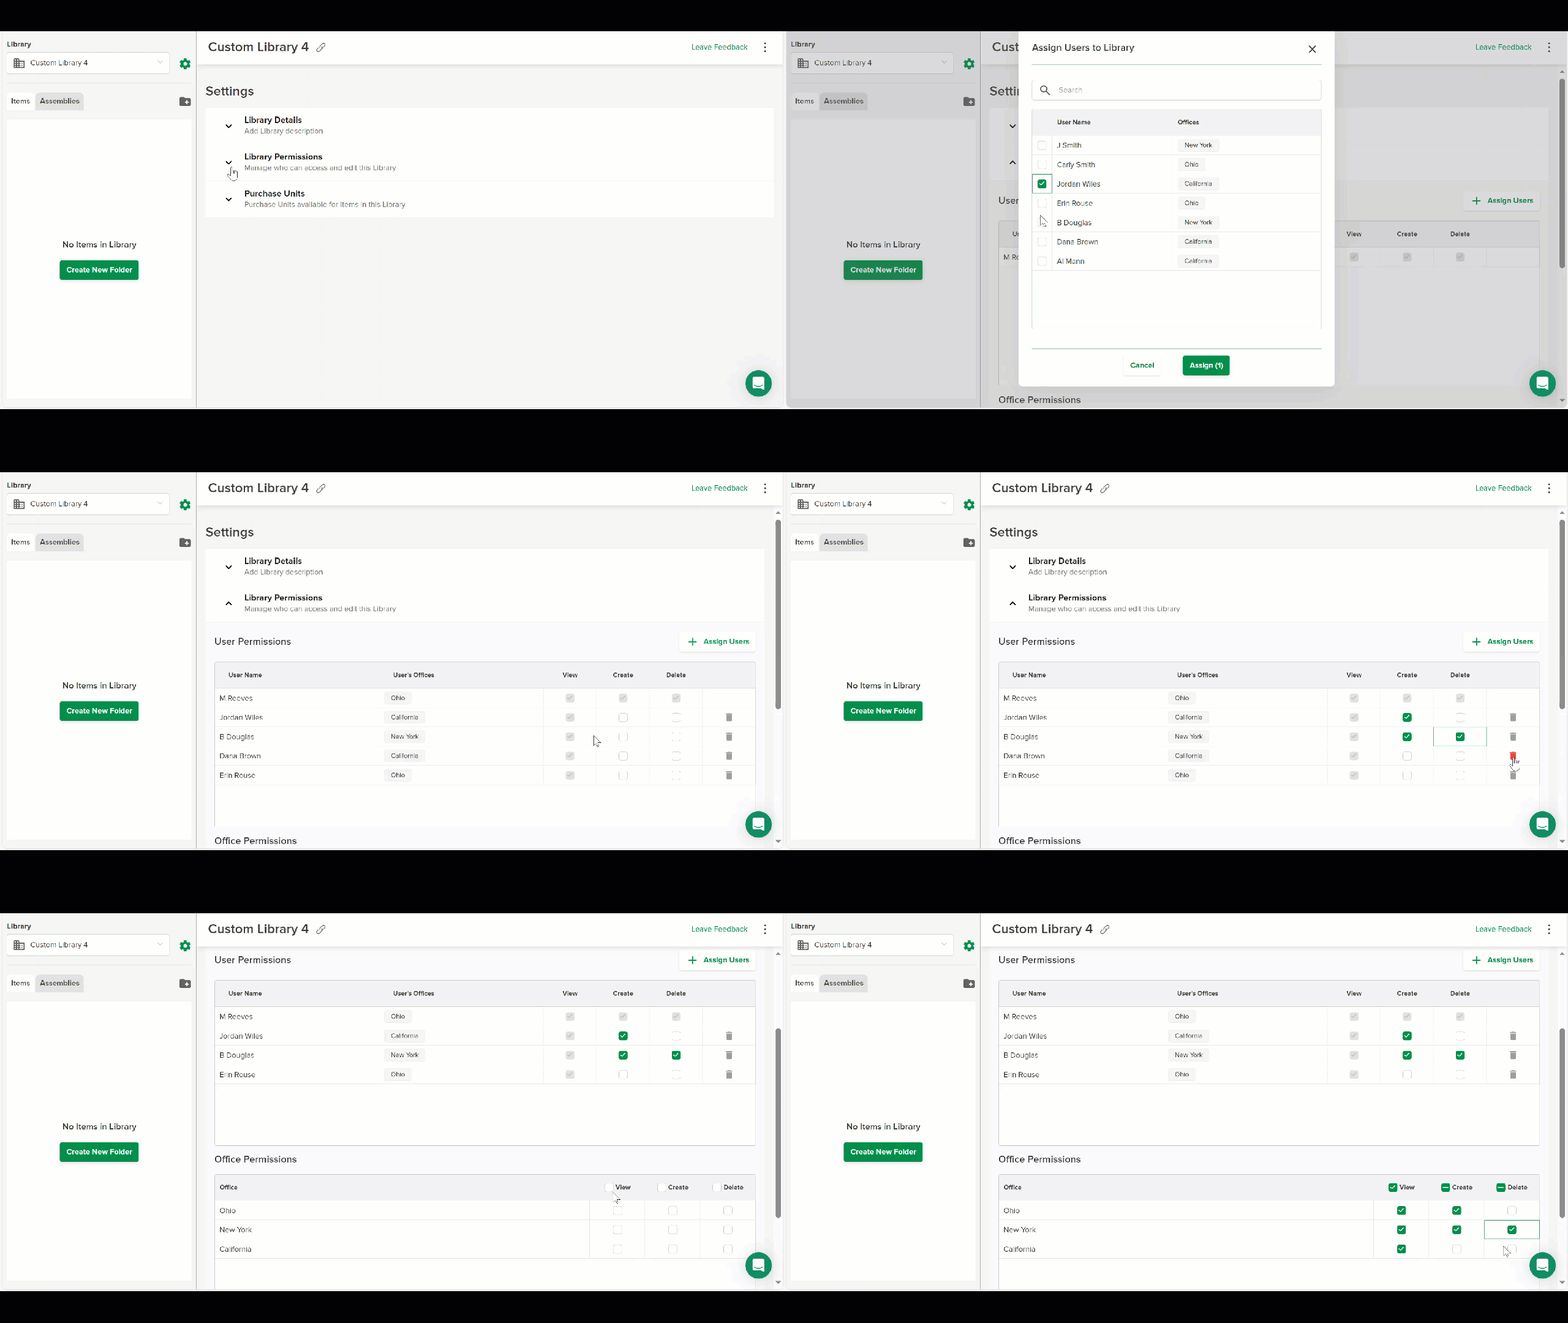
(Optional) Click on Library Permissions to assign/edit User Permissions and Office Permissions.
(See Library Level Permissions section above for additional info on these permissions.)To assign User Permissions:
Click the + Assign Users button.
Click the box next to each user you want to assign permissions for this library.
Click the Assign button.
Each user will automatically be assigned View permissions. Click to check the box for any other permissions (Create and/or Delete) that you want to assign each user.
To assign Office Permissions:
Click to check the box for any permissions (View, Create, and/or Delete) that you want to assign to users in each office.
TIP: You can sort or filter the list of Users and Offices by clicking on the User Name or Office headers..gif)
(Optional) Click on Purchase Units to customize the list of purchase units available for use in the library.
While STACK provides a list of the most common purchase units for you, this allows you to customize list for your work. You can add or delete purchase units from the list and arrange the order in which they appear in the dropdown.To add a Purchase Unit:
Click + Add new Unit.
Enter the purchase unit name in the Name field.
(Optional) Press the tab key on your keyboard or click in the Description field to enter a description.
Click +Add new Unit again to add an additional purchase unit to the list.
OR
Press enter on your keyboard if you are done adding purchase units.
TIP: The order in which the Purchase Units appear on this list is the order they will appear on the Purchase Unit dropdown menu when creating an item. You can sort the list alphabetically in ascending or descending order by clicking the Sort by name buttons at the top right of the list. You can also manually change the order of the list by clicking the dots to the left of a purchase unit and dragging it to the position you want on the list.
To delete a Purchase Unit:
Click the Trash icon to the right of the Purchase Unit you want to delete.
Click Yes to confirm.
NOTE: You cannot delete the Hours purchase unit.
Edit a Custom Library
You can edit the Library Name and Library Details, change permissions, and/or edit the list of Purchase Units if needed.
NOTE: Only Account Owners and other users who have been assigned the Can create libraries permissions in Account Settings can edit a Custom Library.
.jpg)
Click Libraries on the main navigation toolbar.
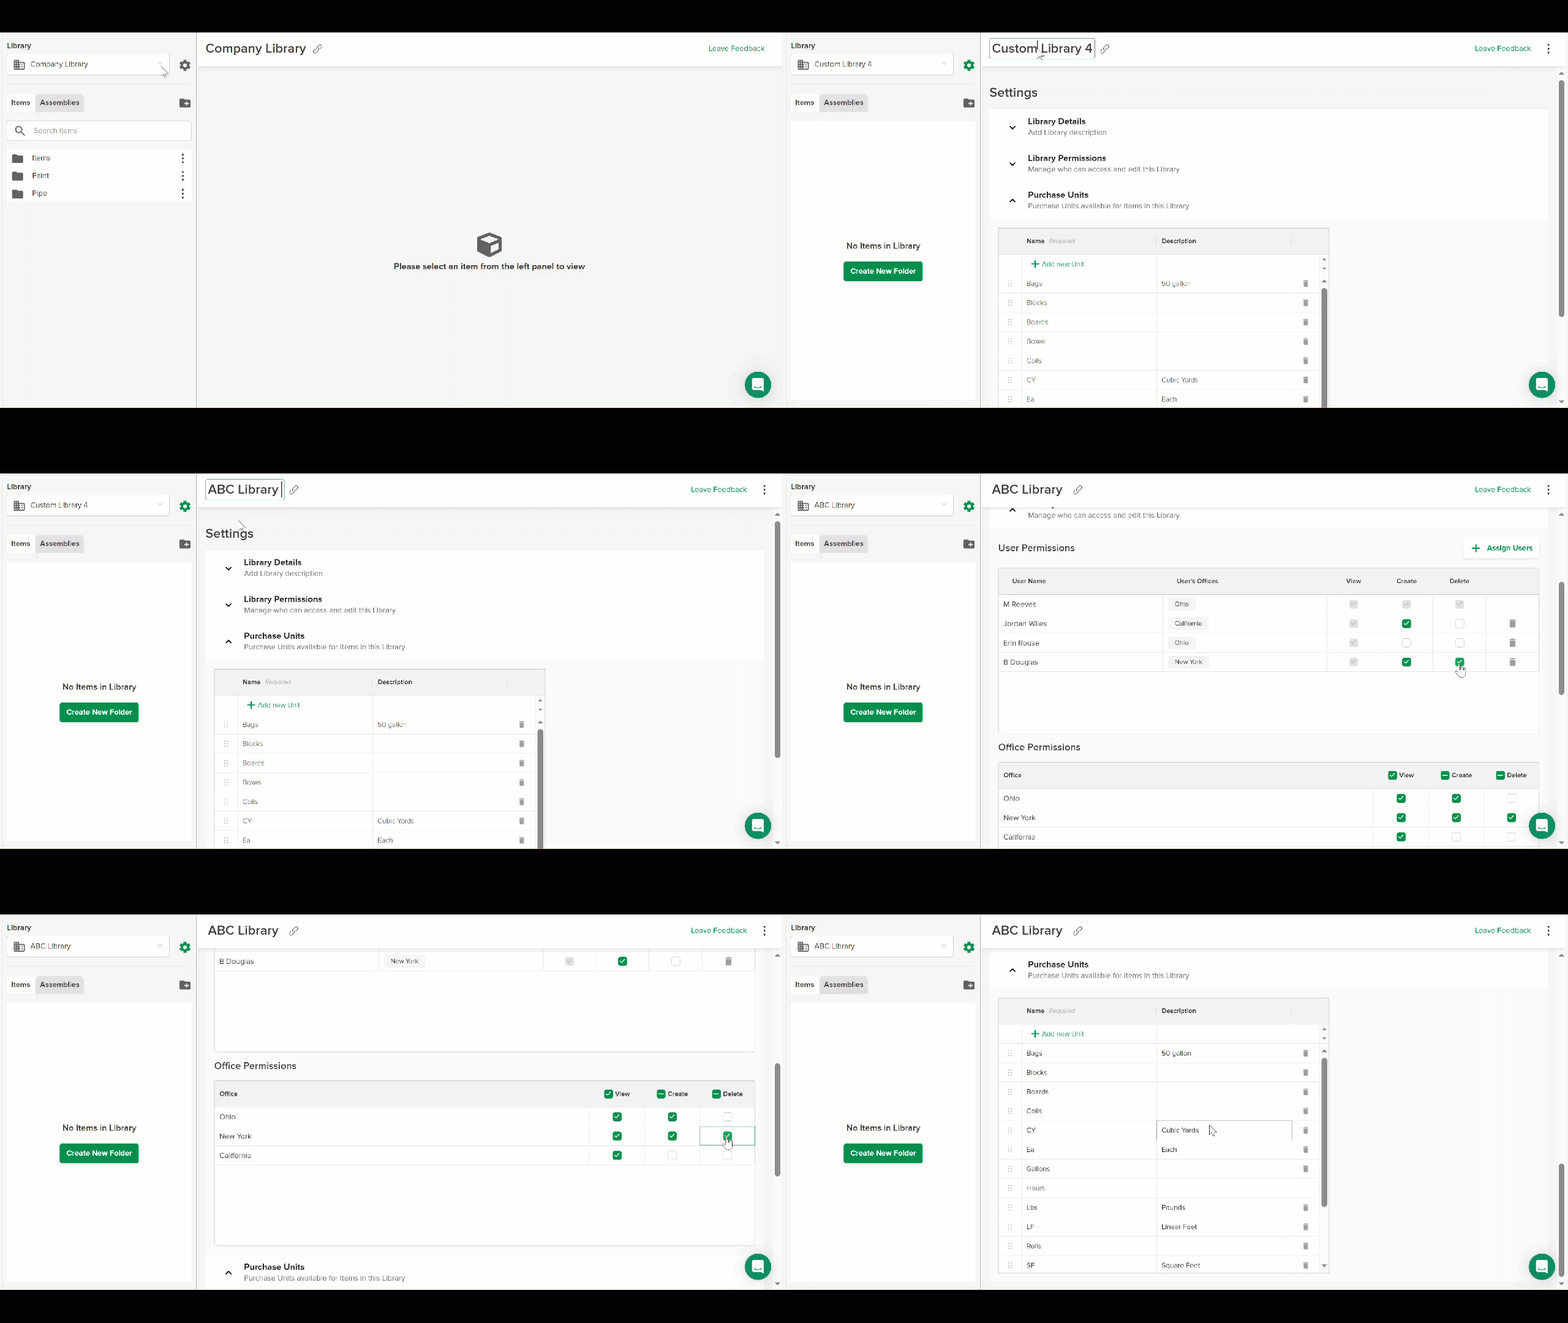
Select the Custom Library you want to edit from the Library dropdown.
Make the desired changes.
(See Create a Custom Library instructions above if you need more details on how to make these changes.)To edit the name, click on the library name at the top left of the screen and type in the name you want.
To edit the Library Description, click in the Library Details field and type in the new info.
To change permissions, click on Library Permissions and add/delete permissions as needed.
To edit the list of purchase units, click on Purchase Units and add/delete as needed.
Move Folders to a Different Library
You can move folders of items and assemblies to another folder within a selected Custom Library or from one Custom Library in your account to another Custom Library in your account.
When you move a folder, the entire folder (all subfolders and items or assemblies within it) will be moved to the Custom Library you select. The folder and contents will no longer be available in the original location.
NOTE: You must have Create permission in both Custom Libraries to move a folder.
.jpg)
Click Libraries on the main navigation toolbar.
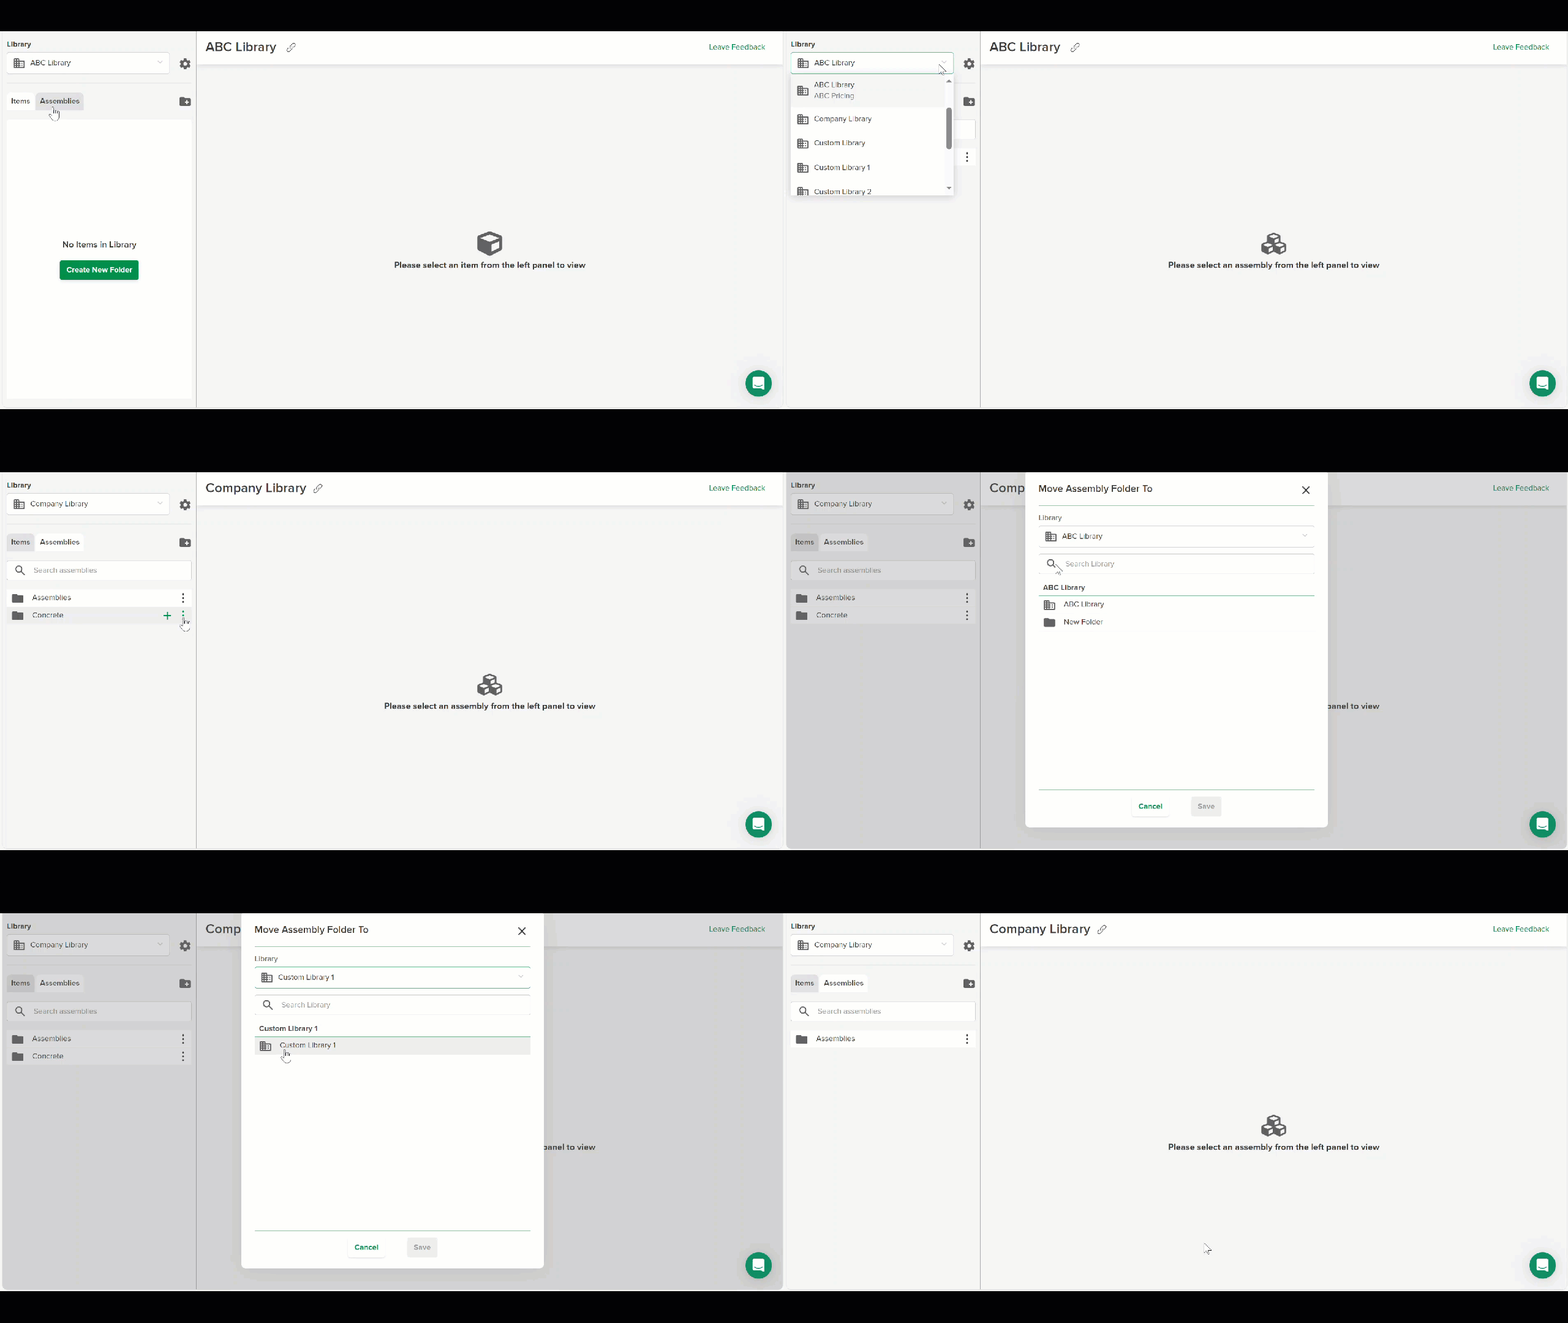
Click the Items or Assemblies tab depending on what you want to move.
Click in the Library dropdown and select the Custom Library containing the folder you want to move.
Locate the folder you want to move.
Click the three dots to the right of the folder and select Move Folder To.
In the dialog box that opens, click in the Library dropdown and select the Custom Library where you want to move the folder.
Choose where you want the folder to be located within the selected library.
The current folder tree for the selected library will be displayed in the bottom section of the dialog box.If you want the folder that is being moved to be a top-level folder, click the library name.
If you want the folder to be a subfolder within an existing folder, click the existing folder name where you want it located.
The Save button at the bottom of the dialog box will turn green once you have clicked on a location.
Click the Save button.
The folder can now be found in the selected library location.
Delete a Custom Library
You do have the ability to delete a Custom Library from your account if needed.
Know that when you delete a Custom Library, all Items, Assemblies and Takeoffs that have been saved to that Library will also be deleted.
TIP: Move any Items or Assemblies that you want to keep to another Custom Library in your account before you delete.
NOTE: Only Account Owners and other users who have been assigned the Can delete libraries permissions in Account Settings can delete a Custom Library.
.jpg)
Click Libraries on the main navigation toolbar.
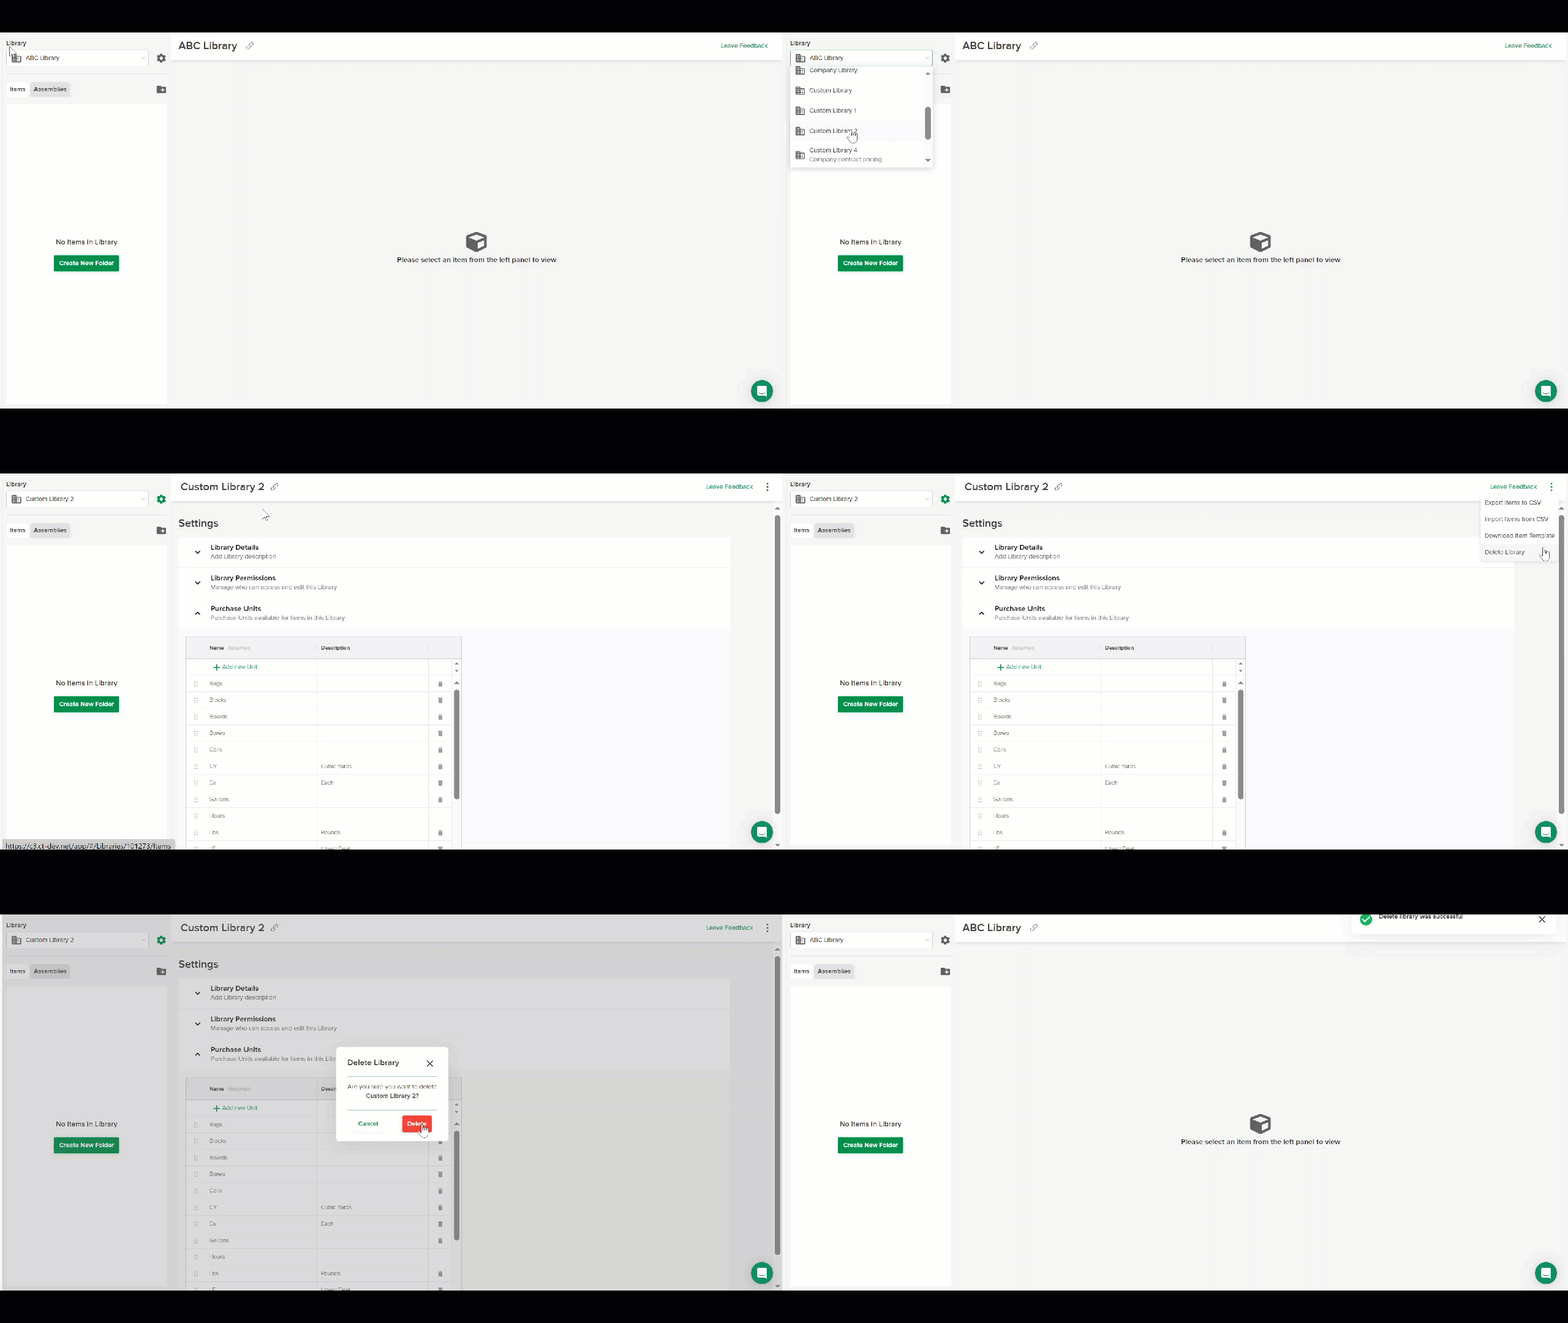
Select the Custom Library you want to delete from the Library dropdown.
Click the Settings (gear) icon to the right of the Library dropdown.
Click the three dots to the far right of the library name at the top of the screen.
Select Delete Library.
Click the red Delete button to confirm.
Related Articles
Assign and Manage Account Users
User Roles and Permissions
Create, Edit, or Delete Custom Items
Create, Edit, or Delete a Custom Assembly
Bulk Import Custom Items to STACK

