Create a Project and Add Project Information
- Print
- DarkLight
- PDF
Create a Project and Add Project Information
- Print
- DarkLight
- PDF
Article summary
Did you find this summary helpful?
Thank you for your feedback!
Any work you do in STACK Takeoff and Estimating is done within the context of a Project. You’ll upload plan sets and supporting documents, create takeoffs, and generate estimates at the project level so you should have at least one Project in STACK for each job you’re bidding.
When you create a project, you can assign specific account users and offices to the project and enter various project information – project name, status, bid date and time, location, and notes - that can be updated throughout your takeoff and estimating process to help you organize and manage your projects. You have the ability to make the project Private to restrict which account users have access to the project and can also restrict which Libraries (Items/Assemblies and Takeoffs Libraries) in your account can be used on the project by selecting Project Libraries.
Create a Project
We recommend entering as much project information as possible when you create a project - the more details you enter, the easier it will be to organize and manage your projects.
TIP: When managing addendums, rebids, alternates, phases, and options on a project or working on similar type projects, it might be easier to copy an existing project instead of creating a project from scratch. See Copy a Project for more info.
.jpg)
Click on the PROJECTS tab on the main navigation bar to get to your Project List.
Click the green New Project button at the top right of the screen.
A new project will be created, and you’ll be taken to the project’s Home screen where you can enter project information using steps 3-8 below, and upload plan sets and supporting documents.
Enter Project Information (see Project Information Overview below for more details on each info section).gif)
Enter the Project Name - type in the name in the blue highlighted field at the top left of the screen where it says New Project.
Enter Project Details - Project Status (optional but recommended), Bid Date, and Bid Time.
Click in the Project Status field and select the appropriate status from the dropdown.
Click in the Bid Date field or click on the calendar icon to enter the bid date.
Click in the Bid Time field or click on the clock icon to enter the bid time.
Assign users to the project in the Assigned To section. (Optional unless the project is Private. Private Projects must have at least one assigned user.)
Click on the green +Add User button.
Check the box next to the name of each user you want to assign to the project. (Uncheck boxes for users who should not have access.)
NOTE: For Private Projects, only users assigned to the project will be able to view and access the project.
Click the green Confirm button.
Enter Location information. (optional)
Click on the Add Location button.
Click in the Country field and select the appropriate country from the dropdown.
Fill in the additional address fields.
Click Save.
.gif)
Select Project Settings (optional) - Project Office (required if your account has enabled the option to Restrict access to projects by Office), Project Libraries, Private Project, and/or metric units.
Click in the Project Office field and check the box next to any Office(s)* you want to add or uncheck the box next to Office(s) you want to remove.
* Offices will only be available if they have been added to your account in Account Settings. See Add Offices to Your Account for information.
To limit which Libraries are available for use on the project, click on the Project Libraries field and check the box next to any Library for which you want to allow access.
NOTE: If no boxes are checked, all Libraries in the account will be available for use on the project.Check the Make private box if you want to make the project Private to restrict which account users can see and access the project. (Click for more info on Private Projects.)
Check the Use metric units box if you want to use metric units instead of imperial units for the project. (See Change Measurements to Metric for more info.)
.gif)
Enter Project Notes. (optional)
Click on the Add Notes button.
Type in your notes and format as desired using the text editor at the bottom of the Project Notes box.
Click Save.
Upload Plans and Documents
Project Files- After you've entered all the project information you want and you're ready to upload your plan sets and supporting document files to the project, see Upload Project Files.
Once you create a project, you’ll be able to find and open it from the Project List.
Project Information Overview
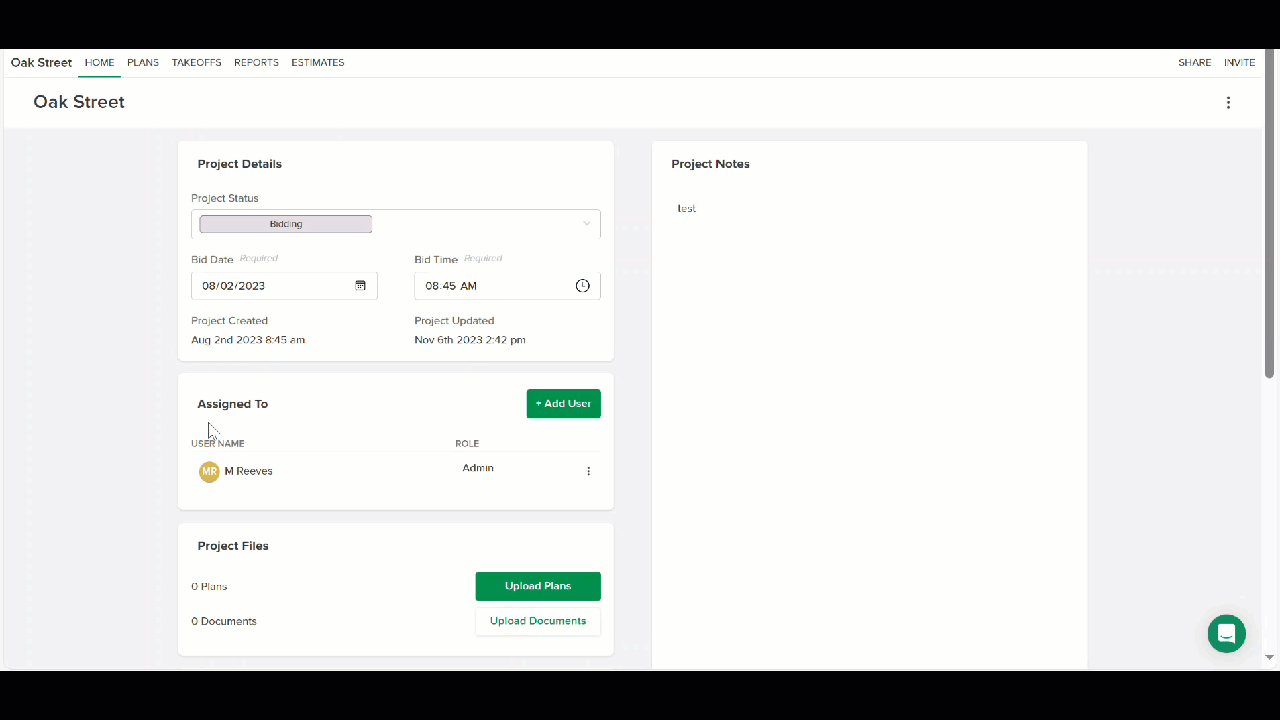
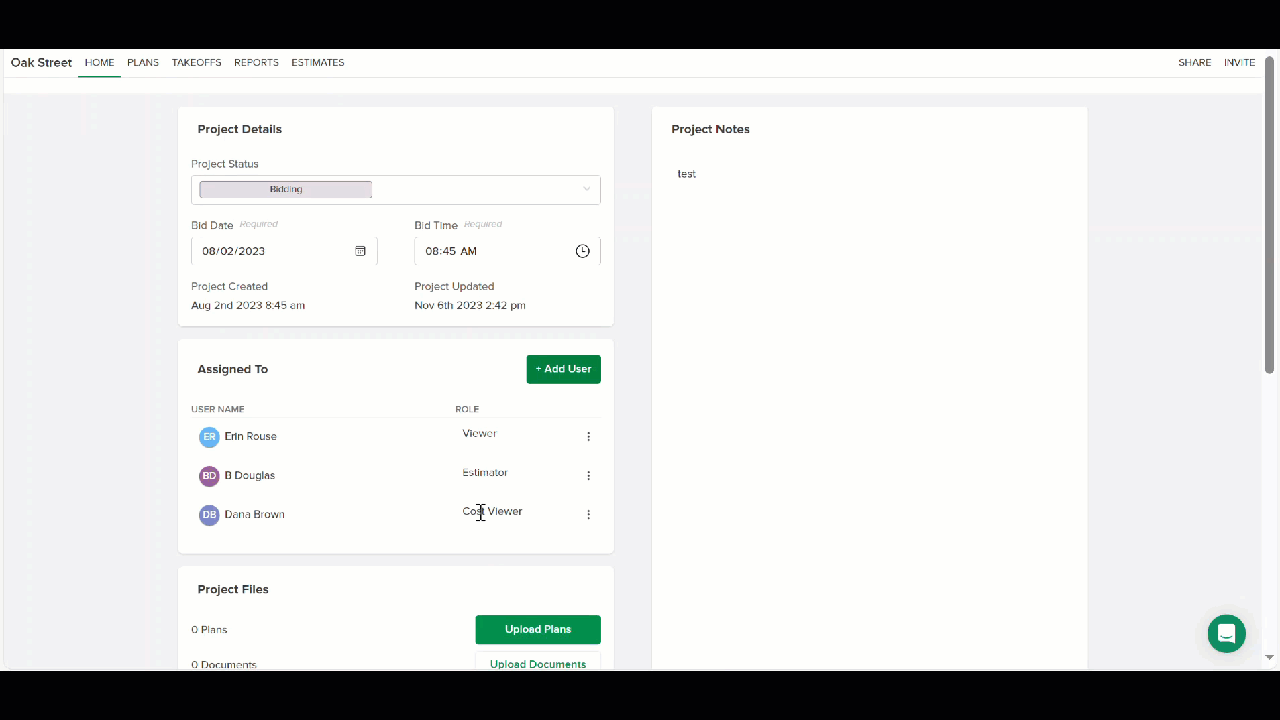
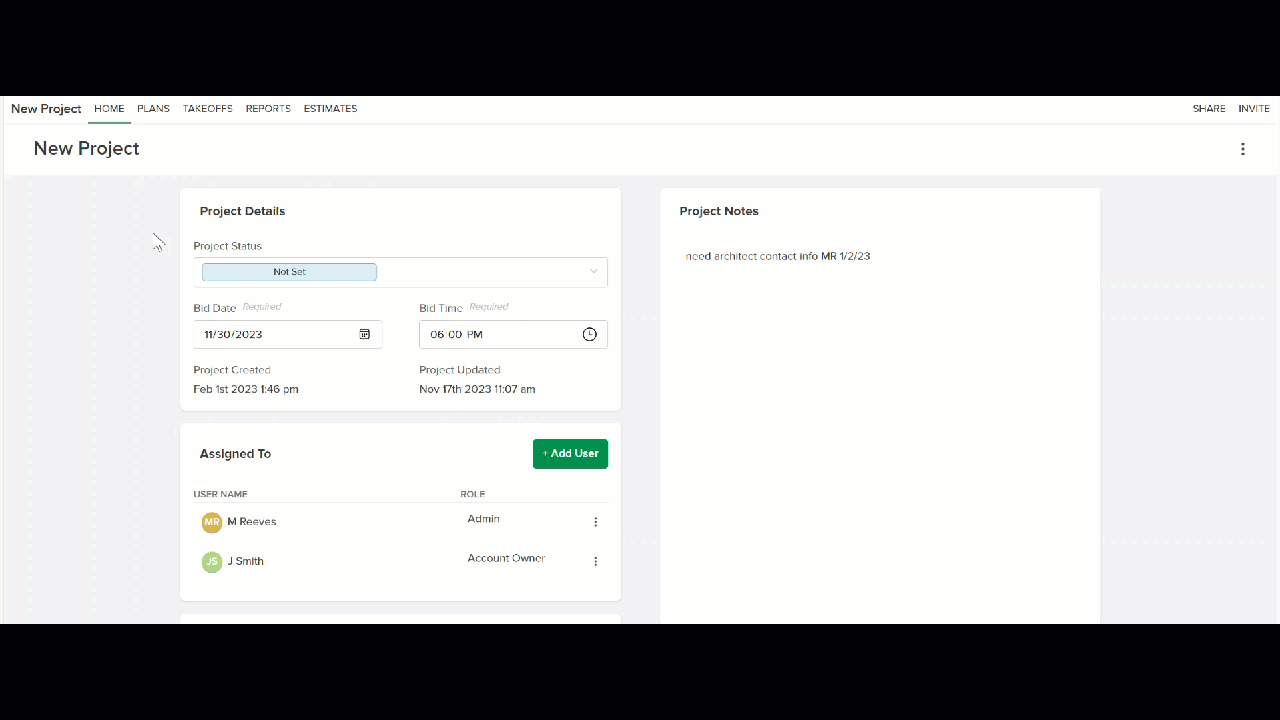
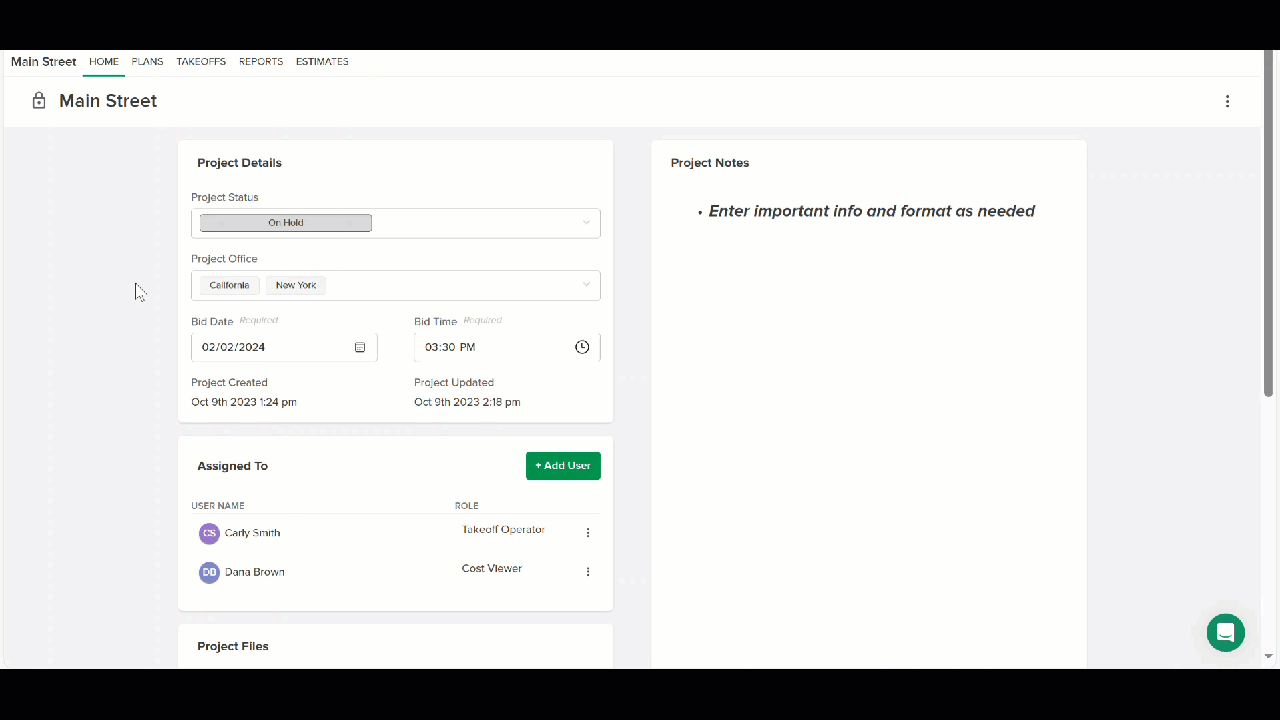
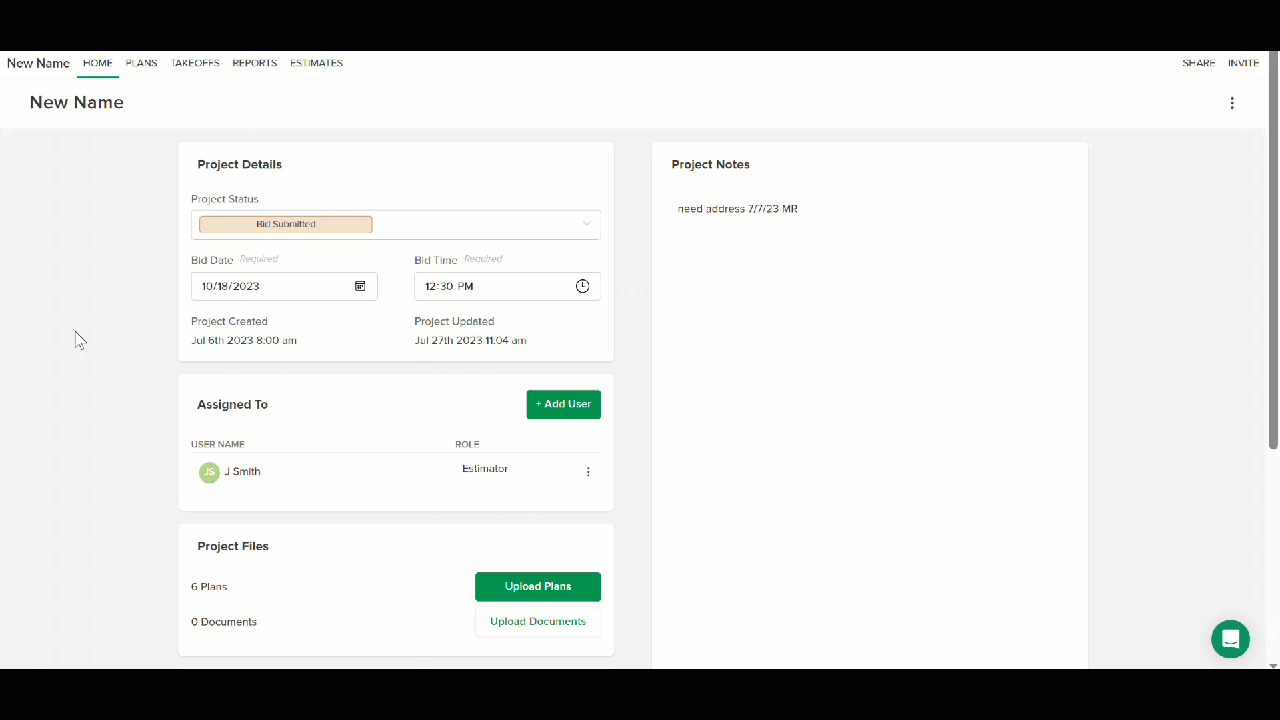
Each project has a HOME screen where you can enter, edit, and view basic project information – project name, bid status, bid date and time, account users/offices assigned to the project, number of project files, project location, and notes - to help your team better organize and manage your projects.
Some of this project information is also displayed on the Project List for quick reference.
Project Name – When you create a project, it is auto named New Project and appended with the date and time it was created. (E.g., New Project - July 24th 2023 2:02pm) We recommend that you enter your own descriptive, project specific name so you can easily find the project on the Project List.
Project Status – STACK provides 13 Project Status options to choose from so you can update and track project status throughout the bid process. If you do not select a status, the status will default to Not Set.*
TIP: You can edit the STACK provided project status options or create your own project statuses if needed. See Create a Custom Project Status for info.
*If you've customized Project Statuses, the default status will be the first status on your list.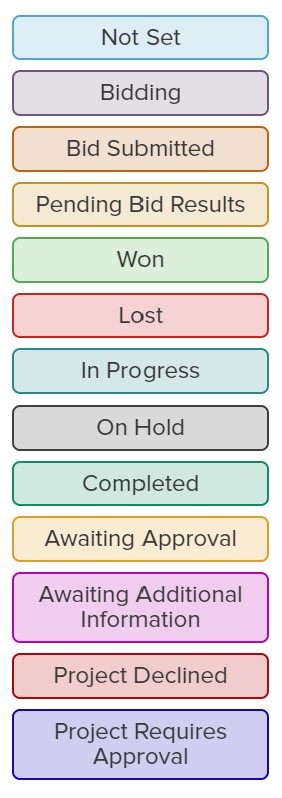
Bid Date – This is the date the bid is due. If you do not enter a bid date, it will be populated with the date the project was created.
Bid Time – This allows you to be very specific about when the bid is due by entering an actual time. If you do not enter a bid time, it will be populated with the time the project was created.
Assigned To – Projects can be assigned to one or multiple users on your account to help everyone quickly find and manage the projects they’re working on. The person creating the project is automatically assigned to the project but can be removed if needed. If you make the project Private, only the users assigned to the account and Account Owners will be able to access the project according to their role/permissions. Private Projects must have at least one user assigned.
Project Files – Displays the number of plans and documents that have been uploaded to the project.
Location – You can enter the project address. If available, a Google map showing the location will be displayed on the HOME screen.
(Only the City and State text will be displayed on the Project List.)Project Notes – This is a place to add important information like GC or architect contact info, job site information, or more details about the project status. We recommend that you date and initial each note, so everyone knows who added it and what information is the most current.
Project Office – You can assign a project to one or more Office that has been added to your account in Account Settings to help organize projects and restrict user access. (See Add Offices to your Account for information). By default, when a project is created, it is assigned the same Office(s) as the user who created it. If Offices are not required on your account, and the user creating the project doesn't have an assigned office, no Offices are automatically assigned.
Project Libraries – This allows you to restrict which Libraries in your account are available for use on the project. You can select one or more Library. When selected, only the selected Libraries will be available for use on the project. If no Library is selected, then all Libraries in the account are available for use on the project. By default, when a project is created, the Default Libraries assigned to the Office(s) of the user who created it will be auto selected on the project. You can manually change those selections as needed.
Edit Project Information
You can edit any of your project information at any time from the project HOME screen.
Project Name

Click and highlight the current name at the top left of the screen.
Type in the new name.
Hit Enter on your keyboard.
Project Details - Project Status, Bid Date, Bid Time
Project Status - Click in the Project Status field and select the appropriate status from the dropdown.
Bid Date - Click in the Bid Date field or click on the calendar icon to enter the new bid date.
Bid Time - Click in the Bid Time field or click on the clock icon to enter the new bid time.
Assigned To – Add or Remove Users
To Remove Users
Click the three dots to the far right of their name in the Assigned To section.
Select Remove Assignee.
To Add Users
Click on the green +Add User button.
Check the box next to the name of each user you want to assign to the project. (You can uncheck boxes for users you want to remove.)
Click the green Confirm button.
Location
Click on the Edit (pencil) icon.
Make the necessary changes to the address.
Click Save.
Project Settings - Project Offices, Project Libraries, Private Project, Metric Measurement Units

Project Office - Click in the Project Office field and check the box next to any Office(s) you want to add or uncheck the box next to Office(s) you want to remove.
Project Libraries - Click in the Project Libraries field and check the box next to any Library for which you want to allow access and uncheck the box next to any Library for which you no longer want to allow access.
NOTE: If no boxes are checked, all Libraries in the account will be available for use on the project.Private Project - Check the Make private box if you want to make the project Private to make the project Private or uncheck the box if the project is already Private and you now want it to be Public. (Click for more info on Private Projects.)
Metric Measurement Units - Check the Use metric units box if you want to use metric units instead of imperial units for the project. Uncheck the box if you want to use imperial units. (See Change Measurements to Metric for more info.)
Project Notes
Click in the Project Notes section.
Type in and format your notes.
Click Save.
TIP: You can also quickly edit Status and Assigned To directly from the Project List by clicking on that detail for a specific project.
.jpg)
Related Articles
Copy a Project
Upload Project Files
Private and Public Projects
Add Offices to Your Account
Create a Custom Project Status
Project List
Organize your Project Documents
Was this article helpful?