Connect Your Acumatica and STACK Account
- Print
- DarkLight
- PDF
Connect Your Acumatica and STACK Account
- Print
- DarkLight
- PDF
Article summary
Did you find this summary helpful?
Thank you for your feedback!
STACK's integration with Acumatica allows you to quickly transfer various data between the platforms so you can take full advantage of all the tools and features each platform offers and streamline your workflow.
To connect your Acumatica and STACK accounts, you'll need to:
Download the STACK Customization Package and install it in Acumatica.
Connect Acumatica to STACK.
Configure Acumatica in STACK.
Once you complete the connection process (instructions below), you'll be able to use the integration to import/export data between STACK and Acumatica.
TIP: It is important to set up certain areas of your STACK account and enter certain data in a very specific way to ensure data is exported and mapped to the appropriate data points in each platform. See Best Practices to Use Acumatica with STACK for info on how to do this.
Key Information
The Acumatica integration is an add-on to your STACK subscription. Contact your STACK Account Manager for pricing.
This integration only works with Acumatica 2023 or newer versions.
The CRM module in Acumatica is NOT required for this integration.
In order to connect your STACK and Acumatica accounts, you must download the STACK Customization Package and install it in Acumatica.
You must have a Customizer role in Acumatica in order to install the STACK Customization Package.
You can only connect one Acumatica account to your STACK account.
Only STACK users with a role/permissions to access Account Settings can set up the connection.
The user setting up the connection must have permissions/access to the Acumatica projects you want to import to STACK.
This is a one-time setup. Once you have connected your STACK and Acumatica accounts, you will not need to repeat this process.
You can easily disconnect your STACK and Acumatica accounts if needed.
This integration is supported via a third-party integration platform.
Download and Install STACK Customization Package
Before you can connect your Acumatica and STACK accounts, you must download the STACK Customization Package and install it in Acumatica.
The instructions below are based on a standard/out-of-the-box version of Acumatica. The process and screens may differ based on the version of Acumatica you're using and the level of customization you have implemented.
NOTE: You must have a Customizer role in Acumatica to install the STACK Customization Package.
Click on the link below to download the necessary STACK Customization Package:
Download the STACK Customization Package for 2023 and newer versions of Acumatica.
The STACK Customization Package will be downloaded and saved to your device's Downloads folder.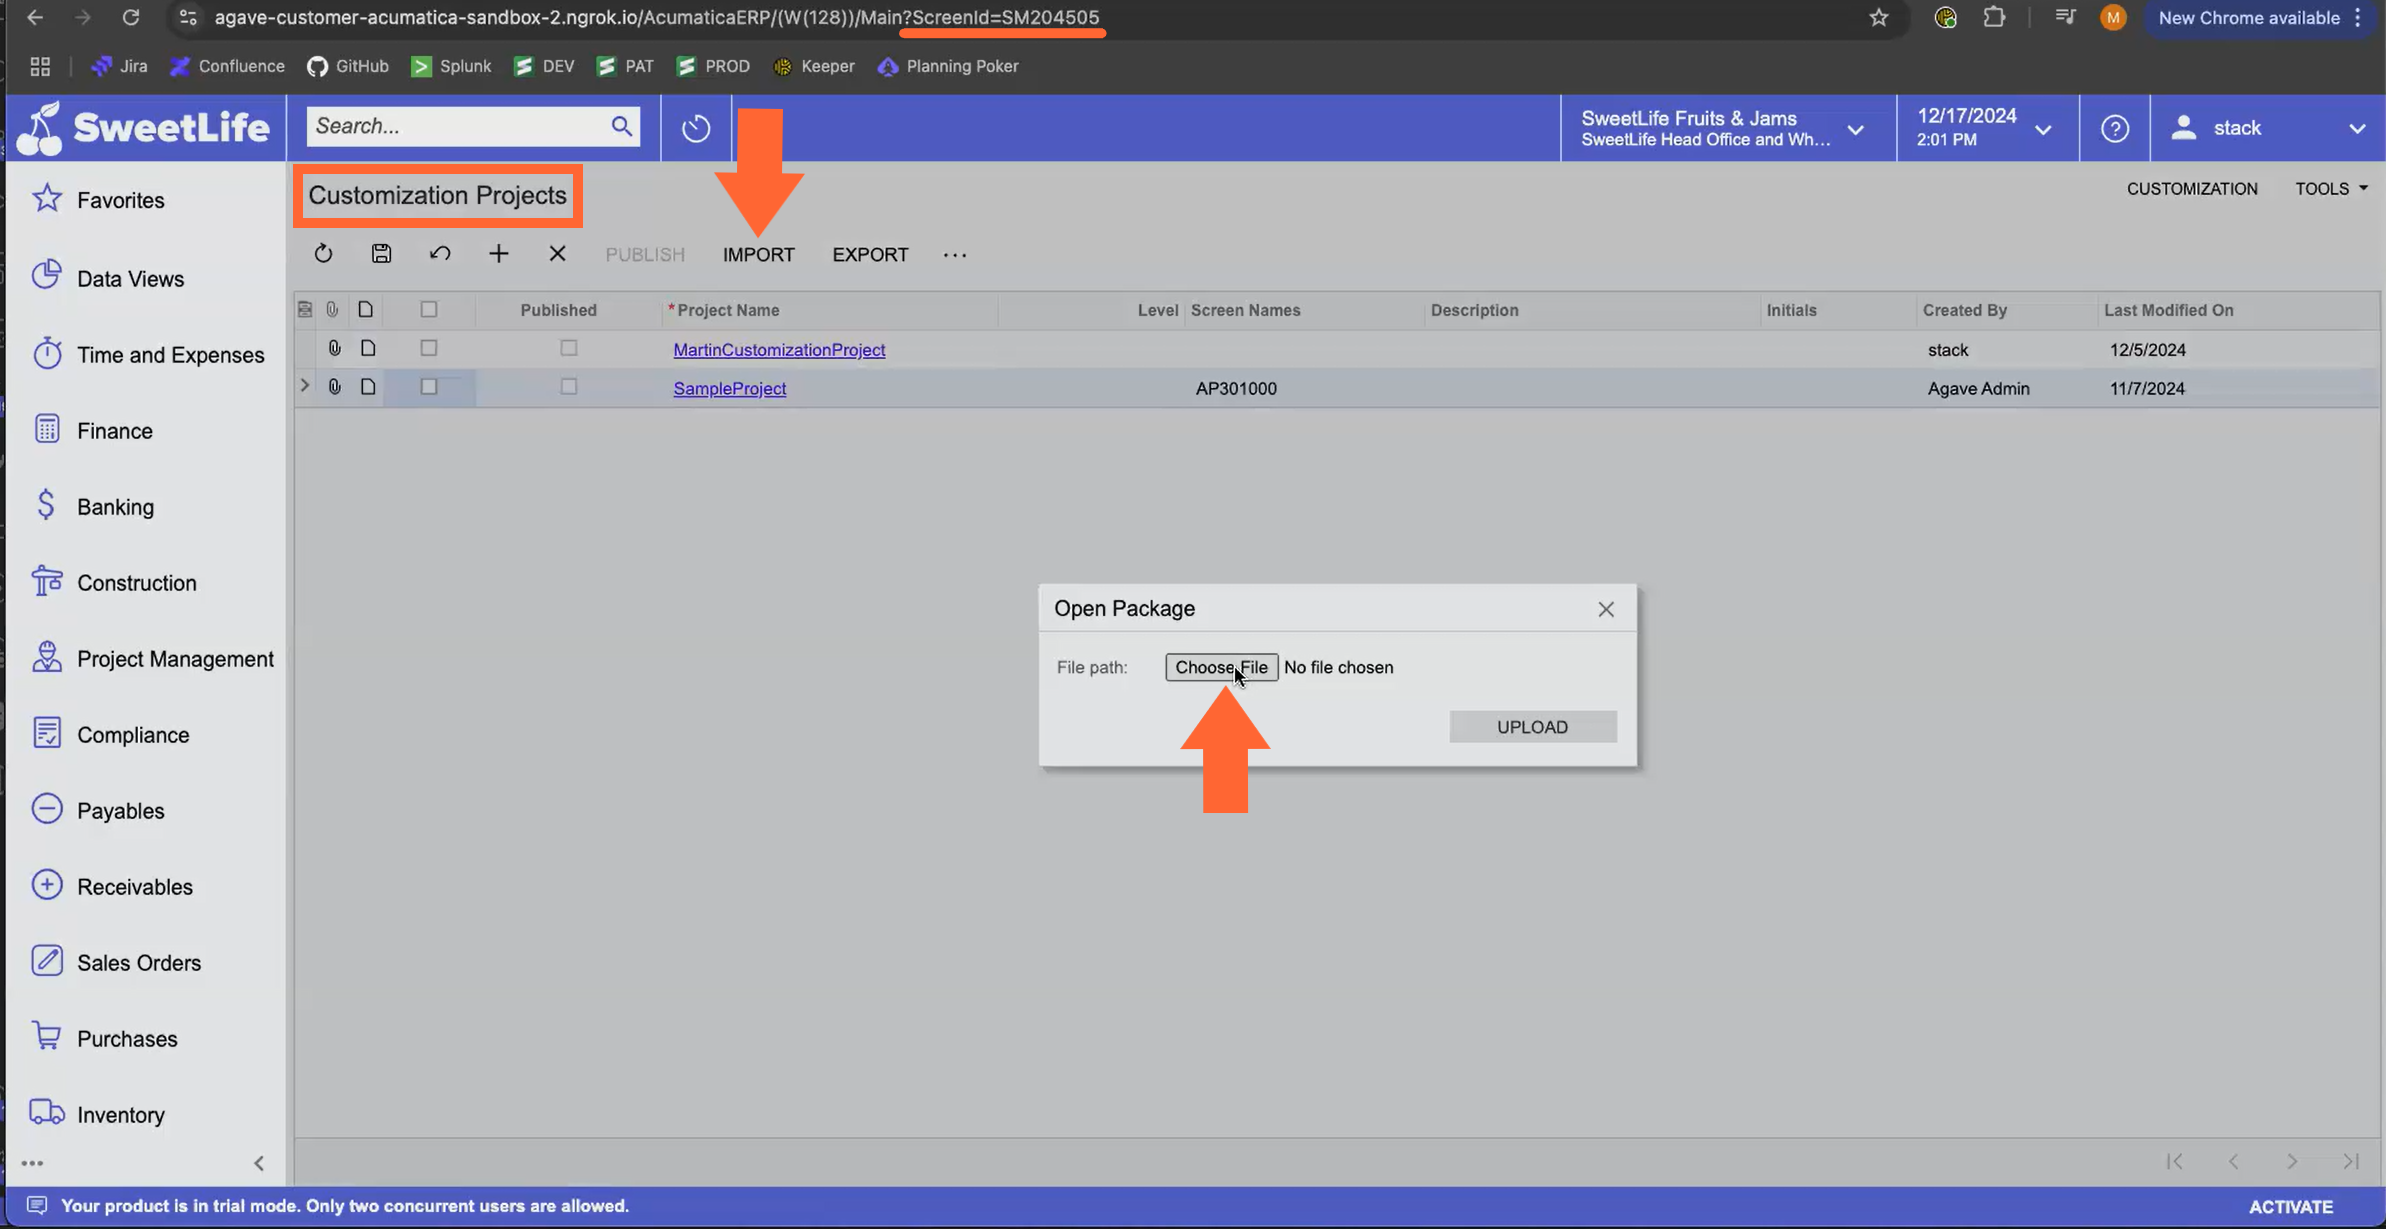
In Acumatica, go to the Customization Projects screen (Screenid=204505).
Click IMPORT on the top toolbar.
Click the Choose File button on the Open Package dialog box that opens.
Locate and select the STACK Customization Package zip file that you downloaded in step 1.
TIP: It should be in your Downloads folder.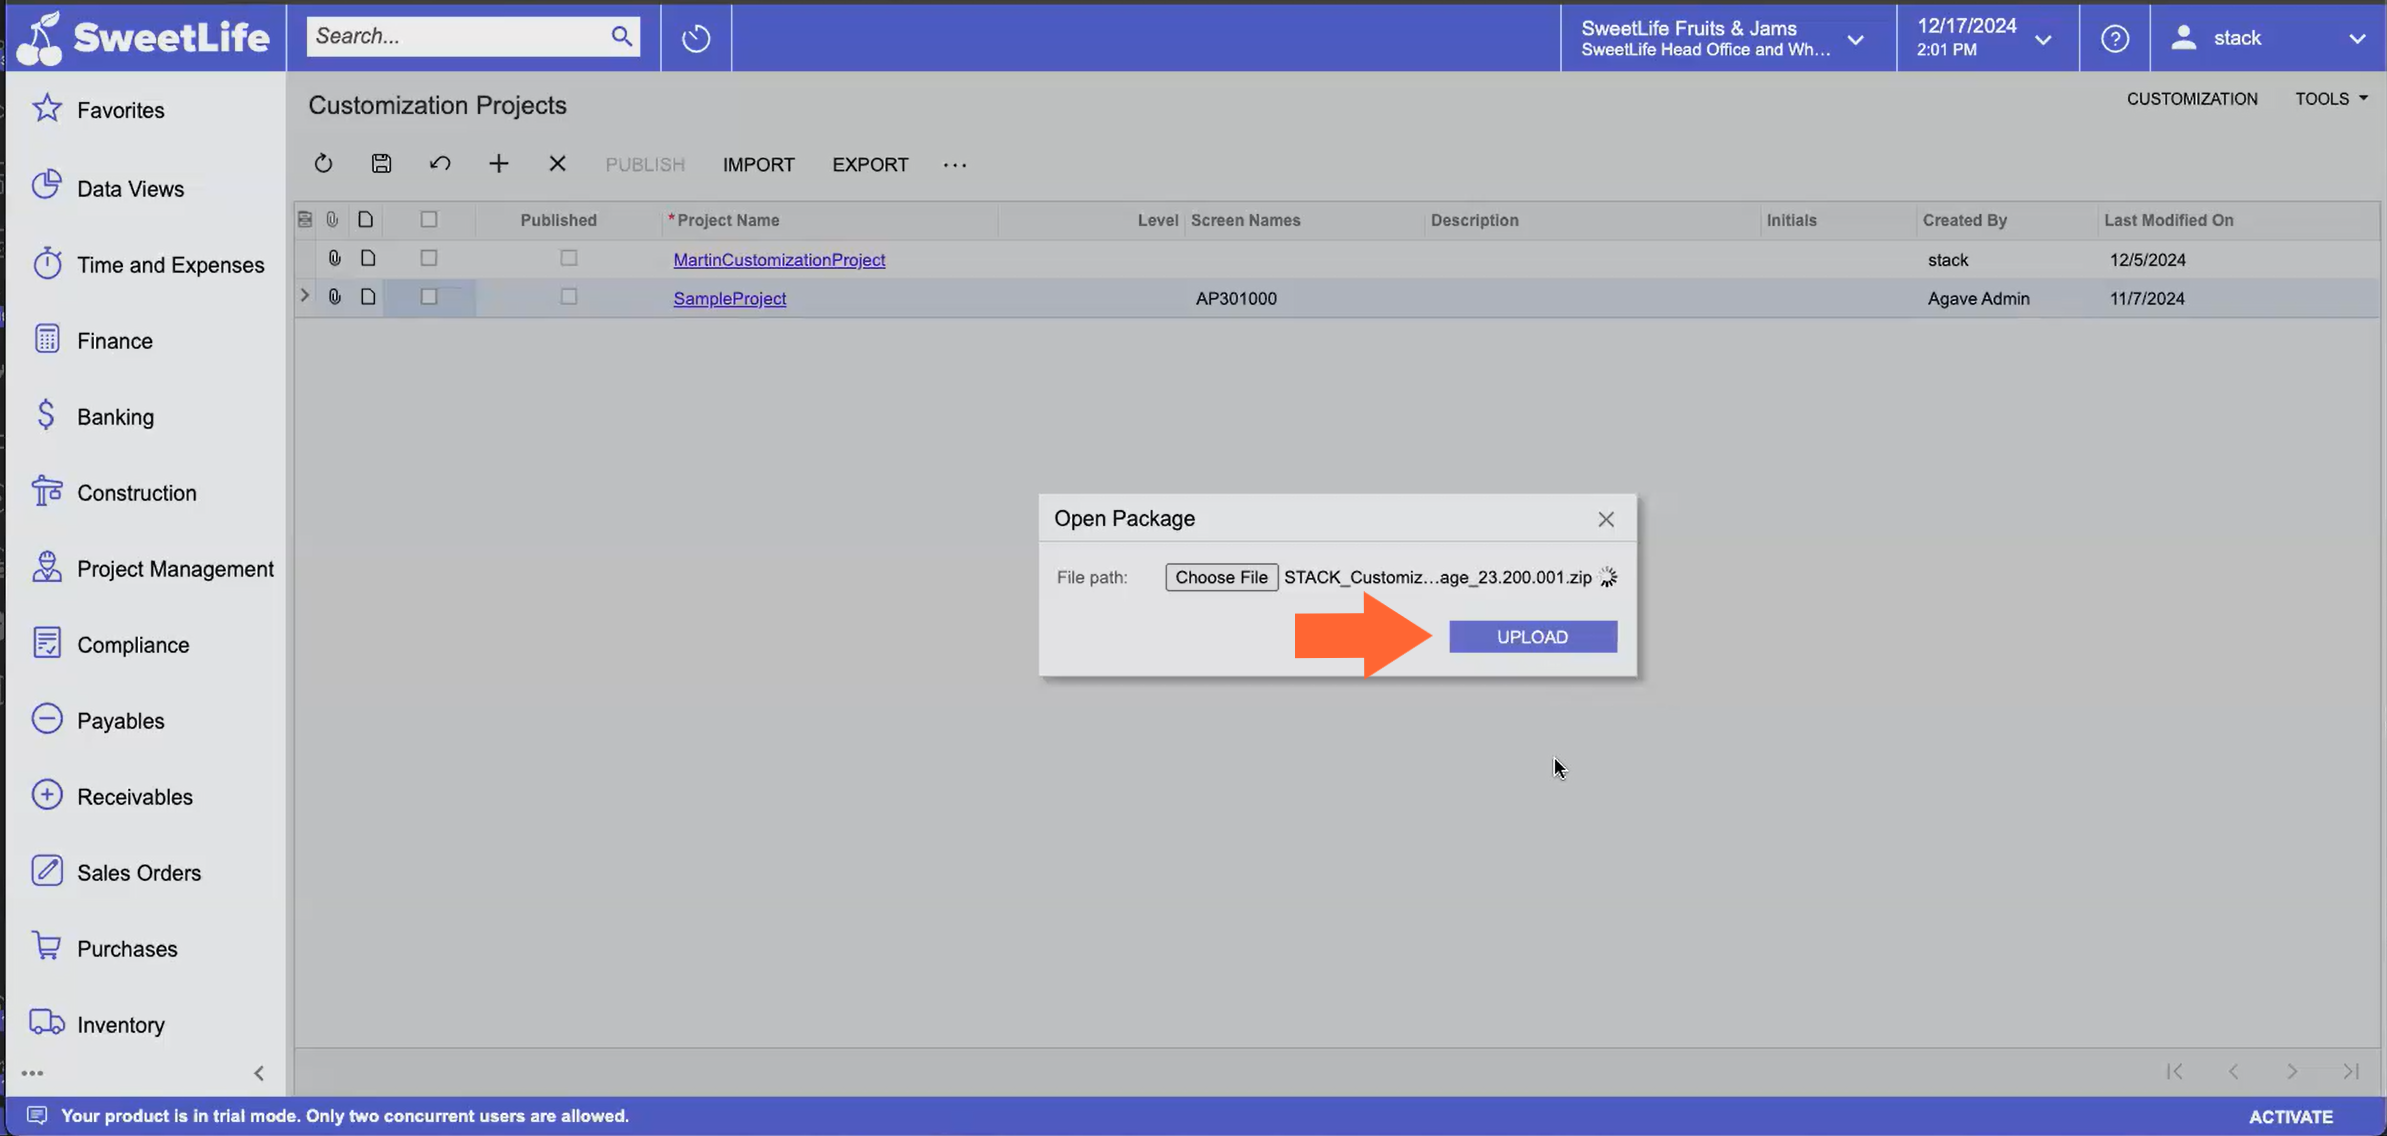
Click UPLOAD on the Open Package dialog box.
.jpg)
The STACK Customization Package will now be listed on the Customization Projects list.
Check the box to the far left of STACK Customization Package.
Click PUBLISH on the top toolbar.
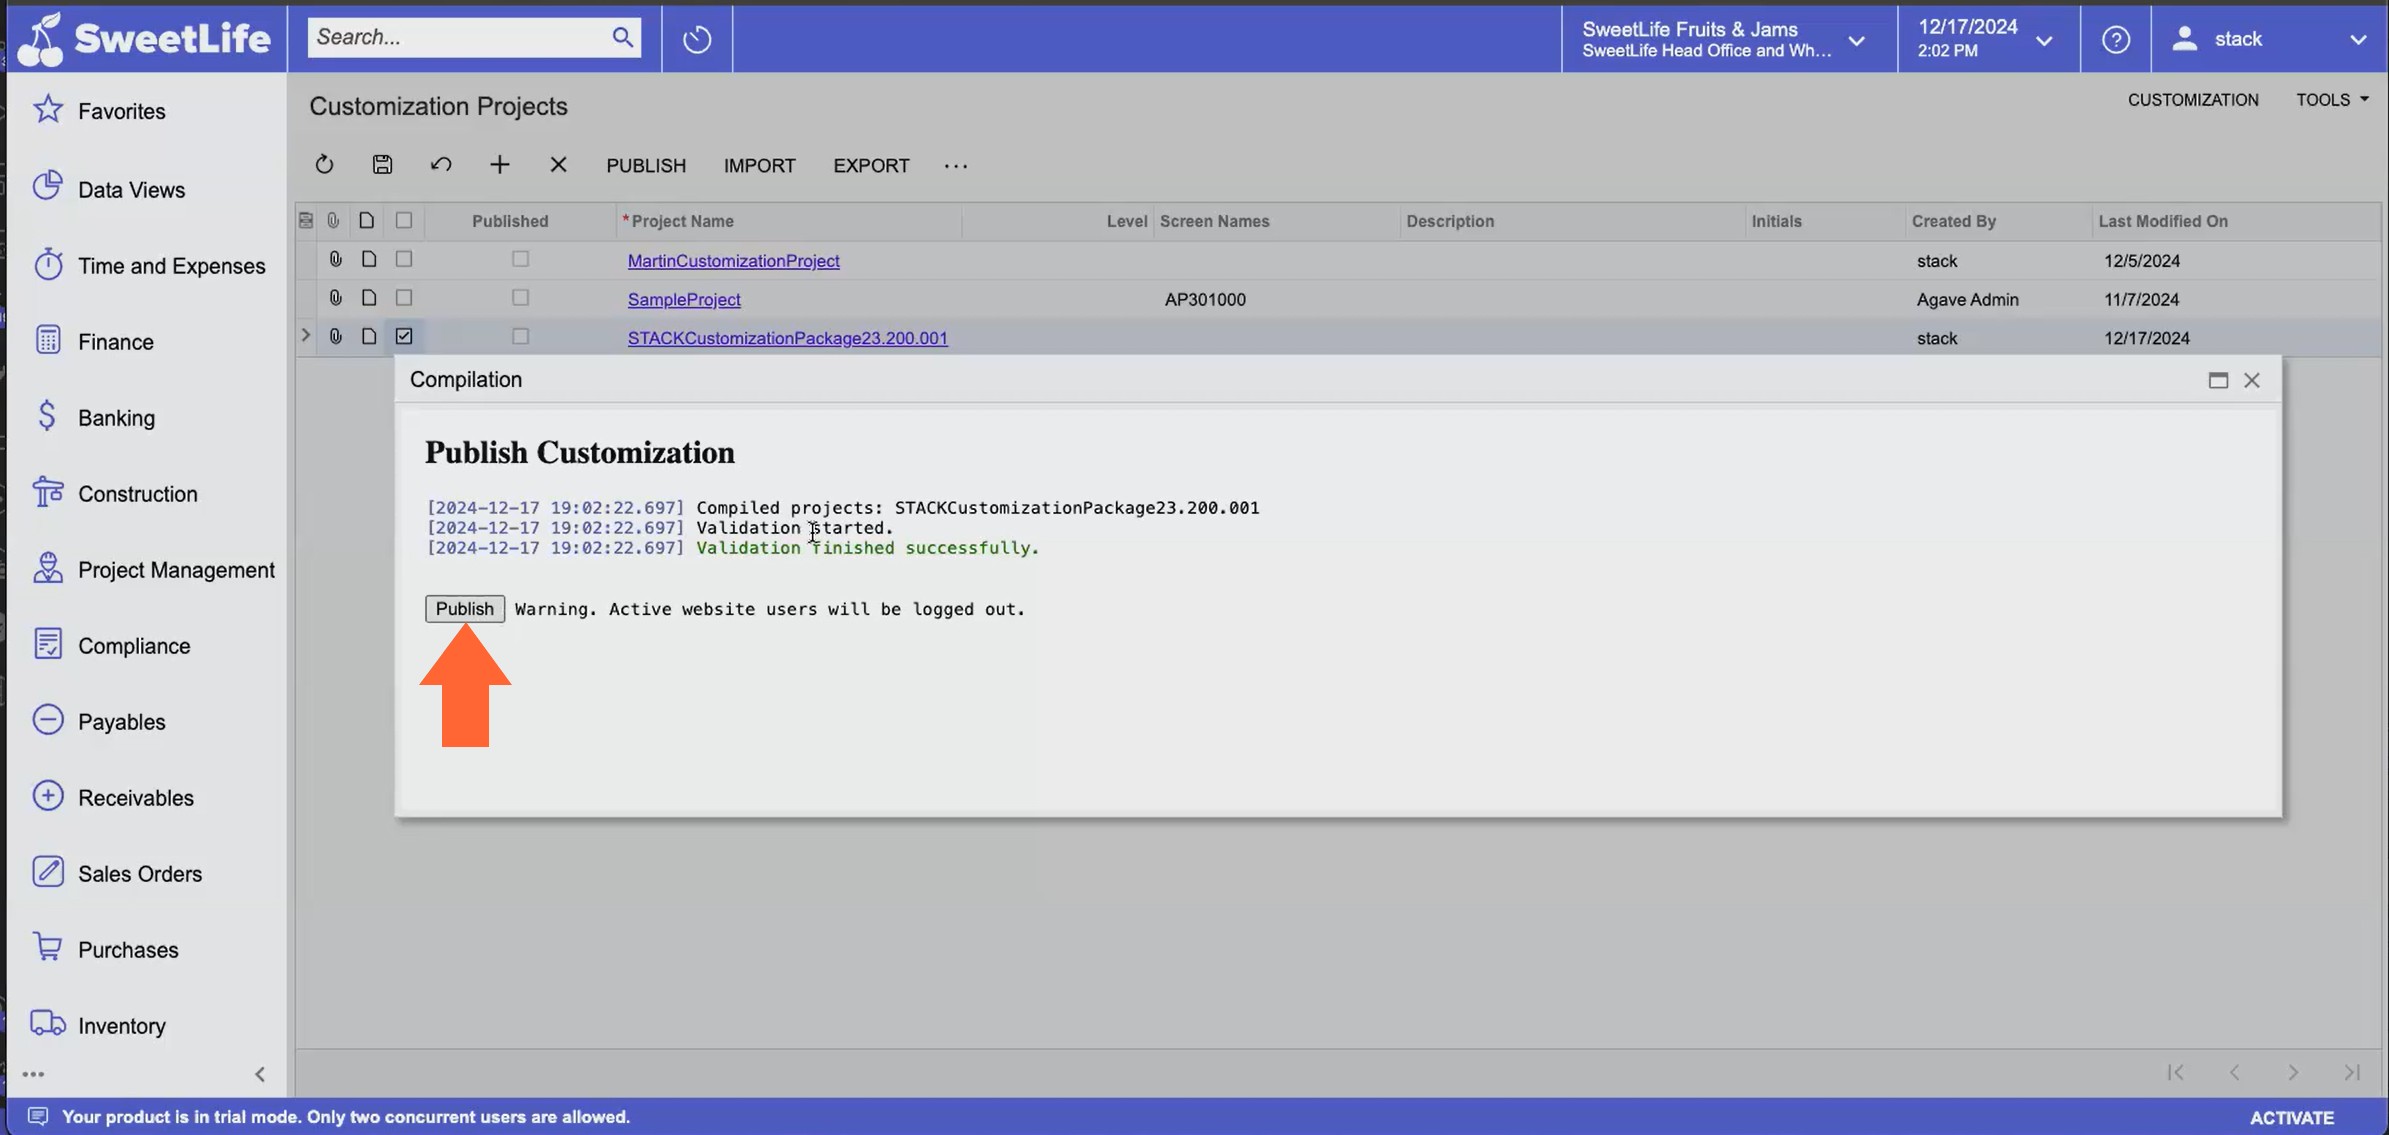
Click the Publish button on the Compilation dialog box that opens.
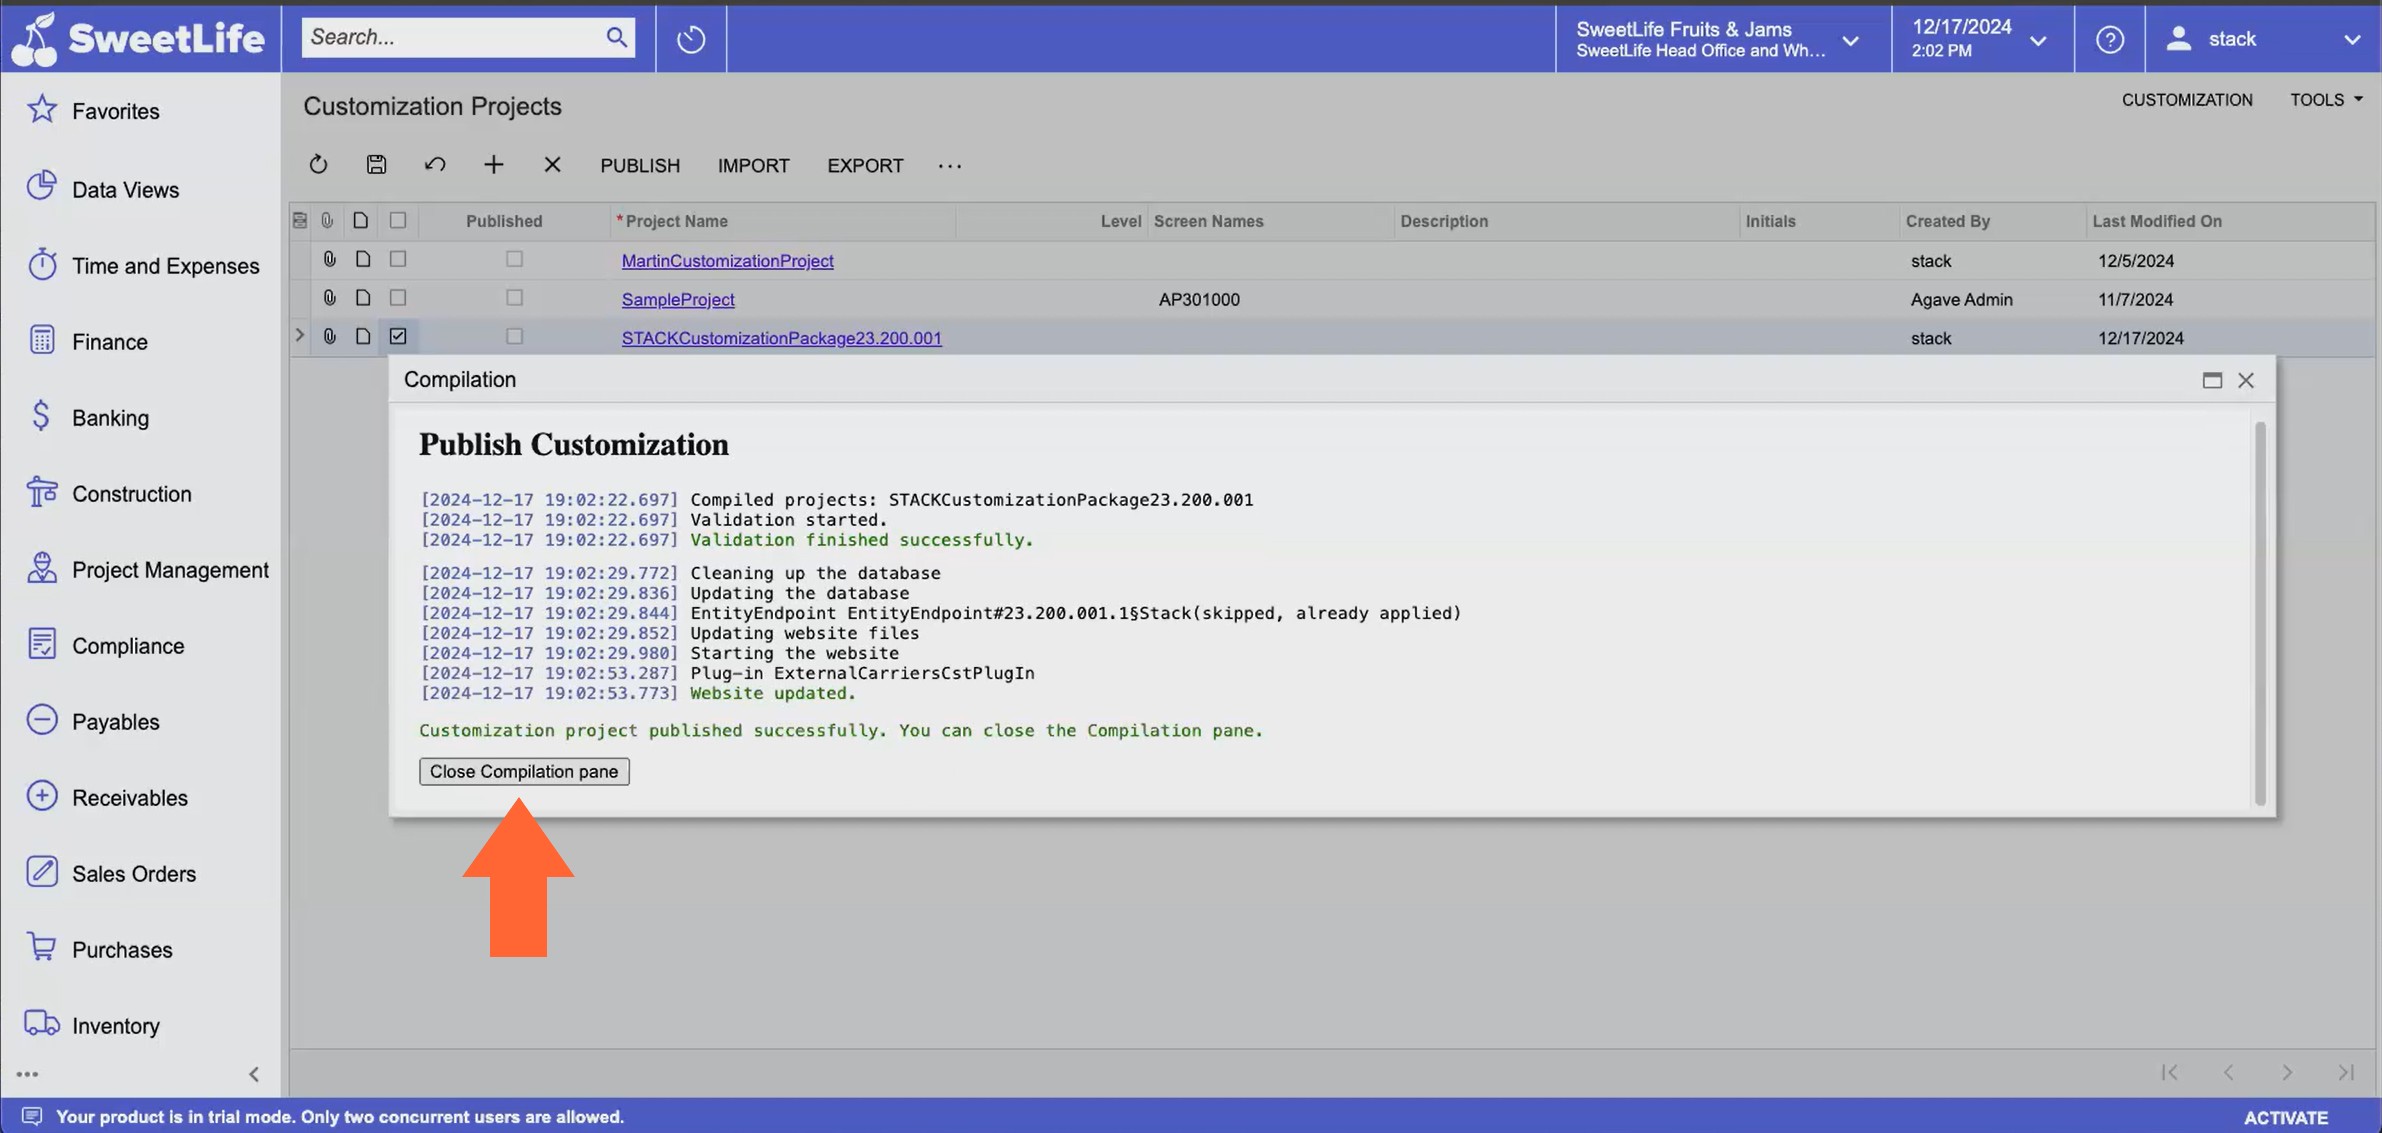
When you see the message that it has published successfully, click the Close Compilation pane button on the Compilation dialog box.
The STACK Customization Package will be marked as published on the Customization Projects list and the Web Service Endpoints page will list STACK.
You can now follow the instructions to Connect Acumatica to STACK.
Connect Acumatica to STACK
Make sure you have downloaded the STACK Customization Package and installed it in Acumatica before proceeding.
Log in to the Acumatica account from which you want to import/export data to STACK.
NOTE: The Acumatica account user must have permissions/access to the projects you want to import..jpg)
Click More Items on the left menu.
Scroll to the Configuration section and click Integration.
.jpg)
Under Preferences, click Connected Applications.
TIP: You may need to click Show All to expand the list to see Connected Applications..jpg)
Enter the Client Name (STACK).
Make sure the Active checkbox is selected.
Click on the Flow dropdown and select Authorization Code.
Set the Refresh Tokens settings.
Set Mode to Sliding Expiration.
For more information on sliding expiration, see Acumatica's help article.Set Absolute Lifetime to Infinite or as long as you plan to use the integration. (You will need to reconnect after this time period.)
Set the Sliding Lifetime. Generally, 15 - 30 days works well.
Click the Save icon at the top left of the toolbar. (The Client ID field will autofill.)
Copy and save the Client ID. You will need to enter this in STACK.
.jpg)
Click ADD SHARED SECRET.
Enter the Description (STACK).
NOTE: If you choose to enter an expiration date, you will have to repeat this process to connect your Acumatica and STACK accounts when that date arrives.Copy and save the Value. This is the Client Secret you will need to enter in STACK.
NOTE: You must copy and save before moving to the next step. You will NOT be able to see the Secret Value after you click OK.Click OK.
Click the Save icon at the top left of the toolbar.
.jpg)
Click the REDIRECT URIS tab.
Click the + icon.
Type https://app.agaveapi.com/link/oauth-callback in the Redirect URI field.
Click the Save icon at the top left of the toolbar.
You are now finished in Acumatica.Log in to the STACK account you want to connect to your Acumatica account.

Click the Settings icon at the right of the main navigation toolbar.
Select Account Settings from the dropdown menu.
.jpg)
Click App Integrations at the left of your screen.
Locate the Acumatica tile and click Connect.
TIP: You can use the Search... bar so you don't have to scroll through every integration to find it..jpg)
Click Continue on the STACK uses Agave... message box.
.jpg)
Enter the URL of your Acumatica instance in the Full Acumatica URL field.
E.g., https://acme.myacumatica.com or https://acumatica.my-company.com
NOTE: The URL should not contain any characters after ".com".Enter the name of your Acumatica instance in the Instance Name field.
Enter the Client ID saved in step 9.
Enter the Client Secret saved in step 12.
Click CONTINUE.
.jpg)
Click Yes, Allow on the Agave permissions screen.
If the connection is successful, the Agave screen will close.
You can now move to the steps to Configure Acumatica in STACK.
Configure Acumatica in STACK
The Configure process allows you to choose which Acumatica Account Group each STACK Cost Type will map to when Estimate Worksheet data is exported from STACK to Acumatica. It also gives you the ability to select Acumatica User Defined Fields as a mapping option for your STACK Tags during export.
You only need to do this process once, unless you want to change your selections or you add/edit Cost Types in STACK.
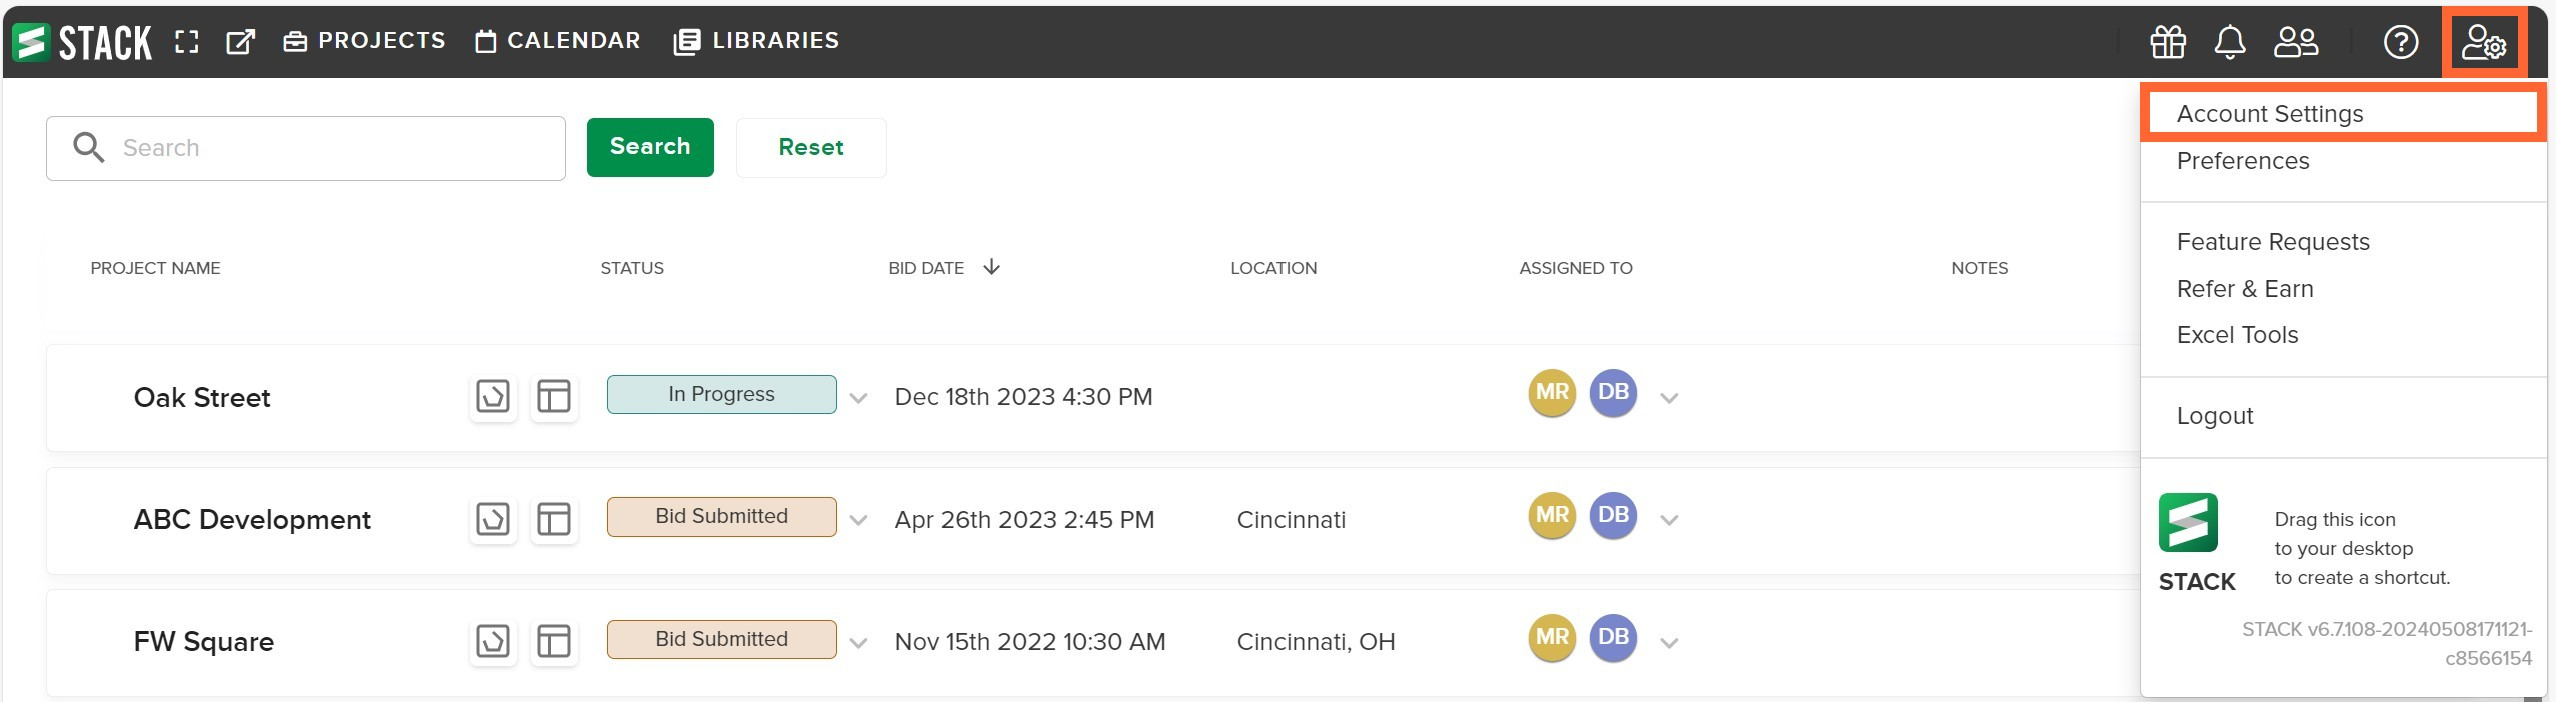
In STACK, click the Settings icon (person with gear) at the right of the main navigation toolbar.
Select Account Settings from the dropdown menu.
.jpg)
Click App Integrations at the left of your screen.
Locate the Acumatica tile and click Configure.
TIP: You can use the Search... bar so you don't have to scroll through every integration to find it.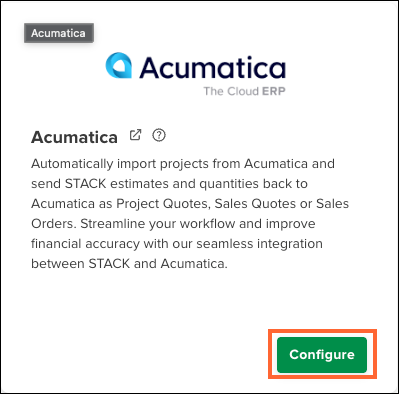
(Optional) If you want to be able to map your STACK Tags to an Acumatica User Defined Field during export, click on the Acumatica User Defined Fields section of the Configure Acumatica dialog box.
NOTE: STACK currently supports user-defined fields (UDFs) from these Acumatica screens:Project Quote(Screen PM304500)|
To find in Acumatica:Go to the Estimation tab
Scroll to the Products grid
Sales Quote (Screen CR304500)
To find in Acumatica:Go to the Details tab
Scroll to the Products grid
Make sure your UDFs are added to these sections in Acumatica. STACK will retrieve these values so you can easily map them to a STACK Tag or Label during export.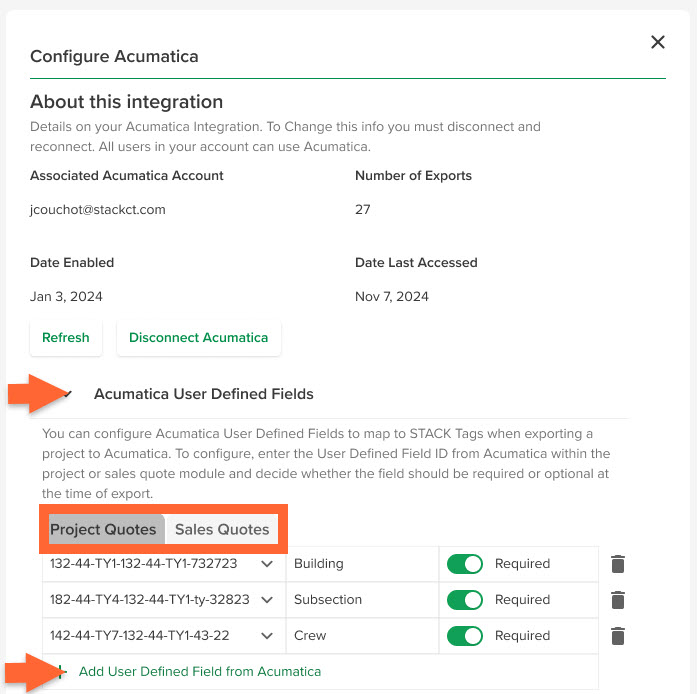
Click on the Projects Quotes tab or Sales Quotes tab to add the fields that will be available for that type of export.
Click +Add User Defined Field from Acumatica.
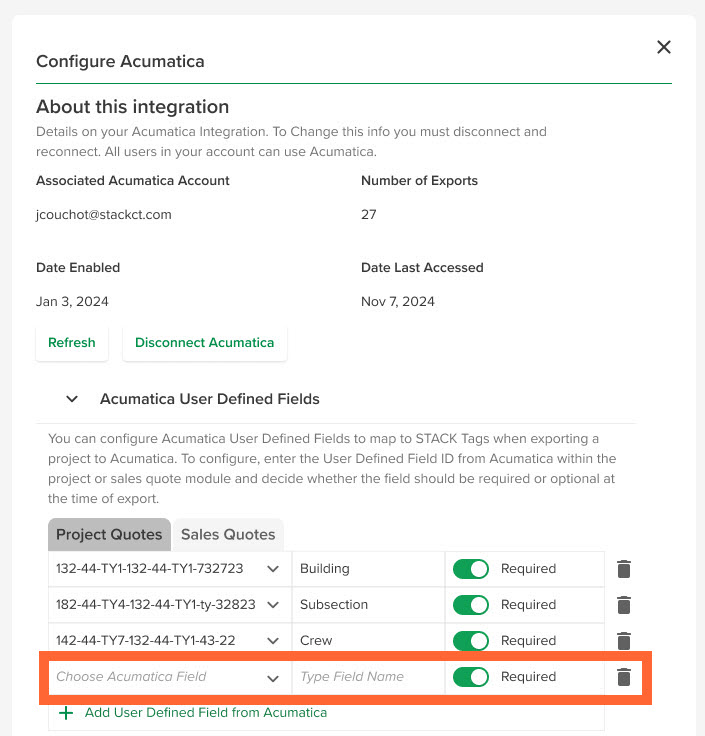
Click in the Choose Acumatica Field cell and select the desired Acumatica field ID.
Click in the Type Field Name and enter a name for the field.
Click the associated toggle to determine if the field will be Required or Optional at the time of export.*
*If needed, repeat steps 5-10 to add additional User Defined Fields from Acumatica.
TIP: If you need to remove an Acumatica field that you've added in STACK, just click the Trash icon next to it to delete it.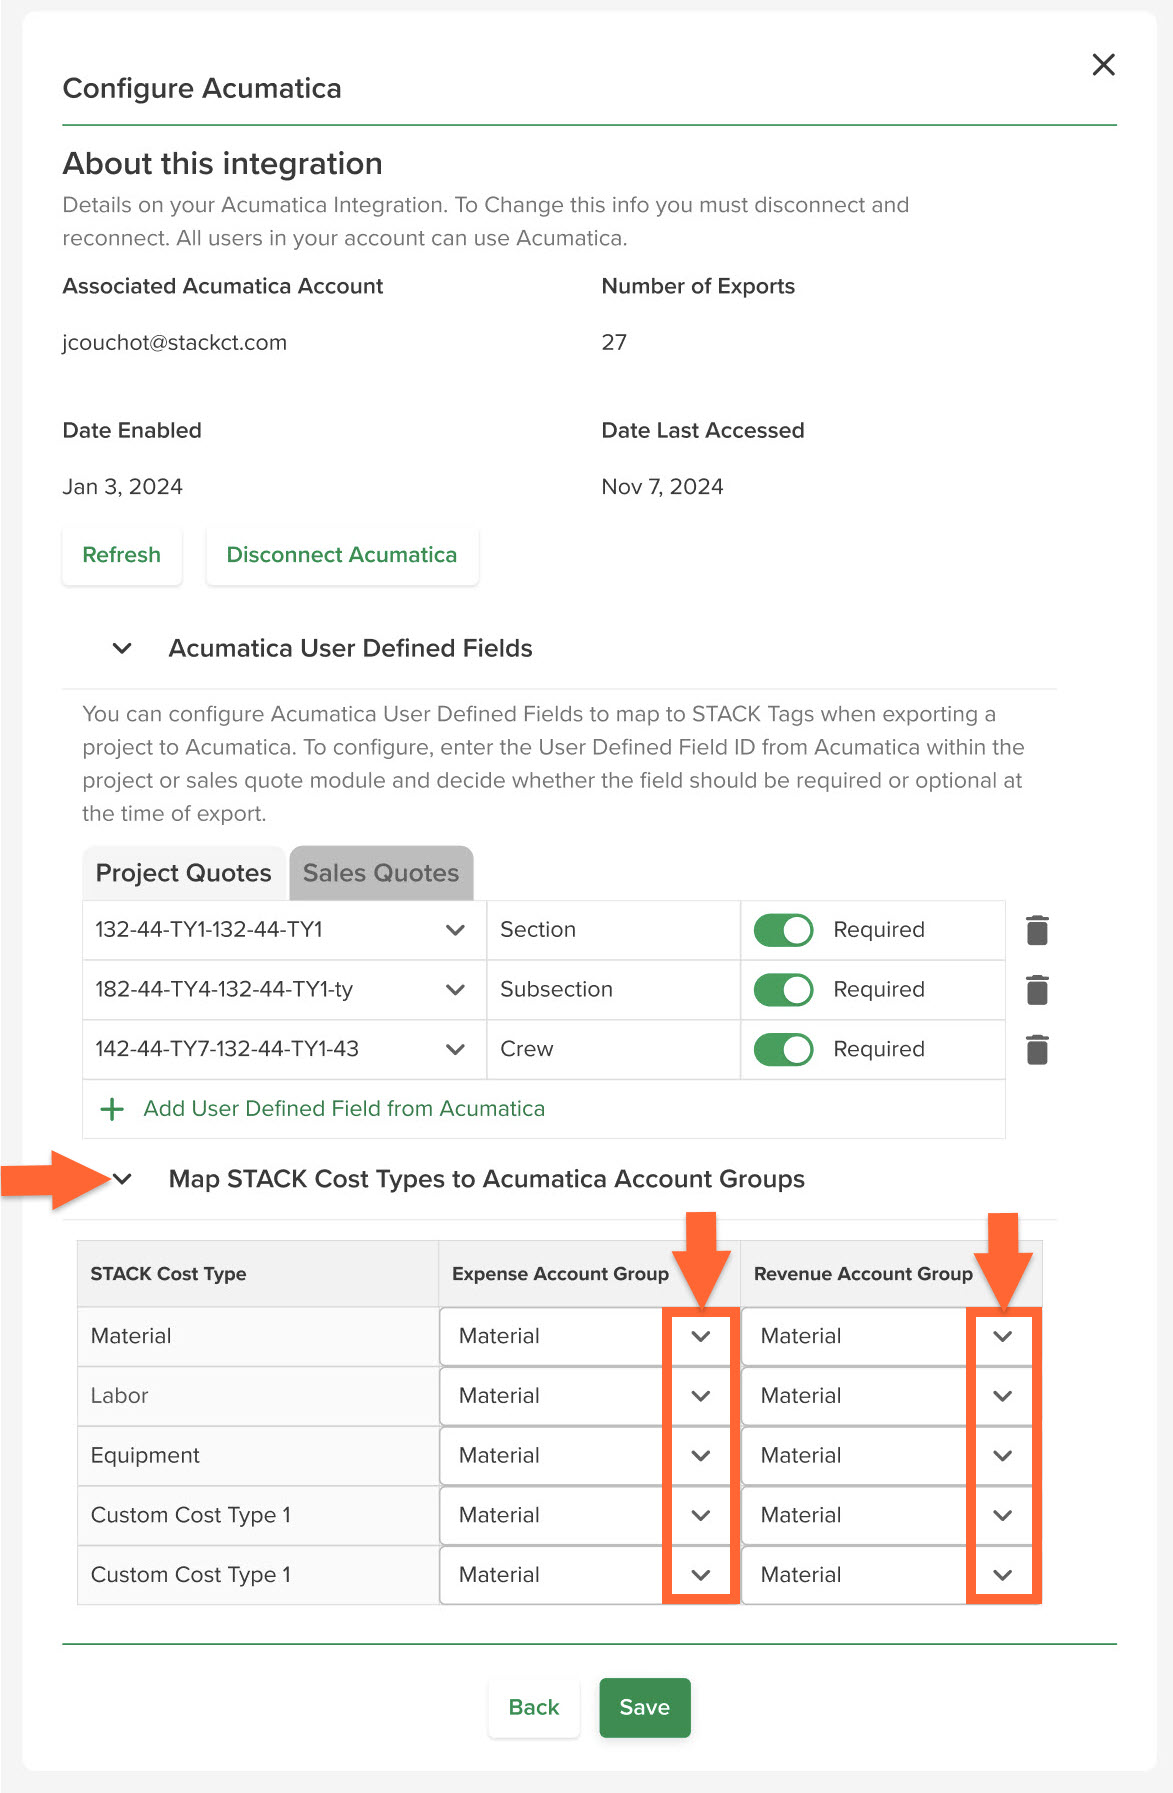
Click on the Map STACK Cost Types to Acumatica Account Groups section of the Configure Acumatica dialog box.
For each of the STACK Cost Types listed, click in the corresponding Acumatica Expense Account Group cell and Acumatica Revenue Account Group and select the Acumatica Account Group to which you want that STACK Cost Type data mapped when data is transferred from STACK to Acumatica.
NOTE: If your Acumatica account does not use the Account Group module, you will not need to make these selections. Instead you will see a message that no Account Groups were found.* Proceed to step 7.
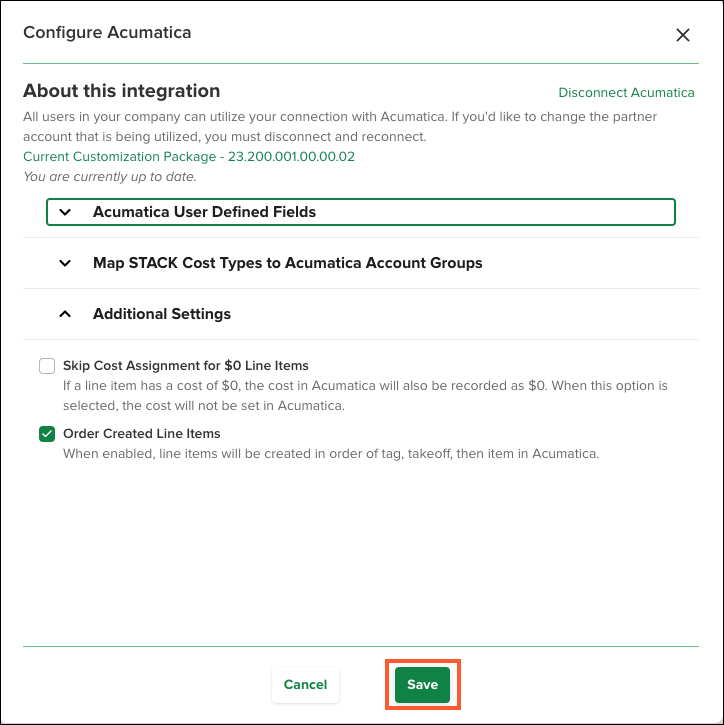
*If you see the message and your account DOES use Account Groups in Acumatica, click Try Again to try and pull your Account Group options into STACK to make your selections.Configure the Additional Settings:
Skip Cost Assignment for 0$ Line Items: (Optional) By default, when line items that have a $0 cost in STACK are exported to Acumatica, the $0 value is sent to Acumatica and the Acumatica cost is set to $0. If you do not want the value sent and the Acumatica cost automatically set to $0 for these line items, click on the Additional Settings section of the Configure Acumatica dialog and check the Skip Cost Assignment for $0 Line Items box.
Order Created Line Items: (Optional) When selected, allow users to export their estimate data to Acumatica using the same sort order they set up in their STACK Estimate Worksheet—including the order of takeoffs and the items inside assemblies.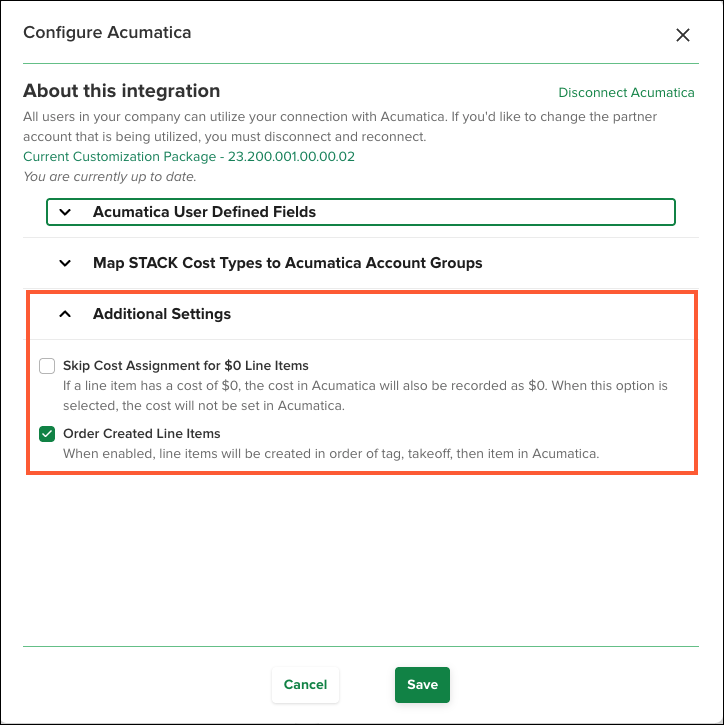
Click Save.
Anyone in your STACK account with the necessary role/permissions can now import/export project data between Acumatica and STACK.
TIP: See Best Practices to Use Acumatica with STACK for instructions on how to enter data in STACK to ensure successful exports.
Update the STACK Customization Package
You may occasionally need to update your STACK Customization Package. If you need to update the package, you will receive a warning message when using one of the Acumatica features in STACK - E.g., The version of your customization package is not supported. Please update your customization package.
If you receive the warning, simply follow the instructions below, then you can proceed using the Acumatica features in STACK again.
In STACK, click the Settings icon (person with gear) at the right of the main navigation toolbar.
Select Account Settings from the dropdown menu.
Click App Integrations at the left of your screen.
Locate the Acumatica tile and click Configure.
TIP: You can use the Search... bar so you don't have to scroll through every integration to find it.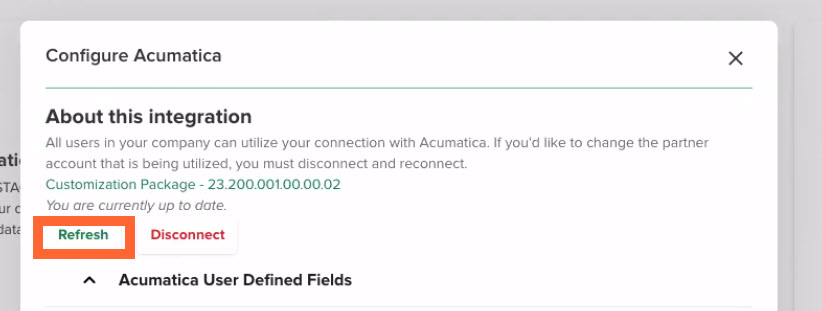
Go to the About this Integration section of the Configure Acumatica dialog box that opens and click Refresh.
The Customization Package version will update and the message above the Refresh button will state that You are currently up to date.
Disconnect Acumatica from STACK
If you ever need to disconnect your STACK and Acumatica accounts, you can do so by following the instructions below.
Once you disconnect Acumatica from STACK, you will no longer be able to export data between the two platforms. However, data that has already been exported will still be available.
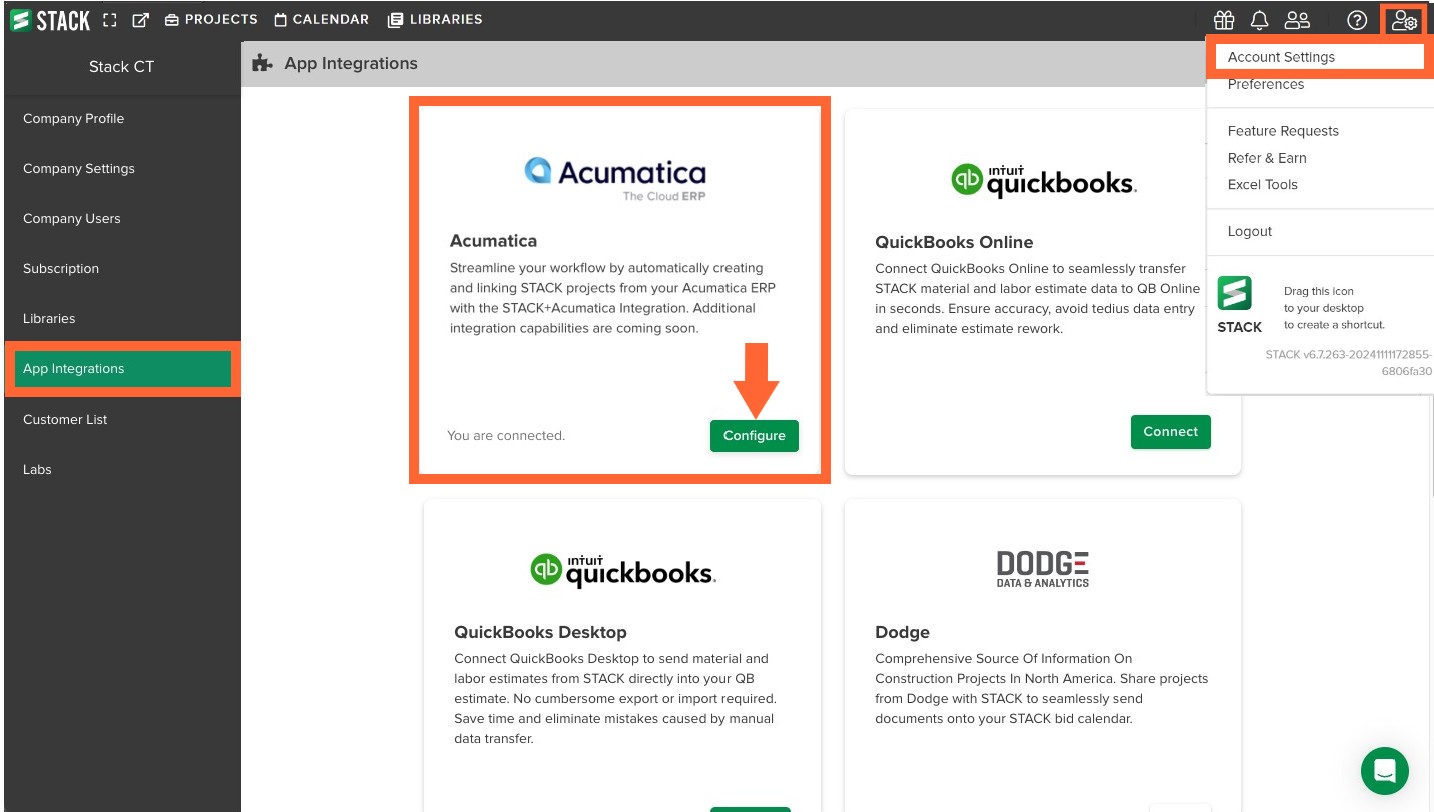
In STACK, click the Settings icon (person with gear) at the right of the main navigation toolbar.
Select Account Settings from the dropdown menu.
Click App Integrations at the left of your screen.
Locate the Acumatica tile and click Configure.
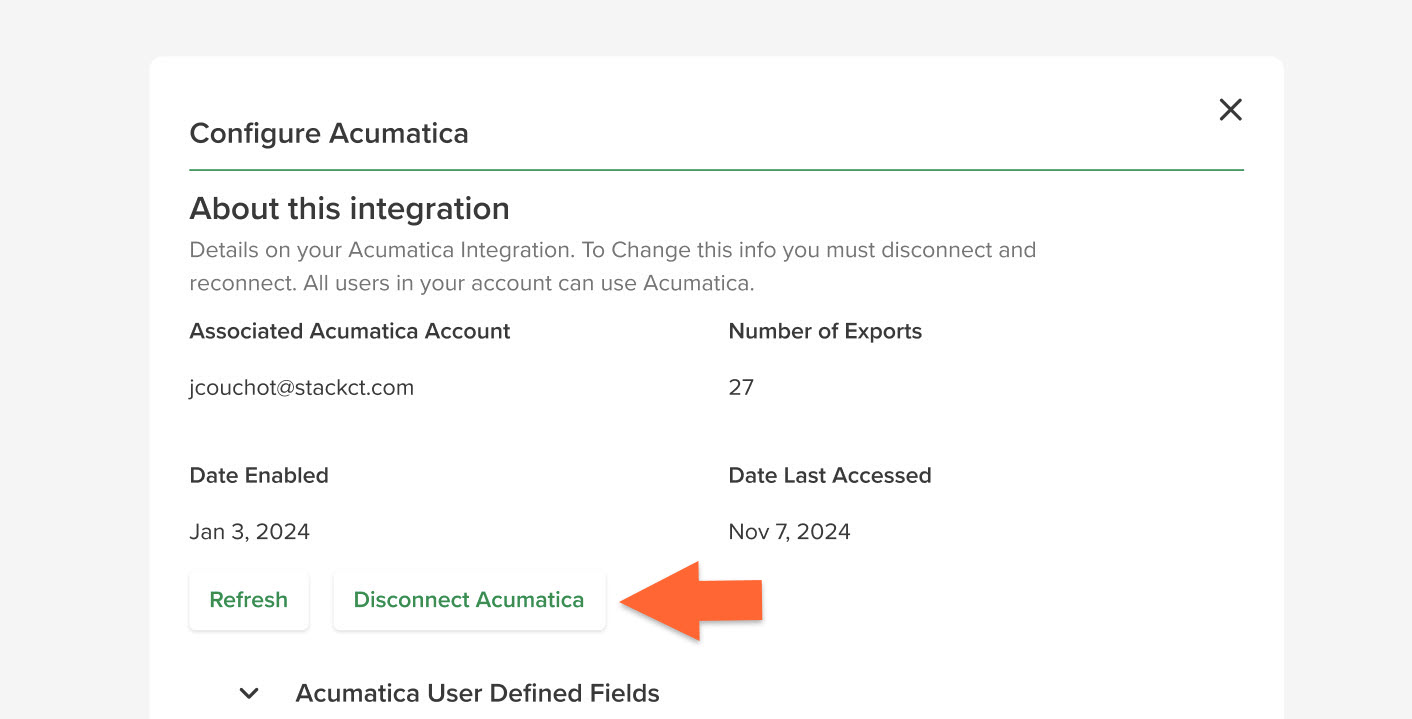
Click the Disconnect Acumatica button.
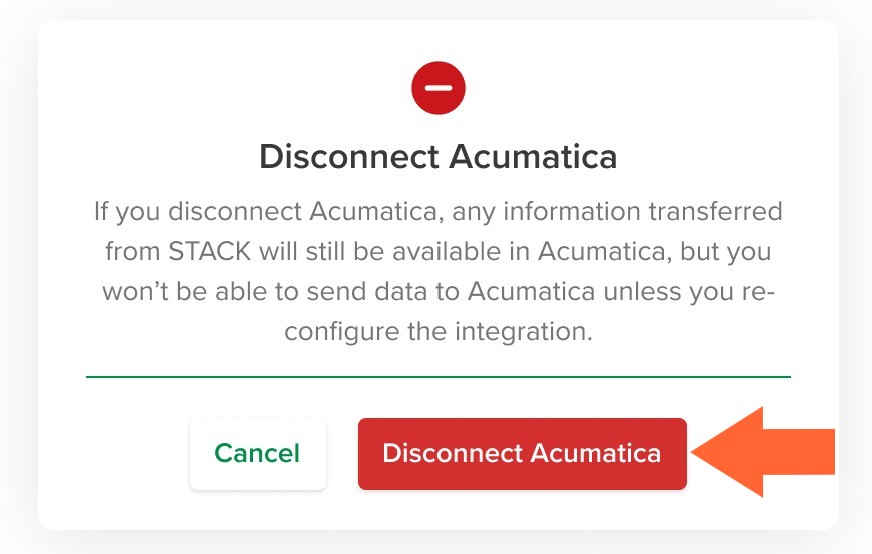
Click the red Disconnect Acumatica button to confirm.
TIP: If you want to reconnect your accounts, you can follow the instructions above to Connect Acumatica to STACK.
Related Articles
Create a Project from an External Source
Export Item Quantities to Acumatica
Export Estimate Worksheet Data to Acumatica
Was this article helpful?